Usage basics for the Dataiku Python API#
The public API of Dataiku is a powerful tool to automate tasks and programmatically interact with your instance’s components. This tutorial will guide you through its basics and provide a few good practices to use it efficiently.
Prerequisites#
Dataiku >= 11.4
Dataiku’s Python API client is properly set up on your client machine following this tutorial.
A bit of architecture#
When working on Dataiku, under the hood, every user interacts with the platform’s backend. In short, Dataiku’s backend is a key process responsible for managing many configuration items and orchestrating all running tasks.
The main interface to interact with the backend is through your browser by accessing Dataiku’s web interface. However, to provide more flexibility to advanced users, there is a programmatic alternative: Dataiku’s public API.
A quick word on the REST API#
At its core, Dataiku’s public API is a collection of RESTful API endpoints that can be queried via HTTP. For example, if you want to retrieve the schema of a given dataset, you would send the following request:
GET /public/api/projects/yourProjectKey/datasets/yourDataset/schema HTTP/1.1
Host: yourinstance.com
Content-Type: application/json
Authorization: Basic your-api-key
If it’s successful, the response will look like this:
HTTP/1.1 200 OK
Content-Type: application/json;charset=utf-8
DSS-Version: x.x.x
DSS-API-Version 1

{
    columns: [
        {"name": "Column1", type: "string", maxLength: -1},
        {"name": "Column2", type: "bigint"},
        ...
    ]
}
Working at this fine-grained level can be cumbersome and require lots of code to manage the HTTP query properly. While Dataiku’s REST API endpoints are fully documented, we strongly advise our coder users to rely on the Python client instead.
The benefits of the Python API client#
Dataiku’s Python API client is explicitly built to speed up the work of programmatic users. It wraps low-level endpoint operations into helper functions that make for more transparent and concise code. Additionally, working at a higher level removes the need for the user to manually parse the (often complex) responses provided by the REST API endpoints.
Following the previous example, listing projects with the Python API client would look like this:
import dataiku

client = dataiku.api_client()
project = client.get_project("YOURPROJECTKEY")
dataset = project.get_dataset("yourDataset")
schema = dataset.get_schema()

print(schema)
which should output a similar result:
{
    columns: [
        {"name": "Column1", type: "string", maxLength: -1},
        {"name": "Column2", type: "bigint"},
        ...
    ]
}
From the previous code snippet, you can see that you have to manipulate a few handles before getting to the final result. You’ll learn more about them in the next section.
Using the Python API handles#
Code written with the Python API client follows a pattern where the user:
First, “logs in” by providing credentials when instantiating a
dataikuapi.DSSClientobject, which then acts as the main entry point to interact with the APIThen navigates through a hierarchy of scopes to reach the item of interest they want to interact with
Finally gets a handle object on that item and manipulates it using the relevant methods at their disposal
To illustrate this, let’s decompose the previous code snippet:
import dataiku

client = dataiku.api_client()
First, a
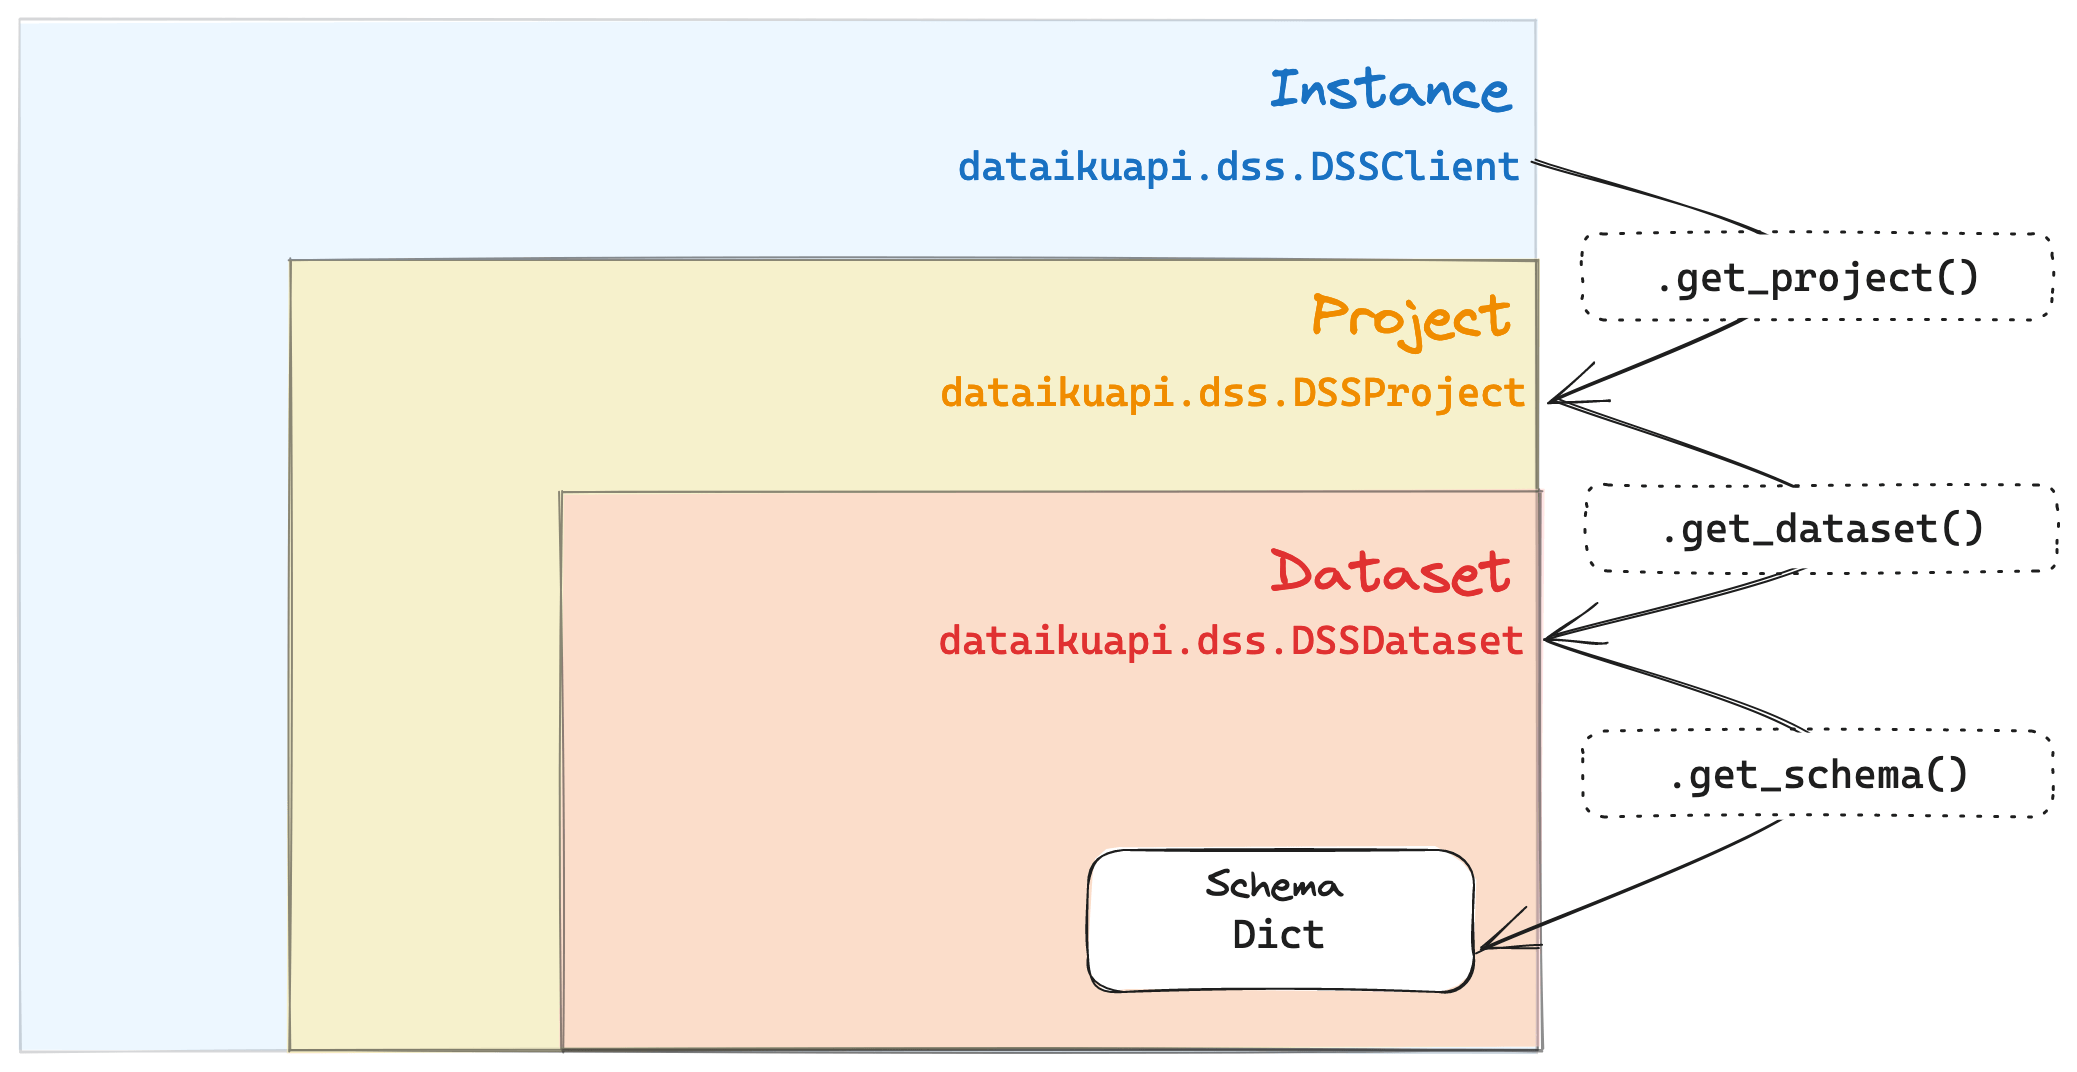
client(adataikuapi.DSSClientobject) is created and gives access to the instance-level scope, which, as the name indicates, allows you to perform operations on your Dataiku instance such as:Editing the administration settings
Creating projects and project folders
Of course, these actions are only available if you have the proper permissions. We’ll get to this in the last section of the tutorial.
project = client.get_project("YOURPROJECTKEY")
Then the scope shifts to the project-level: you acquire a handle on a specific project from the
clientobject. More precisely, theprojectvariable you create is an instance ofdataikuapi.dss.project.DSSProjectobtained through thedataikuapi.DSSClient.get_project()method. It allows you to perform operations only within theYOURPROJECTKEYproject and manipulate project-level items, for example:Datasets
Recipes
Scenarios
dataset = project.get_dataset("yourDataset")
Following the same logic, you switch from the project-level scope to the dataset-level scope by creating a
dataikuapi.dss.DSSDatasetobject viadataikuapi.dss.DSSProject.get_dataset(). From there, thedatasetvariable allows you to handle all items relative to theyourDatasetdataset within theYOURPROJECTKEYproject, such as:Schema
Metrics
Checks
schema = dataset.get_schema()
Finally, within the dataset-level scope, you can obtain a handle on the dataset’s schema to display using the
dataikuapi.dss.DSSDataset.get_schema()method. Other examples of dataset-level operations are:Listing the existing partitions
Getting the last computed metric values
Running checks
In summary, interacting programmatically with a given item is all about traversing the proper scopes, as illustrated in this diagram:

Authentication, scopes, and permissions#
When instantiating the dataikuapi.dss.DSSClient object, standard practice is to pass a
personal API key to authenticate.
All the subsequent actions will then be executed as the Dataiku user who owns the key.
They will also be bounded by the permissions granted to that user.
For example, if your user doesn’t have permission to create projects when you try running this:
import dataiku

client = dataiku.api_client()
client.create_project("MYKEY", "My project", "myuserlogin")
Your code will fail after throwing an exception:
DataikuException: java.lang.SecurityException: You may not create new projects
For more details on Dataiku’s permission system, you can read the security section in Dataiku’s reference documentation.
Wrapping up#
You now have the basics to manipulate Dataiku’s public API through its Python client! If you are looking for specific API documentation, the client is extensively documented in the API reference section.


