

Advanced setup: Web application creation and publication#
Prerequisites#
You need a Code Studio template, as defined in the previous tutorial.
Creating your backend#
If you choose to code your backend in a location other than the project libraries, you will have to do so in the Code Studio. You may also have to run your backend manually. Coding the backend in the project libraries allows you to share its development with different users. The following shows how to create the backend in the project library, which you may want to adapt for your specific needs. If you don’t, Code Studio won’t be able to start the backend correctly.
Go to the project libraries (</> > Libraries), and in the library editor under the lib folder,
create a folder named “my-app “(if you choose my-app as a name for your backend server in
this section).
In this folder, create a file named api.py.
This file is responsible for defining the API that your backend will use.
Code 1
shows a basic example of an interaction between the backend and Dataiku.
The highlighted line defines a Flask blueprint (for more information,
see the Flask documentation).
You can define as many files as you need.
These files will be attached to a specific route when creating the backend.
from flask import Blueprint, jsonify
import dataiku

api = Blueprint("api", __name__)

@api.route("/")
def get_projects_name_from_instance():
    client = dataiku.api_client()
    projects = client.list_projects()

    return [p.get('name') for p in projects]
Still in the folder named my-app, create a file named wsgi.py.
This file is responsible for creating and configuring the Flask backend server.
In this file, you will link all the files previously defined.
Code 2 shows an example
of a correctly defined backend using the file api.py previously created.
from flask import Flask
from api import api

app = Flask(__name__)

app.register_blueprint(api)

if __name__ == "__main__":
    app.run(host="127.0.0.1", port=5000)
You don’t need a fully functional server to start your Code Studio. However, if you need to add new files, restart the Code Studio for those files being considered. Or, if you choose to add “Custom actions” in the template, you can click on the action button to restart the backend.
Once the backend is ready, you can create the Angular application.
Creating your angular application#
Creating the Code Studio#
Go to </> -> Code studios, click the + New code studio, choose the template created in this tutorial, select a name for your web application edition, and click the Create button. Once the Code Studio is created, click the Start code studio button. After a little wait, the Code Studio should be started, as shown in Figure 1. In this figure, you will find five different zones:
This is the place where you will code your application.
This is where you will visualize your application under development (
ng serve). You will see only the front end part, as the back end is not exposed to users but only to the front.This tab is for visualizing the compiled version of your application(
ng build).This folder is where your application will live.
This folder contains the code of your backend.
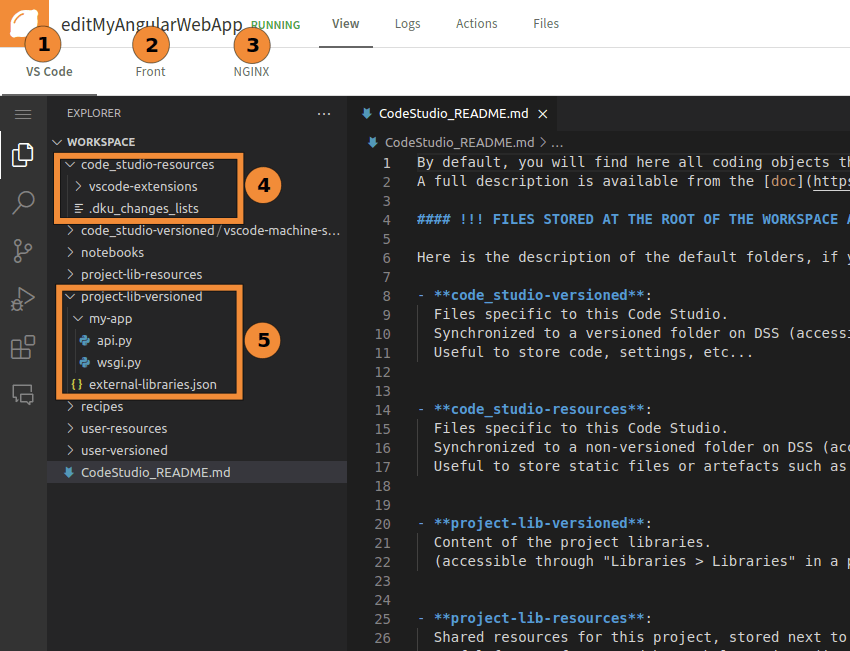
Figure 1: Starting Code Studio for the first time.#
Currently, neither the “Front” tab nor the “NGINX” tab shows meaningful content. In Visual Code, open a new terminal and enter the following commands:
cd code_studio-resources
ng new --skip-git my_app
These commands will create a new angular application in the folder code_studio-resources/my_app.
The previous tutorial uses this name in the “Preparing the Code Studio template to be published as a standalone web application” section.
If you don’t want to skip the git part, you should first configure your git id (user.name and user.email).
You should not enable the server-side rendering.
Once your Angular application is created,
go to your application directory and save the permission of the node_modules directory:
cd my_app
getfacl -R node_modules > saved_permissions
Each restart of the Code Studio will modify those permissions. To restore the initial permissions, enter the following command:
setfacl --restore=saved_permissions
Still in the terminal, note the result of:
echo $DKU_CODE_STUDIO_BROWSER_PATH_4200
If you choose another port for your frontend, you should change 4200 to the one you previously selected.
Edit the code_studio-resources/my-app/angular.json file and change the projects/my-app/architect/build/options/outputPath field with the following content:
"outputPath": {
      "base": "dist",
      "browser": ""
},
"baseHref": "<RESULT_OF_THE_PREVIOUS_COMMAND_YOU_SHOULD_REPLACE_THIS>/",
"deployUrl": "",
baseHref and deployUrl should also be added/updated. Now, you are ready to go.
To view the result of this angular application in the terminal, enter the command:
ng serve --host 127.0.0.1
If everything goes well, you should have something similar to Figure 2.
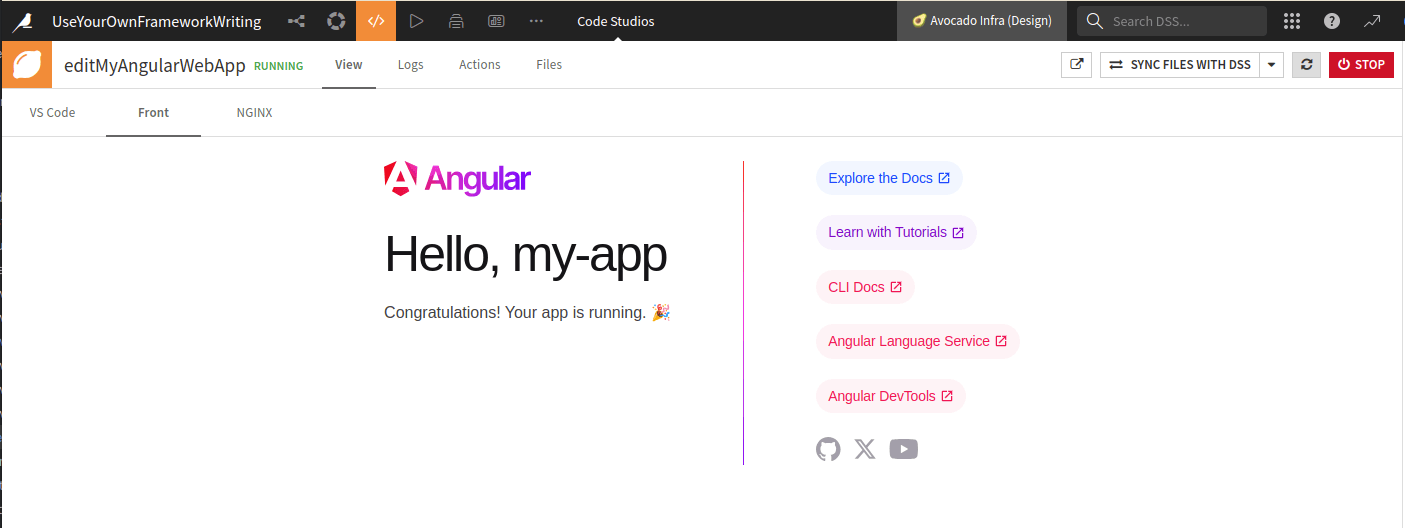
Figure 2: Starting Angular application for the first time.#
Accessing the backend#
Now that you have a running application, you may need to connect it to the backend.
To do this, you need to use an HttpClient.
For example, to populate your welcome page with a list of all existing (and accessible) projects, you will first create the backend function to retrieve those names (shown in Code 1).
In app.config.ts, located in my_app/src/app, add the HttpClientModule as a provider:
import { ApplicationConfig, importProvidersFrom } from '@angular/core';
import { provideRouter } from '@angular/router';

import { routes } from './app.routes';
import { HttpClientModule } from '@angular/common/http';

export const appConfig: ApplicationConfig = {
  providers: [
    provideRouter(routes),
    importProvidersFrom(HttpClientModule)
  ]
};
Then, connect this provider with your root component (in code-studio-resources/my_app/src/app.component.ts),
as shown in Code 3.
This code snippet creates a new property (projects) that you may use in the associated template.
For example, you can put {{ projects }} just after the line containing <div class="content">,
in the file my_app/src/app/app.component.html.
By doing so, you will obtain something similar to the Figure 3.
import { Component, OnInit, isDevMode } from '@angular/core';
import { RouterOutlet } from '@angular/router';
import { HttpClient } from '@angular/common/http';

@Component({
  selector: 'app-root',
  standalone: true,
  imports: [RouterOutlet],
  templateUrl: './app.component.html',
  styleUrl: './app.component.css'
})
export class AppComponent implements OnInit {
  title: String = "my-app";
  projects: String = "";
  backendUrl: string ='';

  constructor (private http:HttpClient){}

  ngOnInit() {
    this.backendUrl = isDevMode() ? '../5000/' : 'server/';

    this.http.get<String>(this.backendUrl+'projects', { responseType: 'text' as 'json'})
    .subscribe((resp:any) => {
      this.projects = resp
    });
  }
}

Figure 3: Angular application with backend running.#
Publishing your angular application#
Once you are happy with your application, you can publish it.
As the NGINX block serves the dist folder when you start the web application, you need to build it.
So that the dist directory contains an up-to-date version of your application.
To build the angular application, in the terminal, enter the following command:
ng build --base-href __DKU_RUNTIME_BASE_PATH__/
Once the build is completed, go to the action panel and click the Publish button.
Then, fill out the form, selecting the NGINX Entrypoint to show, as shown in
Figure 4. Your web application is live!
If the publication is the last step of your journey, you should remove (and update from the template)
the --debug parameter used in Installing and using the backend.
You should not publicly publish a web application with a backend in debug mode.
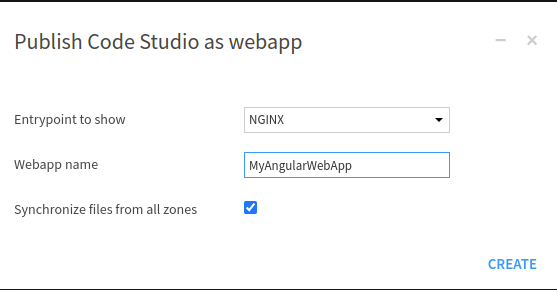
Figure 4: Publishing an Angular application.#
Wrapping up#
Congratulations! You have created and published an Angular application.
You can add an image to the assets of your Angular application and use it in the HTML template.
Replacing the content of the app.component.html with
Code 4 will produce something equivalent to
Figure 5.
<style>
  .center {
    text-align: center;
  }
</style>
<main class="main">
  <div class="content center">
    <div>
      <img src="assets/img.jpg" alt="images" style="width:20%;" />
    </div>
    <h1>Projects</h1>
    <p>{{ projects }}</p>
  </div>
</main>

<router-outlet />
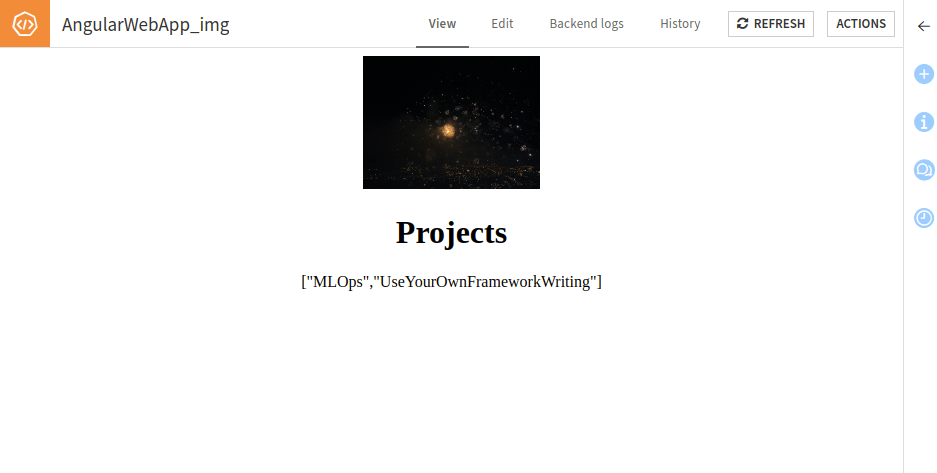
Figure 5: Simple template with an image.#
You can now add new routes to your backend or develop new components for your Angular application. The development process for the Angular application follows the same rules as that for classical Angular application development.