

Simple scoring application#
Prerequisites#
Dataiku >= 12.1
- Access to an existing project with the following permissions:
“Read project content”
“Write project content”
Access to a model deployed as an API endpoint for scoring
Introduction#
In this tutorial, you will learn how to request an API endpoint.
This endpoint can be a deployed model (like in this tutorial) or anything else connected to an API endpoint.
This tutorial uses the model from the MLOps training (from Learning projects > MLOps project)
and a deployed API endpoint named SimpleScoring.
It provides an API endpoint to predict the authorized flag for the provided data (transaction from credit card).
To follow the tutorial, you must know the URL where the endpoint is deployed. You can find this URL in the Local Deployer > API services and select the tab Sample code from your deployment, and note the IP address (and the port) as shown in Fig. 1
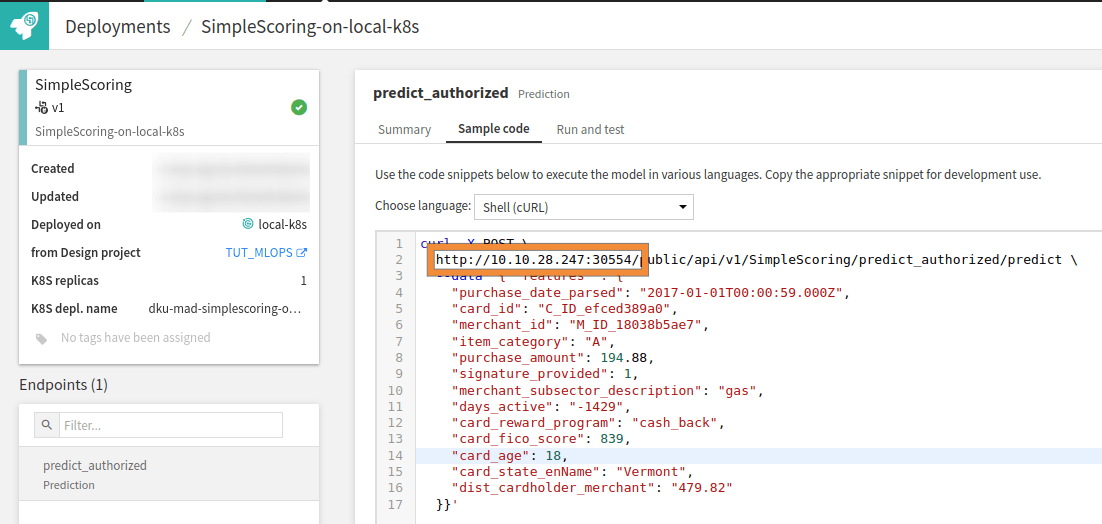
Figure 1: Where to find the URL of an API endpoint.#
Once the URL is known, you are ready to start the tutorial. Create a new “Simple web app to get started” standard webapp.
Building the webapp#
You will rely on the method dataikuapi.APINodeClient.predict_record()
from the dataikuapi package to use the API endpoint.
This method requires having an identifier of the endpoint to query and a Python dictionary of features.
Before using this method, you need to obtain a dataiku.APINodeClient. This process is shown in
Code 1.
dataiku.APINodeClient# try:
client = dataikuapi.APINodeClient(url, endpoint)
record_to_predict = features
prediction = client.predict_record("predict_authorized", record_to_predict)
To instantiate the client, you need the endpoint’s URL and the deployed endpoint’s name.
So you will create a form for the user to enter this data.
And, as features must be supplied to use the dataikuapi.APINodeClient.predict_record() method,
you will include this data entry in the form.
Code 2 shows a possible implementation of such a form.
<form action="" onsubmit="score(event)">
<div class="mb-3">
<div class="row">
<label for="endpoint_url"
class="col-sm-2 col-form-label">
Endpoint URL
</label>
<div class="col-sm-10">
<input id="endpoint_url" type="text"
class="form-control"
placeholder="Please enter the endpoint URL (http://<IP_Address>:<Port>)"
required/>
</div>
</div>
<div class="row">
<label for="endpoint_name"
class="col-sm-2 col-form-label">
Endpoint name
</label>
<div class="col-sm-10">
<input id="endpoint_name" type="text"
class="form-control"
placeholder="Please enter the name of the endpoint"
required/>
</div>
</div>
<div class="row">
<label for="features"
class="col-sm-2 col-form-label">
Data to score
</label>
<div class="col-sm-10">
<textarea id="features" type="text"
class="form-control"
placeholder="Please enter the name of the endpoint"
style="height: 300px;"
required></textarea>
</div>
</div>
<div class="row mt-3">
<div class="col">
<button id="btn_score" type="submit"
class="offset-sm-10 col-sm-2 btn btn-primary">
Score it
</button>
</div>
</div>
</div>
</form>
This form uses Bootstrap in its 5.1.3 version. You will find how to use this bootstrap version in the complete HTML code at the first and last line by using a CDN. But you can use the embedded bootstrap version in Dataiku or a local one if needed.
The first line of the form defines the javascript function to call when the user clicks on the “Score it” button. The score function is responsible for sending the data from the form to the backend and sending back the backend response to the user (Code 3).
/**
* Get the data from the UI, send them to the backend, and display the result on the frontend.
* @param event: not used. Only for preventing default behavior.
*/
window.score = function (event) {
event.preventDefault();
let result_object = $('#result')
result_object.text("Waiting for the result.")
let param;
try {
param = makeRequestParam();
} catch {
result_object.text("Your data seems to be malformed.");
return;
}
let url = getWebAppBackendUrl('/score');
fetch(url, param)
.then(response => response.text())
.then(data => {
let result = JSON.parse(data).result;
if (typeof result === 'string' || result instanceof String) {
result_object.text(result);
} else {
result_object.text(result.prediction);
}
})
.catch(err => result_object.text(err))
}
/**
* Create a javascript object to be sent to the server with a POST request.
*
* @returns {{headers: {"Content-Type": string}, method: string, body: string}}
*/
function makeRequestParam() {
let data = {
"url": $('#endpoint_url').val(),
"endpoint": $('#endpoint_name').val(),
"features": JSON.parse($('#features').val())
}
return {
"method": 'POST', "headers": {
'Content-Type': 'application/json',
}, "body": JSON.stringify(data)
}
}
You do not know how many features will be sent to the backend, neither the order nor the name of the features.
This prevents you from defining a specific route to be processed by the backend.
It also prevents you from using the query string (?...).
You should use a POST request with a JSON body containing all information needed by the backend.
This is the purpose of the highlighted lines in Code 3.
The first function is sending the data to the backend and processing the response to display the result on the frontend. Some error handlings have been implemented, but you can do more.
The Python backend (Code 4) is pretty simple. It extracts the needed information from the body request, uses it to predict the result, and creates an appropriate response that you will send back to the caller That is the javascript code in the context of this tutorial.
from flask import request
import dataikuapi
@app.route('/score', methods=['POST'])
def getit():
"""
Query the API endpoint with the data passed in the body of the request.
Returns:
A response object containing the prediction is everything goes well
or an object with an error as the result.
"""
body = request.get_json()
url = body.get('url', None)
endpoint = body.get('endpoint', None)
features = body.get('features', None)
if url and endpoint and features:
        try:
            client = dataikuapi.APINodeClient(url, endpoint)
            record_to_predict = features
            prediction = client.predict_record("predict_authorized", record_to_predict)
return prediction
except Exception as e:
return {"result": str(e)}
else:
return {"result": "Unable to reach the endpoint"}
Complete code and conclusion#
Code 6 is the complete HTML code you should have at the end of the tutorial. Codes 7 and 8 are for the Javascript and the Python code. You should not have specific CSS code, as you use Bootstrap. You now have a working webapp for scoring data.
You can go further by changing the result display, or the input form to adapt to your specific needs.
Code 6: Complete HTML code of the webapp
<link href="https://cdn.jsdelivr.net/npm/[email protected]/dist/css/bootstrap.min.css" rel="stylesheet"
integrity="sha384-1BmE4kWBq78iYhFldvKuhfTAU6auU8tT94WrHftjDbrCEXSU1oBoqyl2QvZ6jIW3" crossorigin="anonymous">
<div class="container-fluid">
<h1>Standard webapp: Simple Scoring</h1>
<h2>Enter your data</h2>
    <form action="" onsubmit="score(event)">
        <div class="mb-3">
            <div class="row">
                <label for="endpoint_url"
                       class="col-sm-2 col-form-label">
                    Endpoint URL
                </label>
                <div class="col-sm-10">
                    <input id="endpoint_url" type="text"
                           class="form-control"
                           placeholder="Please enter the endpoint URL (http://<IP_Address>:<Port>)"
                           required/>
                </div>
            </div>
            <div class="row">
                <label for="endpoint_name"
                       class="col-sm-2 col-form-label">
                    Endpoint name
                </label>
                <div class="col-sm-10">
                    <input id="endpoint_name" type="text"
                           class="form-control"
                           placeholder="Please enter the name of the endpoint"
                           required/>
                </div>
            </div>
            <div class="row">
                <label for="features"
                       class="col-sm-2 col-form-label">
                    Data to score
                </label>
                <div class="col-sm-10">
                    <textarea id="features" type="text"
                              class="form-control"
                              placeholder="Please enter the name of the endpoint"
                              style="height: 300px;"
                              required></textarea>
                </div>
            </div>
            <div class="row mt-3">
                <div class="col">
                    <button id="btn_score" type="submit"
                            class="offset-sm-10 col-sm-2 btn btn-primary">
                        Score it
                    </button>
                </div>
            </div>
        </div>
    </form>
<h2>Result</h2>
<div>
<div class="row">
<label
class="col-sm-2">
Prediction
</label>
<div class="col-sm-10">
<p id="result">
Here goes the result
</p>
</div>
</div>
</div>
</div>
<script src="https://cdn.jsdelivr.net/npm/[email protected]/dist/js/bootstrap.bundle.min.js"
integrity="sha384-ka7Sk0Gln4gmtz2MlQnikT1wXgYsOg+OMhuP+IlRH9sENBO0LRn5q+8nbTov4+1p"
crossorigin="anonymous"></script>
Code 7: Complete Javascript code of the webapp
/**
 * Get the data from the UI, send them to the backend, and display the result on the frontend.
 * @param event: not used. Only for preventing default behavior.
 */
window.score = function (event) {
    event.preventDefault();
    let result_object = $('#result')
    result_object.text("Waiting for the result.")
    let param;
    try {
        param = makeRequestParam();
    } catch {
        result_object.text("Your data seems to be malformed.");
        return;
    }
    let url = getWebAppBackendUrl('/score');
    fetch(url, param)
        .then(response => response.text())
        .then(data => {
            let result = JSON.parse(data).result;
            if (typeof result === 'string' || result instanceof String) {
                result_object.text(result);
            } else {
                result_object.text(result.prediction);
            }
        })
        .catch(err => result_object.text(err))
}

/**
 * Create a javascript object to be sent to the server with a POST request.
 *
 * @returns {{headers: {"Content-Type": string}, method: string, body: string}}
 */
function makeRequestParam() {
    let data = {
        "url": $('#endpoint_url').val(),
        "endpoint": $('#endpoint_name').val(),
        "features": JSON.parse($('#features').val())
    }
    return {
        "method": 'POST', "headers": {
            'Content-Type': 'application/json',
        }, "body": JSON.stringify(data)
    }
}
Code 8: Complete python code of the webapp
from flask import request
import dataikuapi


@app.route('/score', methods=['POST'])
def getit():
    """
    Query the API endpoint with the data passed in the body of the request.

    Returns:
        A response object containing the prediction is everything goes well
        or an object with an error as the result.
    """
    body = request.get_json()
    url = body.get('url', None)
    endpoint = body.get('endpoint', None)
    features = body.get('features', None)
    if url and endpoint and features:
        try:
            client = dataikuapi.APINodeClient(url, endpoint)
            record_to_predict = features
            prediction = client.predict_record("predict_authorized", record_to_predict)
            return prediction
        except Exception as e:
            return {"result": str(e)}
    else:
        return {"result": "Unable to reach the endpoint"}