

How to create a form for data input?#
Context#
In this tutorial, we want to explain all the concepts used when we write a webapp for interacting with Dataiku objects. This tutorial presents some fundamental concepts for writing a webapp. Many of these concepts are not Dataiku concepts but are widely used concepts. Our “top -> bottom -> top” approach lets you understand why you must do or modify the code. The provided code only covers some options for writing a webapp. You will learn how to send a request from the frontend to the backend. You will also learn how to deal with the backend’s response.
Webapp creation#
In the top navigation bar, go to </> –> Webapps.
Click on + New webapp on the top right, then select Code webapp > Standard, as shown in Fig. 1.
Select any template you want and give a name to your newly-created Webapp (for example,
Simple form webapp).
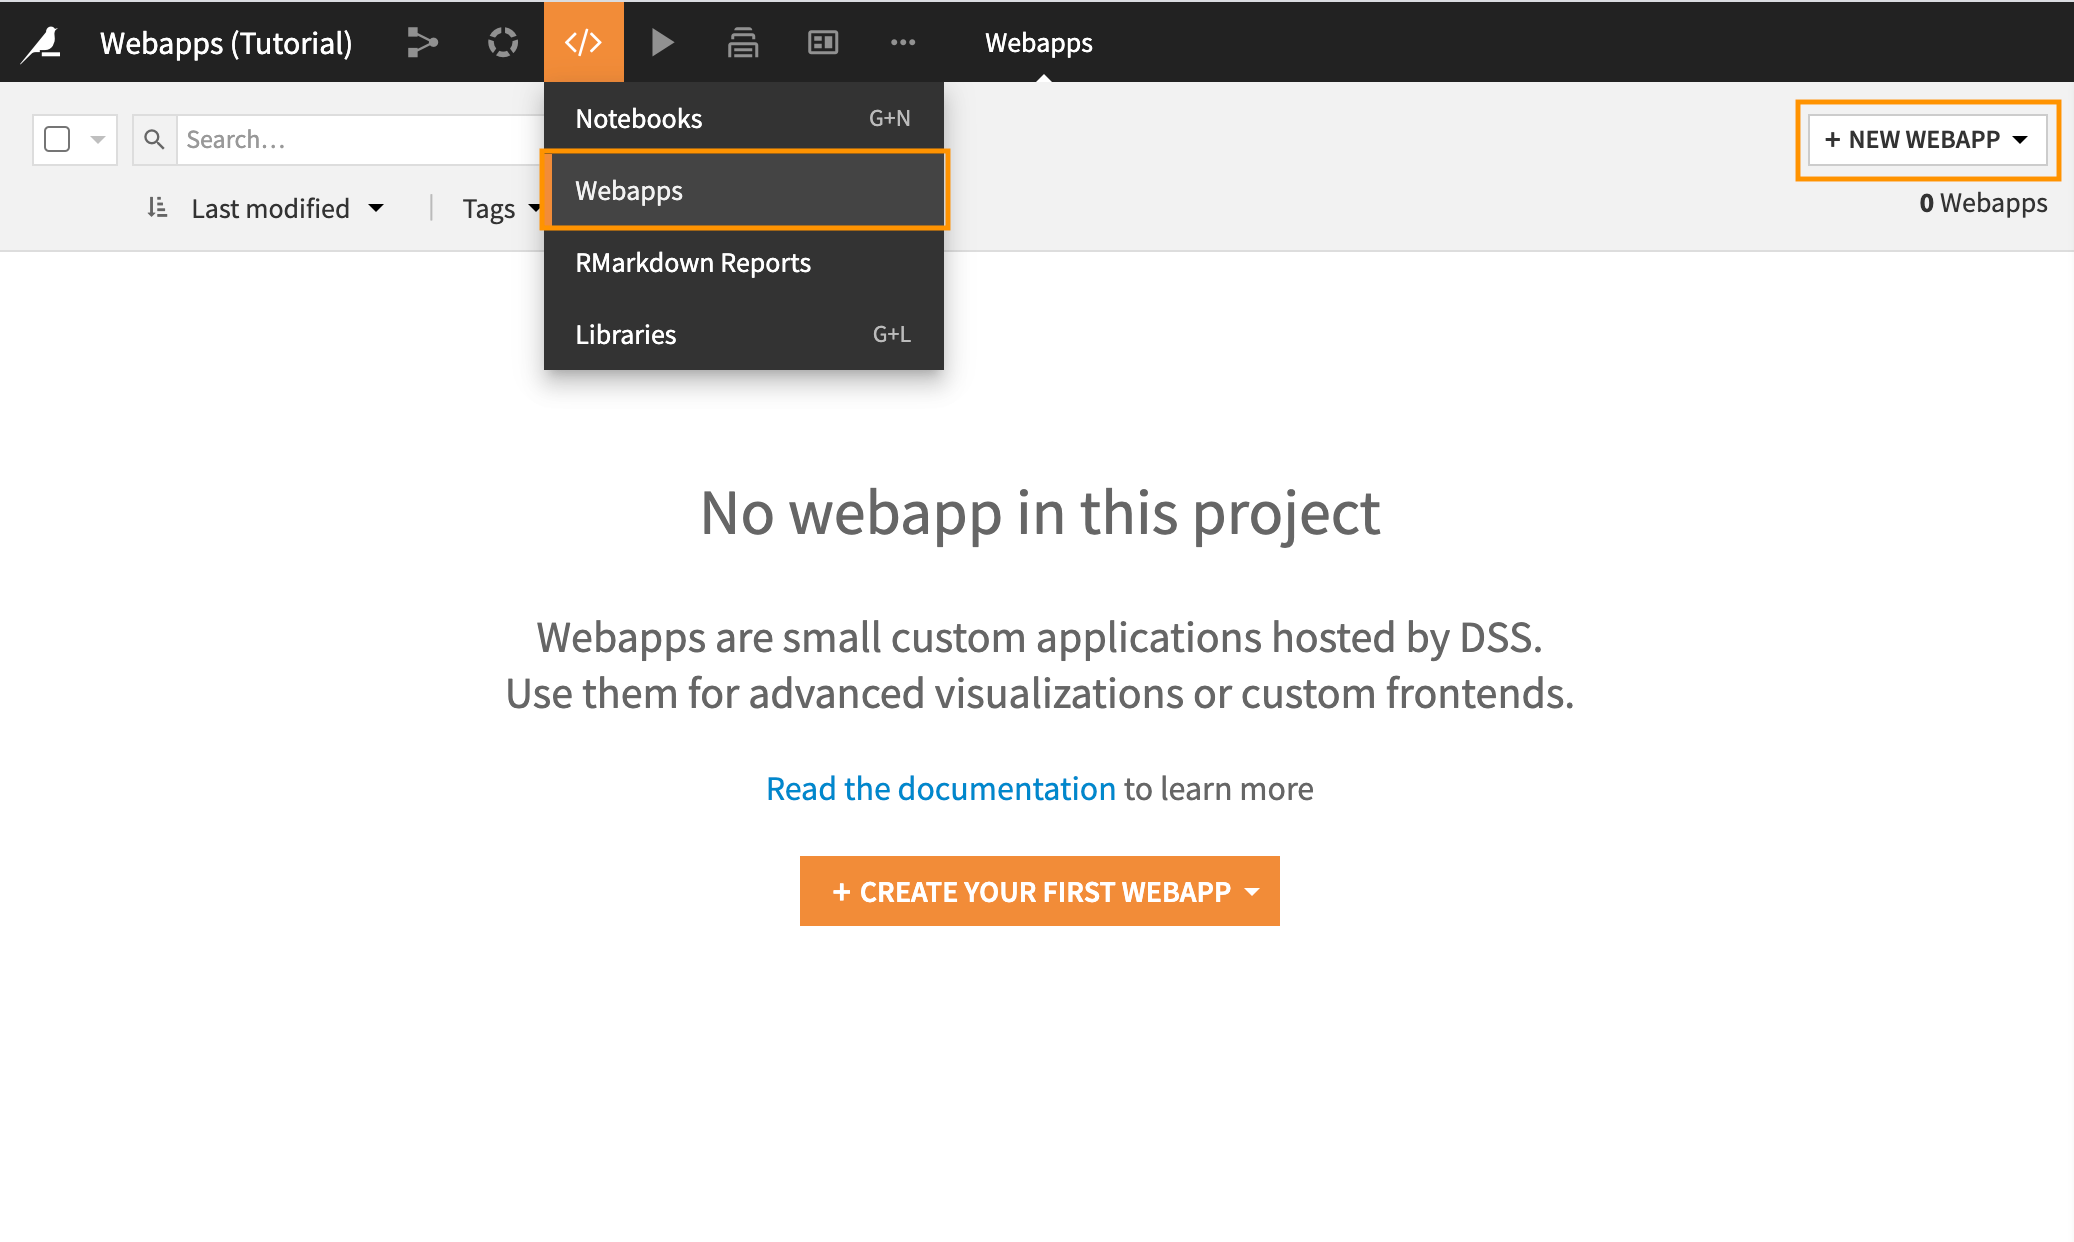
Fig. 1: Creation of a standard web app.#
Once the webapp is open, click on the Settings tab, Python, and click on Enable as shown in Fig. 2, to
enable Python backend, we will use it later. Then, go to the HTML tab, and remove everything; we will construct the
form from the beginning. Do the same for the CSS and JS tabs. Go to the Settings tab and verify that the
DataikuAPI and JQuery libraries are checked.
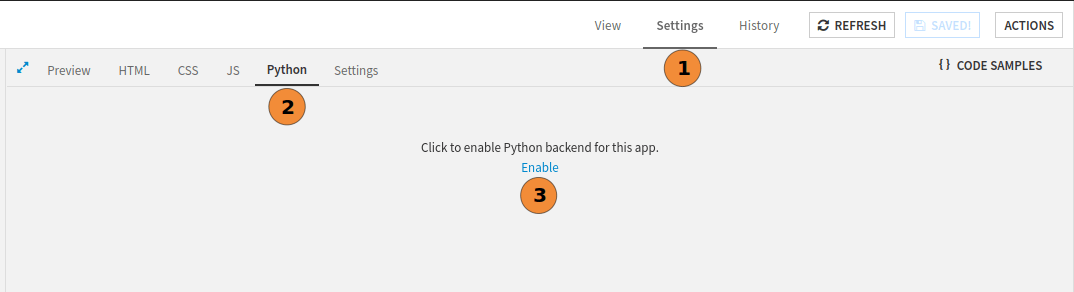
Fig. 2: How to enable python backend.#
First form creation#
HTML#
Now that we have an empty webapp, we can focus on the form creation. In HTML, a form is part of a document
containing interactive controls for submitting information. A form can have many inputs but only one output (the data).
In this tutorial, we will first focus on the processing, that is:
create the form;
retrieve the data from the javascript part;
send the data to the backend;
process the data on the backend.
Once the processing is finished, we will make the form more attractive by adding CSS.
To create a form, go to the HTML Tab, and copy Code 1.
1<form action="" method="" onsubmit="send_data(event)">
2    <label for="name">Enter your name: </label>
3    <input type="text" name="name" id="name" required />
4    <input type="submit" value="Validate" />
5</form>
It is an elementary form, but we have many things to learn. On line 1, the form has three parameters:
action: represents the default URL that processes the form submission. Aformactionattribute, forbuttonorinput, can override it. As Dataiku runs the webapp, we do not know in advance the running context (particularly the URL of the webapp), so we let it empty.method: is the HTTP verb for sending the request to the URL defined inaction. This attribute can be omitted.onsubmit: is a call to a javascript function (which will be defined after) for validating the form. We will use this function to process the form.
The for attribute of the label tag refers to the id attribute of another HTML tag; here, it is the text
input. It helps the user to select the input. If the user clicks on the input or the associated label text, the focus
will be on the input.
Javascript#
Now, go to the JS tab, and copy Code 2. This code defines the function send_data
responsible for sending data to the python backend (line 1) and adds it to the HTML “scope.” This function prevents the
default behavior of an HTML form submission (call to action) in line 2. Lines 3–4 prepare the data needed for the
python backend call, and line 5 makes the request.
 1window.send_data = function (event) {
 2  event.preventDefault()
 3  param = makeRequestParam()
 4  let url = getWebAppBackendUrl('/first_form')
 5  fetch(url, param)
 6}
 7
 8function getName () {
 9  return $('#name').val()
10}
11
12function makeRequestParam() {
13  let data = {
14    "name": getName()
15  }
16  return {
17    "method": 'POST',
18    "headers": {
19      'Content-Type': 'application/json',
20    },
21    "body": JSON.stringify(data)
22  }
23}
The function getName is a simple JQuery call to retrieve the value entered in the input
with the id: name.
An HTTP request is composed of the following:
A verb: one among the verbs: GET, POST, PUT, DELETE, PATCH, OPTIONS, CONNECT, TRACE, HEAD. For more about verb-defined semantics, please refer to HTTP Request methods.
A URL that identifies the resource we want to query.
A content.
The function makeRequestParam retrieves the data and make a JSON Object with those data (line 13 – 15). Then
it builds the complete parameter of the request sent to the python backend.
As we want to pass data to the python backend, we have to provide content with those data. We will use a JSON Object for
this purpose, so the content type should be application/json (line 19). The body of the request is the JSON object,
line 21.
The fetch function, line 5, is a native javascript function that easily handles HTTP requests over the network.
Backend (Python)#
Go to the Python tabs, and copy Code 3.
from flask import request
import logging

# Example:
# As the Python webapp backend is a Flask app, refer to the Flask
# documentation for more information about how to adapt this
# example to your needs.
# From JavaScript, you can access the defined endpoints using
# getWebAppBackendUrl('first_api_call')

@app.route('/first_form', methods=['POST', 'PUT'])
def first_form():
    logging.info(request.get_json())
    return "ok"
The backend will run the associated function when it receives a request on the route /first-form with the verb
PUT (or POST). As the backend is a Flask application, it requires returning something. Usually,
we have to produce a response. For now, we return a string, which is not used, but this is enough for the
webapp to be able to work. We can now run the webapp and see that when a user enters something in the input and
validates it, the backend logs the input. To see the logs, go to the Log and click on the
“Refresh log” button. Fig. 3 represents the webapp workflow, where solid
lines are the actual state of the form. And the dotted ones are the next steps for having a fully working form.
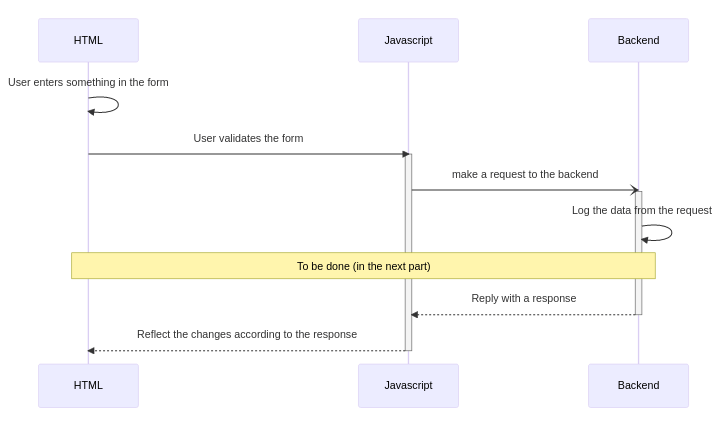
Fig. 3: Webapp workflow.#
Send back the response to the user interface#
Sometimes, we need to inform the user that the processing has ended. We could also give feedback to the caller. That is why we should return a Response in the python backend once the process is finished. An HTTP response (and so the flask response) is composed of:
A status code: for more about the status code, please refer to HTTP Status code documentation.
Possibly a body
Some other standard parameters of HTTP.
In an ideal world, choosing the correct HTTP status code is as crucial as selecting the proper verb for the request. There are two ways to complete a request: success or failure. The request should always succeed in our case, as we are only logging data. So the response should indicate a success so we will choose the 200 status code. Code 4 is the new version of the python backend for sending a response to the javascript part.
from flask import Response, request
import logging
import json


@app.route('/first_form', methods=['POST', 'PUT'])
def first_form():
    """
    Process the request sent from the frontend.

    :return: a response containing the data coming from the request.
    """
    request_body = request.get_json()
    logging.info(request_body)

    response = Response(response=json.dumps(request_body),
                        status=200,
                        mimetype='application/json')
    response.headers["Content-Type"] = "text/json; charset=utf-8"
    return response
Processing the response#
The backend responds to the caller (the javascript code). As a consequence, we can provide some feedback to the user. But before coding the javascript part, we need to understand the asynchronicity concept. Asynchronous communication is like sending a mail to a teammate. The writer sends a message. Then the recipient reads and responds to the message when available. Afterward, the requester (the writer) can read the response when available. This is asynchronous communication. As nobody waits for the other, they can go about their business. For HTTP requests/responses, it is the same. We have already seen how to implement the recipient part (python backend) and how the writer sends a message (javascript part).
The function responsible for sending a request to the backend is the fetch function in the javascript code (line 5,
Code 2). This function implements a mechanism called
promise, and promise
can be chained with the then (callbackSuccess, callbackFailure) method, which can also be chained with then.
You can omit the callbackFailure, either if you don’t plan to handle the failure (which might not be a good
idea) or if you plan to address the overall miss with a catch(callbackFailure). We can write the callbacks with
Arrow functions,
which leads to elegant code to handle promises.
const promise = fetch(url, param)

function displayResponseCode(response) {
    console.log(`Response Code: ${response.status}`)
}

// Handle both Success and Failure with then
promise.then(displayResponseCode, displayResponseCode)

// Alternatively
promise
    .then(displayResponseCode)
    .catch(displayResponseCode)
As our backend returns JSON data, we need to retrieve them from the response using the json() method, which produces a promise. So this leads to Code 6, more likely, to Code 7.
 window.send_data = function (e) {
  e.preventDefault()
  param = makeRequestParam()
  let url = getWebAppBackendUrl('/first_form')
  fetch(url, param)
    .then(extractJSON)
    .then(displayResponse)
    .catch((error) => console.log(error))
  return false
}

function extractJSON(response) {
  return response.json()
}

function displayResponse(response) {
  console.log(`JSON Response: ${JSON.stringify(response)}`)
}

// ...
 window.send_data = function (e) {
  e.preventDefault()
  param = makeRequestParam()
  let url = getWebAppBackendUrl('/first_form')
  fetch(url, param)
    .then((response) => extractJSON(response))
    .then((json) => displayResponse(json))
    .catch((error) => console.log(error))

  return false
}

function extractJSON(response) {
  return response.json()
}

function displayResponse(response) {
  console.log(`JSON Response: ${JSON.stringify(response)}`)
}

// ...
Giving feedback to the user#
Finally, we can display feedback to the user. Giving feedback to the user is done in two steps:
Changing the initial HTML file to add a dedicated zone for feedback.
Modifying the HTML from the javascript to reflect changes.
We will rely on the show()/hide() Jquery mechanism to give feedback to the user.
Code 8 shows the slight modifications we make to enable feedback. The
style="display: none;" prevents the p from being displayed. But the p element exists, so we can show it
as needed in the Javascript, Code 9, by modifying the displayResponse function.
<form action="" method="" onsubmit="send_data(event)">
    <label for="name">Enter your name: </label>
    <input type="text" name="name" id="name" required />
    <input type="submit" value="Validate"/>
</form>

<p id="feedback" style="display: none;">
    User feedback
</p>
function displayResponse(response) {
    let message = `The server respond ${JSON.stringify(response)}`
    $("#feedback").text(message).show()
}
Make it more attractive#
We will rely on the Bootstrap library to make the form more attractive. A library helps speed development and provides some friendly components without writing too many CSS lines. Add the bootstrap library into your HTML, and then use it. Code 10 is one possible use of this library.
<link href="https://cdn.jsdelivr.net/npm/[email protected]/dist/css/bootstrap.min.css" rel="stylesheet" integrity="sha384-GLhlTQ8iRABdZLl6O3oVMWSktQOp6b7In1Zl3/Jr59b6EGGoI1aFkw7cmDA6j6gD" crossorigin="anonymous">
<script src="https://cdn.jsdelivr.net/npm/[email protected]/dist/js/bootstrap.bundle.min.js" integrity="sha384-w76AqPfDkMBDXo30jS1Sgez6pr3x5MlQ1ZAGC+nuZB+EYdgRZgiwxhTBTkF7CXvN" crossorigin="anonymous"></script>

<div class="container-fluid">
    <form action="" method="" onsubmit="send_data(event)">
        <div class="mb-3">
            <label for="name" class="form-label">Enter your name: </label>
            <input type="text" class="form-control" name="name" id="name" required />
        </div>
        <button type="submit" class="btn btn-primary">Validate</button>
    </form>

    <div class="toast-container position-fixed bottom-50 p-3">
      <div id="liveToast" class="toast" role="alert" aria-live="assertive" aria-atomic="true">
        <div class="toast-header">
          <strong class="me-auto">Dataiku webapp -- Simple form</strong>
          <button type="button" class="btn-close" data-bs-dismiss="toast" aria-label="Close"></button>
        </div>
        <div class="toast-body" id="feedback">
          Hello, world! This is a toast message.
        </div>
      </div>
    </div>
</div>
...
const toastLiveExample = document.getElementById('liveToast')

function displayResponse(response) {
    let message = `The server respond ${JSON.stringify(response)}`
    const toast = new bootstrap.Toast(toastLiveExample)
    $("#feedback").text(message)
    toast.show()
}
...
Do something interesting with the backend#
We will use the form to append data to an existing dataset. The backend is responsible for the processing. So we need to modify the backend to add the data sent by the frontend. Read the existing dataset, add a row to this dataset, and write the result. There are many ways to do that; Code 12 is an example of how to process to add data to an existing dataset.
import dataiku
import pandas as pd
from flask import Response, request
import logging
import json


@app.route('/first_form', methods=['POST', 'PUT'])
def first_form():
    """
    Process the request sent from the frontend.

    :return: a response containing the data coming from the request.
    """
    request_body = request.get_json()
    resp = add_json_to_dataset(request_body)


    response = Response(response=json.dumps(resp),
                        status=resp['status'],
                        mimetype='application/json')
    response.headers["Content-Type"] = "text/json; charset=utf-8"
    return response


def add_content_to_dataset(name, json):
    """
    Add a new row in JSON format to an existing data.
    :param name: Name of the dataset.
    :param json: Value to append.
    """
    dataset = dataiku.Dataset(name)
    df = dataset.get_dataframe()
    df = df.append(json, ignore_index=True)
    logging.info(df.head())
    dataset.write_dataframe(df)


def add_json_to_dataset(json):
    """
    Add a row to a dataset, only if the dataset exists.
    :param json: Value to add.
    :return: a dict representing the result of the addition.
    """

    # This could be a part of data sent by the frontend.
    dataset_name = "mydataset"
    client = dataiku.api_client()
    project = client.get_default_project()
    dataset = project.get_dataset(dataset_name)
    if dataset.exists():
        add_content_to_dataset(dataset_name, json)
        return {'status': 200, 'name': json.get('name', '')}
    else:
        return {'status': 400, 'reason': "Dataset {} does not exist".format(dataset_name)}
Conclusion#
We have a complete webapp that creates a form and sends data to the backend. The backend can handle the request and appends data to an existing dataset. We also introduce the usage of an external library for the layout. Although the application is functional, many things are left to the reader, like:
Better error handling (both in the frontend part and the backend);
Entire form;
Smarter processing.
However, we have covered and explained all the required parts to create a web application for interacting with Dataiku objects.
Here are the complete versions of the code presented in this tutorial:
HTML Code
<link href="https://cdn.jsdelivr.net/npm/[email protected]/dist/css/bootstrap.min.css" rel="stylesheet"
      integrity="sha384-GLhlTQ8iRABdZLl6O3oVMWSktQOp6b7In1Zl3/Jr59b6EGGoI1aFkw7cmDA6j6gD" crossorigin="anonymous">
<script src="https://cdn.jsdelivr.net/npm/[email protected]/dist/js/bootstrap.bundle.min.js"
        integrity="sha384-w76AqPfDkMBDXo30jS1Sgez6pr3x5MlQ1ZAGC+nuZB+EYdgRZgiwxhTBTkF7CXvN"
        crossorigin="anonymous"></script>

<div class="container-fluid">
    <form action="" method="" onsubmit="send_data(event)">
        <div class="mb-3">
            <label for="name" class="form-label">Enter your name: </label>
            <input type="text" class="form-control" name="name" id="name" required/>
        </div>
        <button type="submit" class="btn btn-primary">Validate</button>
    </form>

    <div class="toast-container position-fixed bottom-50 p-3">
        <div id="liveToast" class="toast" role="alert" aria-live="assertive" aria-atomic="true">
            <div class="toast-header">
                <strong class="me-auto">Dataiku webapp -- Simple form</strong>
                <button type="button" class="btn-close" data-bs-dismiss="toast" aria-label="Close"></button>
            </div>
            <div class="toast-body" id="feedback">
                Hello, world! This is a toast message.
            </div>
        </div>
    </div>
</div>
JS Code
window.send_data = function (e) {
    e.preventDefault()
    param = makeRequestParam()
    let url = getWebAppBackendUrl('/first_form')
    fetch(url, param)
        .then((response) => extractJSON(response))
        .then((json) => displayResponse(json))
        .catch((error) => console.log(error))

    return false
}

function extractJSON(response) {
    return response.json()
}

const toastLiveExample = document.getElementById('liveToast')

function displayResponse(response) {
    let message = `The server respond ${JSON.stringify(response)}`
    const toast = new bootstrap.Toast(toastLiveExample)
    $("#feedback").text(message)
    toast.show()
}

function getName() {
    return $('#name').val()
}

function makeRequestParam() {
    let data = {
        "name": getName()
    }
    return {
        "method": 'POST',
        "headers": {
            'Content-Type': 'application/json',
        },
        "body": JSON.stringify(data)
    }
}
Python Code
import dataiku
import pandas as pd
from flask import Response, request
import logging
import json


@app.route('/first_form', methods=['POST', 'PUT'])
def first_form():
    """
    Process the request sent from the frontend.

    :return: a response containing the data coming from the request.
    """
    request_body = request.get_json()
    resp = add_json_to_dataset(request_body)

    response = Response(response=json.dumps(resp),
                        status=resp['status'],
                        mimetype='application/json')
    response.headers["Content-Type"] = "text/json; charset=utf-8"
    return response


def add_content_to_dataset(name, json):
    """
    Add a new row in JSON format to an existing data.
    :param name: Name of the dataset.
    :param json: Value to append.
    """
    dataset = dataiku.Dataset(name)
    df = dataset.get_dataframe()
    df = df.append(json, ignore_index=True)
    logging.info(df.head())
    dataset.write_dataframe(df)


def add_json_to_dataset(json):
    """
    Add a row to a dataset, only if the dataset exists.
    :param json: Value to add.
    :return: a dict representing the result of the addition.
    """

    # This could be a part of data sent by the frontend.
    dataset_name = "mydataset"
    client = dataiku.api_client()
    project = client.get_default_project()
    dataset = project.get_dataset(dataset_name)
    if dataset.exists():
        add_content_to_dataset(dataset_name, json)
        return {'status': 200, 'name': json.get('name', '')}
    else:
        return {'status': 400, 'reason': "Dataset {} does not exist".format(dataset_name)}