

Creating a Voilà application using an LLM-based agent#
In this tutorial, you will learn how to build an Agent application using Voilà. You will build an application to retrieve customer and company information based on a login. This tutorial relies on two tools. One tool retrieves a user’s name, position, and company based on a login/ID. This information is stored in a Dataset. A second tool searches the Internet to find company information.
This tutorial is based on two tutorials:
The Voilà: your first web application tutorial; if you have followed it, you can skip the section Building the Code Studio template.
The Building and using an agent with Dataiku’s LLM Mesh and Langchain tutorial uses the same tools and agents in a similar context. If you have followed this tutorial, you can skip the Creating the Agent application section.
Prerequisites#
Administrator permission to build the template
An LLM connection configured
A Dataiku version > 13.0
A code environment (named
voila-and-agents) based on Python 3.9, without Jupyter support, with the following packages:
The code environment needs to be created without including Jupyter support so that the complete Python dependencies can be precisely tuned.
voila           # tested with 0.5.11
langchain_core  # tested with 1.2.29
langchain       # tested with 1.2.15
ddgs            # tested with 9.13.1
numpy<1.27
jupyter_client<9,>=7.4.4
ipykernel
ipywidgets
Building the Code Studio template#
If you know how to build a Code Studio template using Voilà and a dedicated code environment,
you have to create one named voila-and-agent-template.
If you don’t know how to do it, please follow these instructions:
Go to the Code Studios tab in the Administration menu, click the +Create Code Studio template button, and choose a meaningful label (
voila-and-agent-template, for example).Click on the Definition tab.
Add the Add Code environment block, and choose the code environment previously created (
voila-and-agents).Add a new JupyterLab server block. This block will allow you to edit your Voilà application in a dedicated Notebook.
Add the Voila block and select the code environment previously imported, as shown in Figure 1.
Click the Save button.
Click the Build button to build the template.
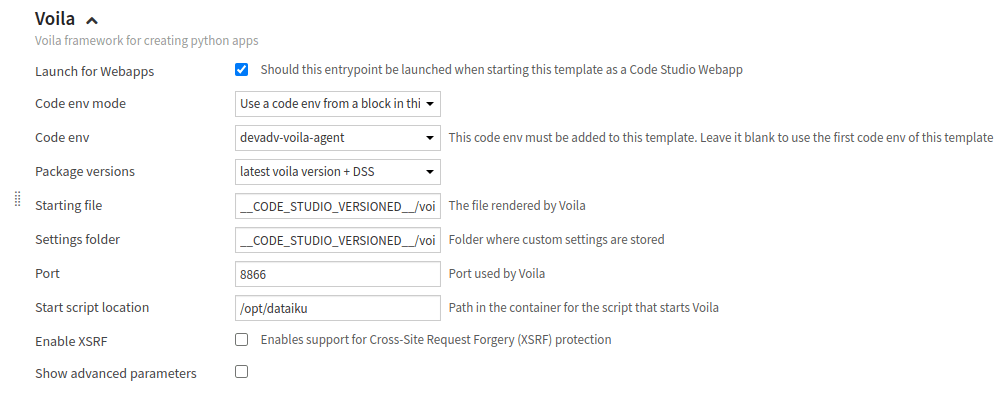
Figure 1: Code Studio - Voilà block.#
Your Code Studio template is ready to be used in a project.
Creating the Agent application#
Preparing the data#
You need to create the associated dataset, as you will use a dataset that stores a user’s ID, name, position, and company based on that ID.
id |
name |
job |
company |
|---|---|---|---|
tcook |
Tim Cook |
CEO |
Apple |
snadella |
Satya Nadella |
CEO |
Microsoft |
jbezos |
Jeff Bezos |
CEO |
Amazon |
fdouetteau |
Florian Douetteau |
CEO |
Dataiku |
wcoyote |
Wile E. Coyote |
Business Developer |
ACME |
Table 1, which can be downloaded here,
represents such Data.
Create a SQL Database named pro_customers_sql by uploading the CSV file
and using a Sync recipe to store the data in an SQL connection.
Creating utility functions#
Be sure to have a valid LLM_ID before creating your Voilà application.
The documentation provides instructions on obtaining an LLM_ID.
Create a new project, click on </> > Code Studios.
Click the +New Code Studio button, choose the previously created template, choose a meaningful name, click the Create button, and then click the Start Code Studio button.
To edit the code of your Voilà application, click the Jupyter Lab tab.
Select the
voilasubdirectory in thecode_studio-versioneddirectory. Dataiku provides a sample application in the fileapp.ipynb.
You will modify this code to build the application.
The first thing to do is define the different tools the application needs.
There are various ways of defining a tool.
The most precise one is based on defining classes that encapsulate the tool.
Alternatively, you can use the @tool annotation or the StructuredTool.from_function function,
but it may require more work when using those tools in a chain.
To define a tool using classes, there are two steps to follow:
Define the interface: which parameter is used by your tool.
Define the code: how the code is executed.
Code 1 shows how to describe a tool using classes. The highlighted lines define the tool’s interface. This simple tool takes a customer ID as an input parameter and runs a query on the SQL Dataset.
class CustomerInfo(BaseModel):
    """Parameter for GetCustomerInfo"""
    id: str = Field(description="customer ID")


class GetCustomerInfo(BaseTool):
    """Gathering customer information"""

    name: str = "GetCustomerInfo"
    description: str = "Provide a name, job title and company of a customer, given the customer's ID"
    args_schema: Type[BaseModel] = CustomerInfo

    def _run(self, id: str):
        dataset = dataiku.Dataset(DATASET_NAME)
        table_name = dataset.get_location_info().get('info', {}).get('quotedResolvedTableName')
        executor = SQLExecutor2(dataset=dataset)
        cid = Constant(str(id))
        escaped_cid = toSQL(cid, dialect=Dialects.POSTGRES)  # Replace by your DB
        query_reader = executor.query_to_iter(
            f"""SELECT "name", "job", "company" FROM {table_name} WHERE "id" = {escaped_cid}""")
        for (name, job, company) in query_reader.iter_tuples():
            return f"The customer's name is \"{name}\", holding the position \"{job}\" at the company named {company}"
        return f"No information can be found about the customer {id}"
Note
The SQL query might be written differently depending on your SQL Engine.
Similarly, Code 2 shows how to create a tool that searches the Internet for information on a company.
class CompanyInfo(BaseModel):
    """Parameter for the GetCompanyInfo"""
    name: str = Field(description="Company's name")


class GetCompanyInfo(BaseTool):
    """Class for gathering in the company information"""

    name: str = "GetCompanyInfo"
    description: str = "Provide general information about a company, given the company's name."
    args_schema: Type[BaseModel] = CompanyInfo

    def _run(self, name: str):
        results = DDGS().text(name + " (company)", max_results=1)
        result = "Information found about " + name + ": " + results[0]["body"] + "\n" \
            if len(results) > 0 and "body" in results[0] \
            else None
        if not result:
            results = DDGS().text(name, max_results=1)
            result = "Information found about " + name + ": " + results[0]["body"] + "\n" \
                if len(results) > 0 and "body" in results[0] \
                else "No information can be found about the company " + name
        return result

    def _arun(self, name: str):
        raise NotImplementedError("This tool does not support async")
Code 3 shows how to declare and use these tools.
tools = [GetCustomerInfo(), GetCompanyInfo()]
tool_names = [tool.name for tool in tools]
Once all the tools are defined, you are ready to create your agent.
An agent is based on a prompt and uses some tools and an LLM.
Code 4 is about creating an agent
and the associated agent_executor.
# Initializes the agent
prompt = ChatPromptTemplate.from_template(
    """Answer the following questions as best you can. You have only access to the following tools:
{tools}
Use the following format:
Question: the input question you must answer
Thought: you should always think about what to do
Action: the action to take should be one of [{tool_names}]
Action Input: the input to the action
Observation: the result of the action
... (this Thought/Action/Action Input/Observation can repeat N times)
Thought: I now know the final answer
Final Answer: the final answer to the original input question
Begin!
Question: {input}
Thought:{agent_scratchpad}""")

agent = create_react_agent(llm, tools, prompt)
agent_executor = AgentExecutor(agent=agent, tools=tools,
                               verbose=True, return_intermediate_steps=True, handle_parsing_errors=True)
Creating the Voilà application#
You now have a working agent; let’s build the Voilà application. This first version has an input Textbox for entering a customer ID and displays the result in an output Textbox. Thus, the code is straightforward. You need to connect your agent to the Voilà framework, as shown in Code 5.
import ipywidgets as widgets
import os

label = widgets.Label(value="Enter the customer ID")
text = widgets.Text(placeholder="fdouetteau", continuous_update=False)

result = widgets.Output(value="")


def search(customer_id):
    """
    Search information about a customer
    Args:
        customer_id: customer ID
    Returns:
        the agent result
    """
    return agent_executor.invoke({
        "input": f"""Give all the professional information you can about the customer with ID: {customer_id}.
        Also include information about the company if you can.""",
        "tools": tools,
        "tool_names": tool_names
    })['output']


def callback(customerId):
    """
        Callback function for calling the agent
    Args:
        customerId: customer ID
    """
    result.clear_output()
    with result:
        result.append_stdout(search(customerId.get('new', '')))


text.observe(callback, 'value')
display(widgets.VBox([widgets.HBox([label, text]), result]))
This will lead to an application like the one shown in Figure 2.
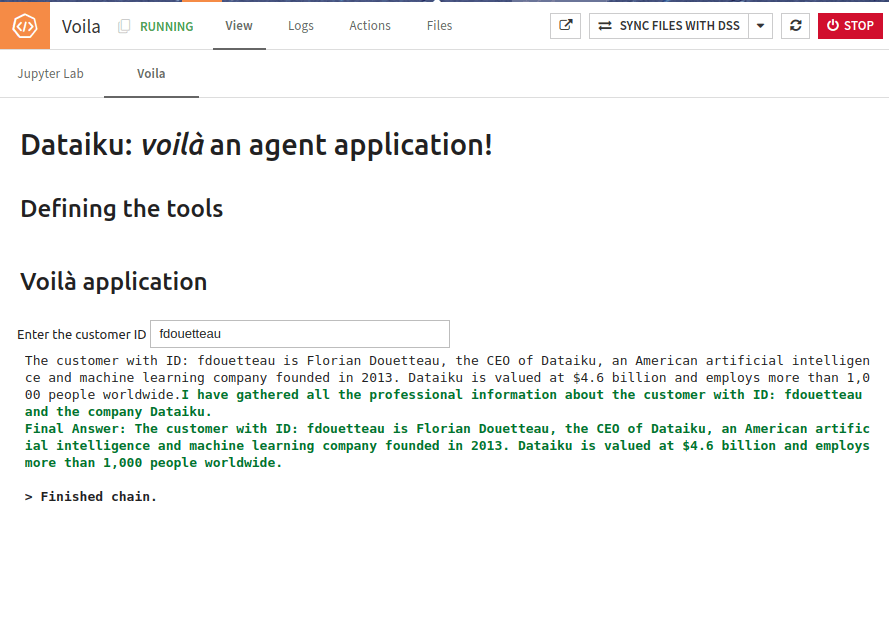
Figure 2: First Voilà agent application.#
Going further#
You have an application that takes a customer ID as input and displays the result. You can tweak it to display the different steps the agent follows.
If you want to test different usage of an LLM, follow the steps:
Use the
list_llms()method (like shown here).Store the result in a list.
Use this list as a dropdown.
Create a new agent each time the user changes the input.
There are many other ways to improve this application, but you now have enough knowledge to adapt it to your needs.
You can download the Jupyter lab notebook here