

Using Dask DataFrames in Dataiku#
This article introduces distributed data manipulation in Dataiku using Dask DataFrames.
Specifically, it illustrates how to:
Deploy a Dask Cluster on a Dataiku-managed Elastic AI cluster.
Natively read a Dataiku dataset as a Dask DataFrame (i.e., without an intermediate step as a Pandas DataFrame).
Perform distributed, parallelized computations on the Dask DataFrame.
Pre-requisites#
A code environment with a Python version supported by Docker Dask (which at the time of writing are 3.10, 3.11, and 3.12) and with the following packages:
dask[distributed]
pyarrow
s3fs
Note
The code environment only needs to be built locally, i.e., containerized execution support is not required.
Deploying a Dataiku-managed Elastic AI cluster#
Before deploying the Dask Cluster, a Dataiku administrator must deploy a Dataiku-managed Elastic AI cluster.
A few things to keep in mind about the Elastic AI Cluster:
Dataiku recommends creating a dedicated
nodegroupto host the Dask Cluster; thenodegroupcan be static or auto-scale.Dataiku recommends that each cluster node have at least 32 GB RAM for typical data processing workloads.
Deploying a Dask Cluster#
The procedure to deploy a Dask Cluster onto a Dataiku-managed Elastic AI cluster is as follows.
Important
Note that this procedure requires Dataiku Administrator privileges.
Install this plugin.
Navigate to the “Macros” section of a Dataiku project, search for the “Dask” macros, and select the “Start Dask Cluster” macro.
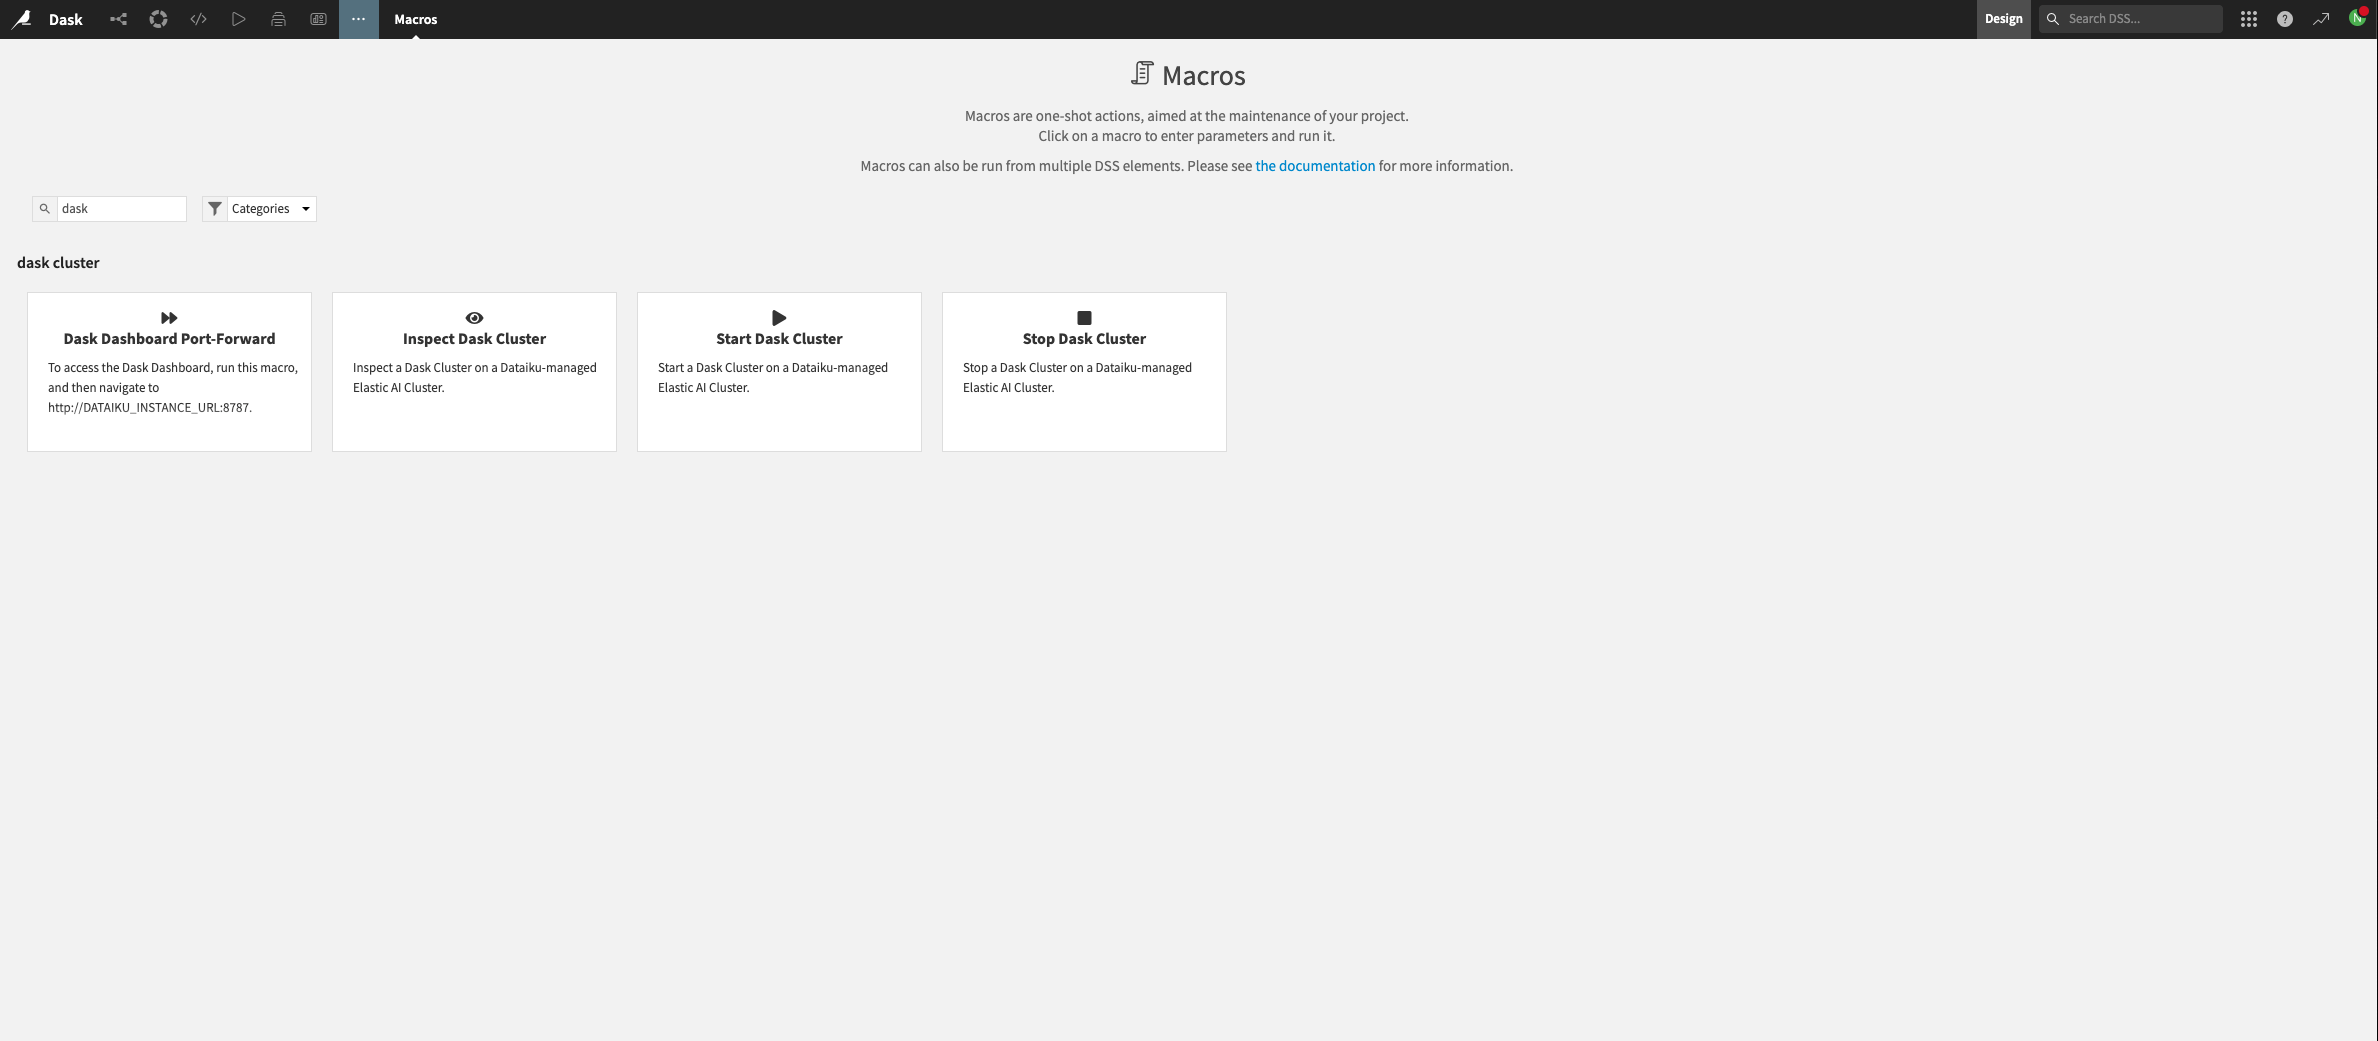
Figure 1.1 – Macros for Dask#
Fill in the macro fields, keeping in mind the following information:
Dask image tag: this should be a valid tag from Dask’s Docker Registry; the Python version of the image tag should match the Python version of the Dataiku code environment created in the pre-requisites section.
The CPU / memory request should be at least 1 CPU / 2GB RAM per worker.
The total worker resources should fit within the Elastic AI Cluster’s default
nodegroup.
Run the macro.
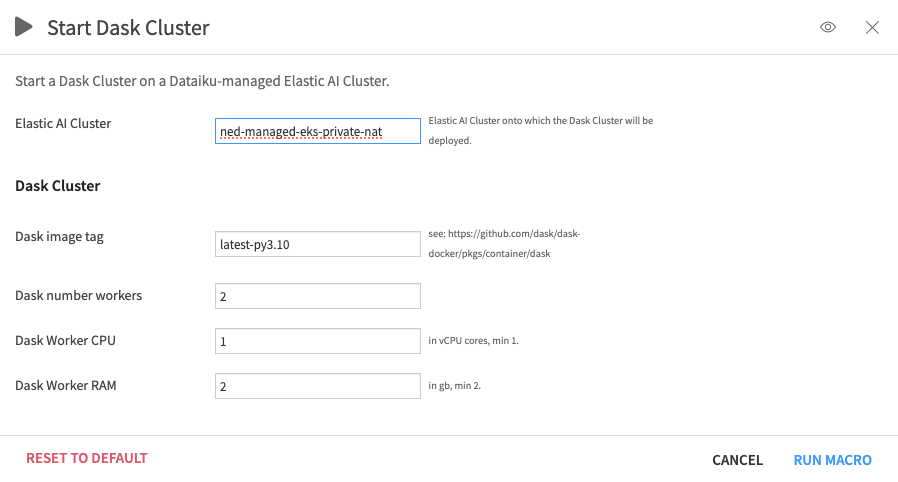
Figure 1.2 – Start macro#
Once the “Start Dask Cluster” macro is complete, run the “Inspect Dask Cluster” macro; this retrieves the Dask Cluster deployment status and provides the Dask Cluster endpoint once the cluster is ready.
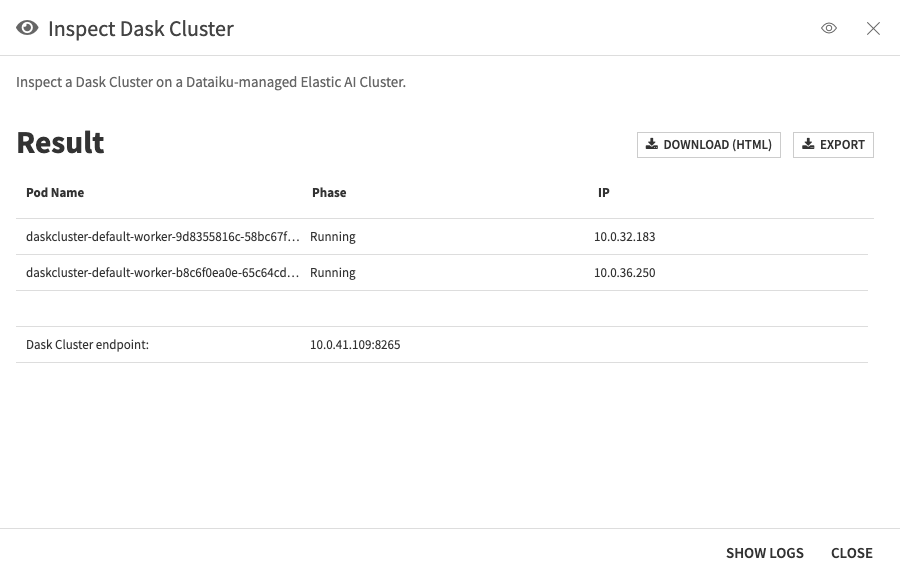
Figure 1.3 – Inspect Dask Cluster#
Optionally, set up a port forwarding connection to the Dask Dashboard using the “Dask Dashboard Port-Forward” macro.
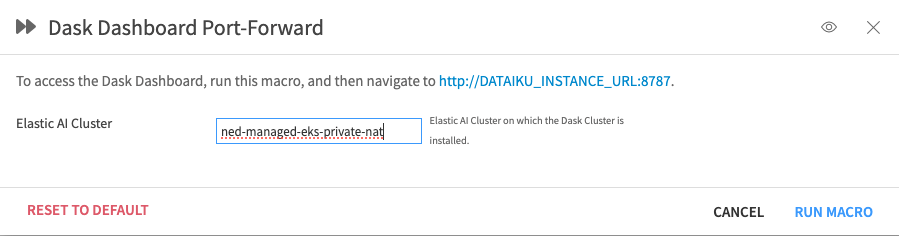
Figure 1.4 – Dask Dashboard Port-Forward#
The Dask Dashboard will then be accessible at
http://\<Dataiku instance domain>:8787while the macro is running.
If everything goes well, you should end up with something similar to:
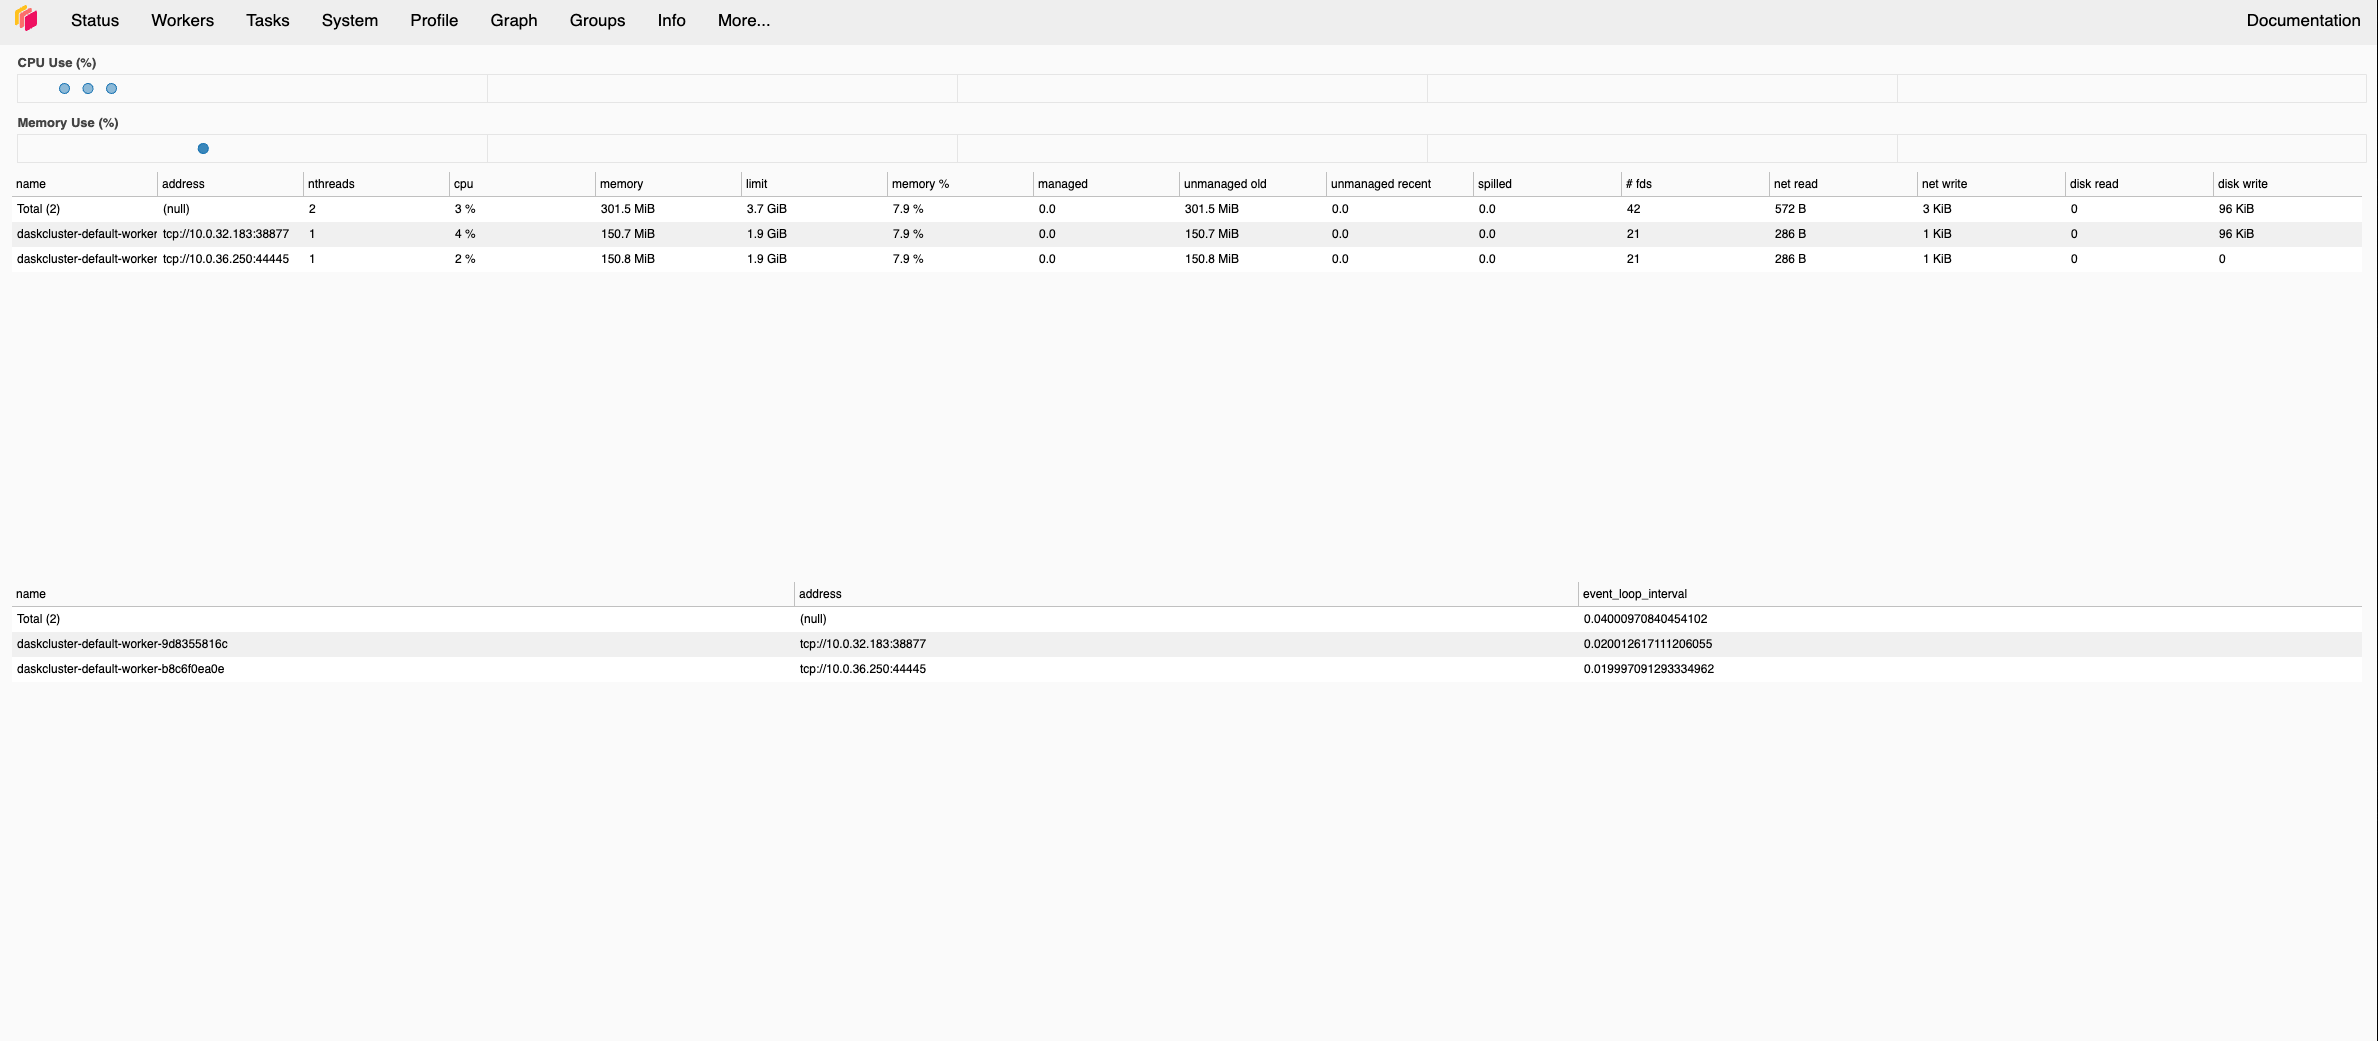
Figure 1: Dask cluster is up and running#
Important
Note that this procedure requires SSH access to the Dataiku server.
SSH onto the Dataiku server and switch to the dssuser.
Point
kubectlto thekubeconfigof the Elastic AI cluster onto which the Dask Cluster will be deployed:export KUBECONFIG=/PATH/TO/DATADIR/clusters/<cluster name>/exec/kube_config
where
/PATH/TO/DATADIRis the path to Dataiku’s data directory, and<cluster name>is the name of the Elastic AI cluster.Install the Dask Operator on the cluster:
helm repo add dask https://helm.dask.org
helm repo update
helm install --create-namespace -n dask-operator --generate-name dask/dask-kubernetes-operator
Deploy the Dask Cluster:
kubectl apply -f dask-cluster.yaml
where
dask-cluster.yamlis a file such as:apiVersion: kubernetes.dask.org/v1 kind: DaskCluster metadata: namespace: dask name: simple-dask-cluster spec: worker: replicas: 2 spec: nodeSelector: label: value containers: - name: worker image: "ghcr.io/dask/dask:latest-py3.10" imagePullPolicy: "IfNotPresent" args: - dask-worker - --name - $(DASK_WORKER_NAME) - --dashboard - --dashboard-address - "8788" ports: - name: http-dashboard containerPort: 8788 protocol: TCP resources: limits: cpu: "1" memory: "2G" requests: cpu: "1" memory: "2G" scheduler: spec: nodeSelector: labelkey: labelvalue containers: - name: scheduler image: "ghcr.io/dask/dask:latest-py3.10" imagePullPolicy: "IfNotPresent" args: - dask-scheduler ports: - name: tcp-comm containerPort: 8786 protocol: TCP - name: http-dashboard containerPort: 8787 protocol: TCP readinessProbe: httpGet: port: http-dashboard path: /health initialDelaySeconds: 5 periodSeconds: 10 livenessProbe: httpGet: port: http-dashboard path: /health initialDelaySeconds: 15 periodSeconds: 20 service: type: NodePort selector: dask.org/cluster-name: simple dask.org/component: scheduler ports: - name: tcp-comm protocol: TCP port: 8786 targetPort: "tcp-comm" - name: http-dashboard protocol: TCP port: 8787 targetPort: "http-dashboard"
Attention
The
metadata.namespaceis optional and should correspond to a previously created namespace; Dataiku recommends using a dedicated namespace for each Dask cluster.The
metadata.nameandspec.scheduler.service.selector.dask.org/cluster-nameshould be set to the desired Dask cluster name.The
spec.worker.spec.nodeSelectorandspec.scheduler.spec.nodeSelectorare optional.The
spec.worker.replicasshould be set to the desired number of Dask workers.The
spec.worker.spec.containers["worker"].nameandspec.scheduler.spec.containers["scheduler"].namefields should be the same and be valid tags from one of Dask’s Docker Registry images.The Python version of the
spec.worker.spec.containers["worker"].nameandspec.scheduler.spec.containers["scheduler"].nameshould match the Python version of the Dataiku code environment created in the pre-requisites section.The
spec.worker.spec.containers["worker"].resources.limitsshould be set to a minimum of 1 vCPU and 2GB RAM (although significantly more resources will likely be required depending on the specific data processing task).
For the complete schema of the Dask Cluster YAML file, see the Dask documentation.
Watch the Dask Cluster pods being created:
kubectl get pods -A -w -n <dask cluster namespace>
Once the
schedulerpod has been successfully created, describe it and determine its IP:kubect describe pod <dask-cluster-scheduler-pod-name> -n <dask cluster namespace>
The Dask Cluster endpoint is
<scheduler pod IP>:8786.Optionally, set up a port forwarding connection to the Dask Dashboard:
kubectl port-forward service/<dask cluster name>-scheduler -n <dask cluster namespace> --address 0.0.0.0 8787:8787
The Dask Dashboard will be accessible at
http://<Dataiku instance domain>:8787. Accessing it via a browser may require opening this port at the firewall.
If everything goes well, you should end up with something similar to:
Figure 1: Dask cluster is up and running#
For more information on this procedure and how to further customize the deployment of a Dask Cluster on Kubernetes (e.g., writing custom Dask Operator plugins), please refer to the relevant Dask Kubernetes documentation.
Read and Manipulate a Dataiku Dataset as a Dask DataFrame#
Now that the Dask cluster is running, users can manipulate Dataiku datasets in a distributed, parallelized fashion using Dask DataFrames. All that is required is the Dask cluster endpoint determined above.
First, you will need to create a Project Library
called dku_dask (under the python folder) with one file, utils.py, with the following content:
utils.py
import dataiku

def extract_packages_list_from_pyenv(env_name):
    """
    Extracts python package list (requested) from an environment.
    Returns a list of python packages.
    """
    client = dataiku.api_client()
    pyenv = client.get_code_env(env_lang="PYTHON", env_name=env_name)
    pyenv_settings = pyenv.get_settings()

    packages = pyenv_settings.settings["specPackageList"]
    packages_list = packages.split("\n")

    return packages_list

def s3_credentials_from_dataset(dataset_name):
    """
    Retireves S3 credentials (access key, secret key, session token) from S3 dataset.
    Assumues dataset is stored on S3 connection, with AssumeRole as auth method.

    TODO: actually check this, and don't just fail.
    """
    client = dataiku.api_client()

    ds = dataiku.Dataset(dataset_name) # resolved path and connection name via internal API
    ds_connection_name = ds.get_config()["params"]["connection"]

    ds_connection = client.get_connection(ds_connection_name)
    ds_connection_info = ds_connection.get_info()
    access_key = ds_connection_info["resolvedAWSCredential"]["accessKey"]
    secret_key = ds_connection_info["resolvedAWSCredential"]["secretKey"]
    session_token = ds_connection_info["resolvedAWSCredential"]["sessionToken"]

    return access_key, secret_key, session_token

def s3_path_from_dataset(dataset_name):
    """
    Retrieves full S3 path (i.e. s3:// + bucket name + path in bucjet) for dataset.
    Assumues dataset is stored on S3 connection.

    TODO: actually check this, and don't just fail.
    """
    ds = dataiku.Dataset(dataset_name) # resolved path and connection name via internal API
    ds_path = ds.get_location_info()["info"]["path"]

    return ds_path
Second, you must create a dataset in the Flow, which will be read as a Dask DataFrame.
This example (and the code of the dku_dask project library) assumes that this dataset is:
on S3
in the parquet format
on a Dataiku S3 connection that uses STS with AssumeRole as its authentication method and that the user running the code has “details readable by” access on the connection
Note
Modifying this example code to work with different connection and/or authentication types should be straightforward. For help, see the Dask DataFrame API documentation.
Finally, the following code illustrates how to load a Dataiku dataset as a Dask DataFrame,
apply a groupby transformation to the DataFrame (distributed over the cluster),
and then collect the results.
In this case, the avocado_transactions dataset is a slightly processed version of
this Kaggle dataset.
import dataiku
from dku_dask.utils import (
    extract_packages_list_from_pyenv,
    s3_credentials_from_dataset,
    s3_path_from_dataset
)

from dask.distributed import Client, PipInstall
import dask.dataframe as dd

# Attach to the Dask cluster
# Note: <Cluster IP> is the Dask cluster endpoint determined during the Dask cluster setup steps.
dask_client = Client("<Dask Endpoint>")

# Install missing packages on the cluster
# Note: <Dataiku code env name> is the name of the code environment created during the pre-requisites steps.
packages = extract_packages_list_from_pyenv("<Dataiku code env name>")
plugin = PipInstall(packages=packages, restart_workers=True)
dask_client.register_plugin(plugin)

# Retrieve Dataiku dataset as Dask DataFrame
## Get S3 credentials
access_key, secret_key, session_token = s3_credentials_from_dataset("avocado_transactions")
storage_options = {
    "key": access_key,
    "secret": secret_key,
    "token": session_token
}

## Get dataset S3 path
dataset_s3_path = s3_path_from_dataset("avocado_transactions")

## Read dataset as Dask DataFrame
df = dd.read_parquet(dataset_s3_path, aggregate_files=True, storage_options=storage_options)

# Perform a groupy manipulation on the DataFrame
result = df.groupby(["type"]).mean()
result.compute()
If all goes well, you should end up with something similar to (assuming you’ve run the code in a notebook):
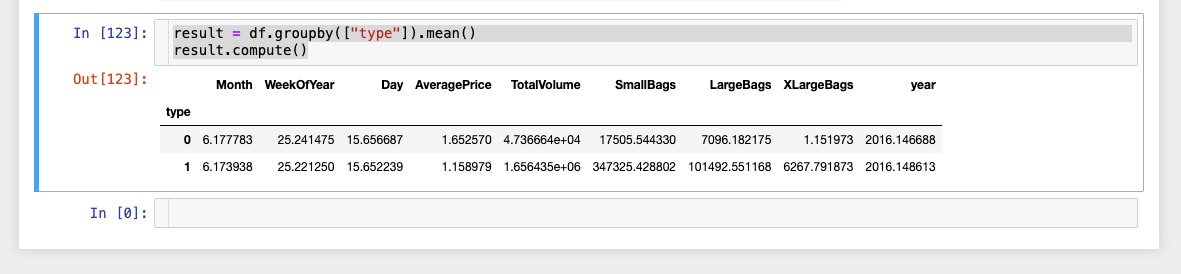
Figure 1: Groupby result#
Conclusion#
You now know how to set up a Dask cluster to achieve distributed, parallelized data manipulation using Dask DataFrames. Adapting this tutorial to your specific ETL needs should be easy.
Here is the complete code for this tutorial:
code.py
import dataiku
from dku_dask.utils import (
    extract_packages_list_from_pyenv,
    s3_credentials_from_dataset,
    s3_path_from_dataset
)

from dask.distributed import Client, PipInstall
import dask.dataframe as dd

# Attach to the Dask cluster
# Note: <Cluster IP> is the Dask cluster endpoint determined during the Dask cluster setup steps.
dask_client = Client("<Dask Endpoint>")

# Install missing packages on the cluster
# Note: <Dataiku code env name> is the name of the code environment created during the pre-requisites steps.
packages = extract_packages_list_from_pyenv("<Dataiku code env name>")
plugin = PipInstall(packages=packages, restart_workers=True)
dask_client.register_plugin(plugin)

# Retrieve Dataiku dataset as Dask DataFrame
## Get S3 credentials
access_key, secret_key, session_token = s3_credentials_from_dataset("avocado_transactions")
storage_options = {
    "key": access_key,
    "secret": secret_key,
    "token": session_token
}

## Get dataset S3 path
dataset_s3_path = s3_path_from_dataset("avocado_transactions")

## Read dataset as Dask DataFrame
df = dd.read_parquet(dataset_s3_path, aggregate_files=True, storage_options=storage_options)

# Perform a groupy manipulation on the DataFrame
result = df.groupby(["type"]).mean()
result.compute()