

Impersonation with webapps#
By default, webapps require users to be authenticated. For more details and options, please see Public webapps.
It is essential to consider the security and permission aspects of impersonation while using webapps. You can refer to this documentation to learn more about these aspects.
Each time a user uses a webapp, the code is executed on behalf of a user, defined by the “Run backend as” parameter configured in the webapp settings, as illustrated in Figure 1. Therefore, the actions performed by the user are attributed to the user mentioned in the “Run backend as” parameter.
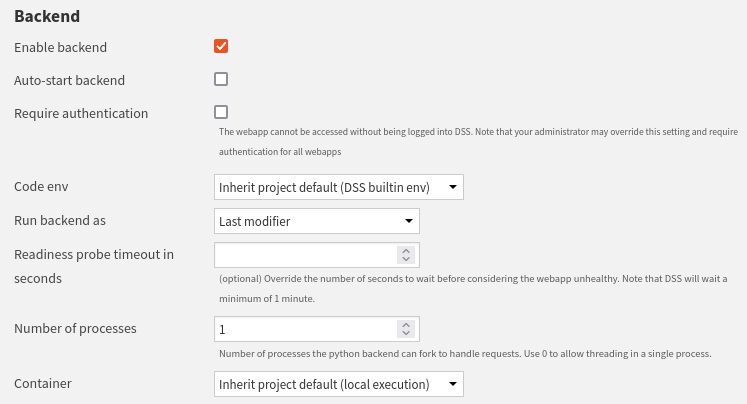
Figure 1: Backend configuration.#
For example, if user U1 runs a webapp with the “Run backend as” parameter set to A1, the actions taken by U1 will be identified as actions taken by the user A1. If you need the actions being identified as actions taken by user U1, you must make an impersonation call.
Webapps can be accessed by any user with the necessary permissions, such as “Read dashboards” or “Read project content” after successfully logging in. You can refer to the Public webapps page if you require further information.
Impersonation usage#
Impersonation calls work on any web framework so that you can use your preferred web framework. Creating a simple webapp allows you to test, evaluate, and understand how impersonation works. When a job starts, Dataiku logs it. Then, you can observe impersonation by examining a Dataiku project’s interface and jobs section.
To test impersonation, you will create a web application that builds a dataset (i.e., starts a job). You can observe impersonation by examining a Dataiku project’s interface or the jobs section. To carry out this task, you will use the Dataiku TShirts project. To do so:
On the top left corner, click + New project > Learning projects > Dataiku TShirts.
On the top navigation bar, navigate to the </> > Webapp section.
Click on + New Webapp and select Code Webapp.
Select the library with which you want to build your webapp. For standard webapps, you can choose either Flask or FastAPI as backend framework. Examples are provided for both.
The webapp aims to build a dataset present in the project; for example,
you will build the web_history_prepared dataset.
Note
If you are calling an agent tool from your webapp backend, and you want to run the agent tool as the end user, you can pass the end user’s identity via the completion context. Obtain a caller ticket from the browser headers and forward it to the agent:
ticket = dataiku.api_client().get_ticket_from_browser_headers(dict(request.headers))
completion.with_context({"dkuCallerTicket": ticket})
To learn more about impersonation in agent tools, check Impersonate end-user identity in a custom agent tool
Implementation#
The code presented demonstrates how to access user information and retrieve their name. The button action will launch a build of a Dataset, using impersonation so that the Dataset build is done as the end-user.
1<h1>Impersonation Demo</h1>
2
3<h2>Welcome: <span id="identified_user"></span></h2>
4
5<div class="build_dataset">
6    <form id="form-dataset" novalidate>
7        <button type="button" class="main-blue-button" id="build-button">Build the dataset</button>
8    </form>
9</div>
 1/*
 2 * For more information, refer to the "Javascript API" documentation:
 3 * https://doc.dataiku.com/dss/latest/api/js/index.html
 4 */
 5
 6let buildButton = document.getElementById('build-button');
 7let identifiedUser = document.getElementById('identified_user')
 8
 9buildButton.addEventListener('click', function (event) {
10    datasetToBuild = "web_history_prepared"
11    $.get(getWebAppBackendUrl("/build_dataset"), {datasetToBuild: datasetToBuild});
12});
13
14// When loading, get the user information
15$.getJSON(getWebAppBackendUrl('/get_user_name'), function (data) {
16    identifiedUser.textContent = data;
17});
 1import dataiku
 2from flask import request, jsonify
 3
 4import logging
 5
 6logger = logging.getLogger(__name__)
 7
 8
 9# Example:
10# As the Python webapp backend is a Flask app, refer to the Flask
11# documentation for more information about how to adapt this
12# example to your needs.
13# From JavaScript, you can access the defined endpoints using
14# getWebAppBackendUrl('get_user_name')
15
16@app.route('/get_user_name')
17def get_user_name():
18    logger.info("In it")
19    logger.info(request)
20    # Get user information from the request
21    headers = dict(request.headers)
22    auth_info = dataiku.api_client().get_auth_info_from_browser_headers(headers)
23    return (json.dumps(auth_info.get("associatedDSSUser")))
24
25@app.route('/build_dataset')
26def build_dataset():
27    dataset = request.args.get('datasetToBuild')
28    logger.info("Impersonation begins...")
29    # Launch the build of a Dataset using impersonation.
30    # This Dataset build will be done as the end-user.
31    with dataiku.WebappImpersonationContext() as context:
32        # Each time you need to do impersonation, you need to obtain a client.
33        local_client = dataiku.api_client()
34        project = local_client.get_default_project()
35        outdataset = project.get_dataset(dataset)
36        outdataset.build()
37
38    logger.info("Impersonation ends...")
39    resp = jsonify(success=True)
40    return resp
1<h1>Impersonation Demo</h1>
2
3<h2>Welcome: <span id="identified_user"></span></h2>
4
5<div class="build_dataset">
6    <form id="form-dataset" novalidate>
7        <button type="button" class="main-blue-button" id="build-button">Build the dataset</button>
8    </form>
9</div>
 1/*
 2 * For more information, refer to the "Javascript API" documentation:
 3 * https://doc.dataiku.com/dss/latest/api/js/index.html
 4 */
 5
 6let buildButton = document.getElementById('build-button');
 7let identifiedUser = document.getElementById('identified_user')
 8
 9buildButton.addEventListener('click', function (event) {
10    datasetToBuild = "web_history_prepared"
11    $.get(getWebAppBackendUrl("/build_dataset"), {datasetToBuild: datasetToBuild});
12});
13
14// When loading, get the user information
15$.getJSON(getWebAppBackendUrl('/get_user_name'), function (data) {
16    identifiedUser.textContent = data;
17});
 1import dataiku
 2from fastapi import Request
 3from fastapi.responses import JSONResponse
 4
 5import logging
 6
 7logger = logging.getLogger(__name__)
 8
 9
10# Example:
11# As the Python webapp backend is a FastAPI app, refer to the FastAPI
12# documentation for more information about how to adapt this
13# example to your needs.
14# From JavaScript, you can access the defined endpoints using
15# getWebAppBackendUrl('get_user_name')
16
17@app.get("/get_user_name")
18async def get_user_name(request: Request):
19    logger.info("In it")
20    logger.info(request)
21    # Get user information from the request (can be done with impersonation)
22    headers = dict(request.headers)
23    auth_info = dataiku.api_client().get_auth_info_from_browser_headers(headers)
24    return JSONResponse(content=auth_info.get("associatedDSSUser"))
25
26@app.get("/build_dataset")
27async def build_dataset(datasetToBuild: str):
28    logger.info("Impersonation begins...")
29    # Launch the build of a Dataset using impersonation.
30    # This Dataset build will be done as the end-user.
31    with dataiku.WebappImpersonationContext() as context:
32        # Each time you need to do impersonation, you need to obtain a client.
33        local_client = dataiku.api_client()
34        project = local_client.get_default_project()
35        outdataset = project.get_dataset(datasetToBuild)
36        outdataset.build()
37
38    logger.info("Impersonation ends...")
39    return JSONResponse(content={"success": True})
 1from dash import html, Input, Output
 2from dash.exceptions import PreventUpdate
 3from flask import request
 4import logging
 5import dataiku
 6
 7logger = logging.getLogger(__name__)
 8
 9dataset_to_build = "web_history_prepared"
10
11# build your Dash app
12app.layout = html.Div([
13    html.H1("Impersonation Demo", style={'text-align': 'center'}),
14    html.H3([
15        html.Span("Welcome: "),
16        html.Span(id="identified_user")
17    ]),
18    html.Button('Build the dataset', id='submit-val', n_clicks=0)
19])
20
21
22@app.callback(
23    Output('identified_user', 'children'),
24    Input('identified_user', 'children')
25)
26def load_user_credentials(children):
27    if children:
28        raise PreventUpdate
29    else:
30        # Get user info from request (can be done with impersonation)
31        request_headers = dict(request.headers)
32        auth_info = dataiku.api_client().get_auth_info_from_browser_headers(request_headers)
33        return auth_info.get("associatedDSSUser")
34
35@app.callback(
36    Output('submit-val', 'n_clicks'),
37    Input('submit-val', 'n_clicks'),
38    prevent_initial_call=True
39)
40def update_output(n_clicks):
41    logger.info("Impersonation begins...")
42    # Launch the build of a Dataset using impersonation.
43    # This Dataset build will be done as the end-user.
44    with dataiku.WebappImpersonationContext() as context:
45        # Each time your need to do impersonation, you need to obtain a client.
46        local_client = dataiku.api_client()
47        project = local_client.get_default_project()
48        outdataset = project.get_dataset(dataset_to_build)
49        outdataset.build()
50
51    logger.info("Impersonation ends...")
52    raise PreventUpdate
 1import dataiku
 2
 3from functools import partial
 4
 5from bokeh.io import curdoc
 6from bokeh.models import Div, Button
 7from bokeh.layouts import layout
 8from dataiku.webapps.run_bokeh import get_session_headers
 9
10import logging
11
12logger = logging.getLogger(__name__)
13
14dataset_to_build = "web_history_prepared"
15
16
17def build_dataset(dataset):
18    logger.info('impersonation')
19    with dataiku.WebappImpersonationContext() as ctx:
20        local_client = dataiku.api_client()
21        project = local_client.get_default_project()
22        outdataset = project.get_dataset(dataset)
23        outdataset.build()
24
25
26def application():
27    title = Div(text="""<h1>Impersonation Demo</h1>""")
28
29    # Get user form http request (can be done with user impersonation)
30    headers = get_session_headers(curdoc().session_context.id)
31    auth_info = dataiku.api_client().get_auth_info_from_browser_headers(headers)
32    user = auth_info.get('associatedDSSUser')
33    subtitle = Div(text=f"""<h2>Welcome: <span id="identified_user">{user}</span></h2>""")
34
35    button = Button(label="Build the dataset")
36    button.on_event('button_click', partial(build_dataset, dataset=dataset_to_build))
37
38    app = layout([title, subtitle, button])
39    curdoc().add_root(app)
40
41    curdoc().title = "Impersonation"
42
43
44application()
 1# tested with Streamlit 1.50.0
 2import streamlit as st
 3
 4import dataiku
 5import logging
 6
 7logger = logging.getLogger(__name__)
 8
 9dataset_to_build = "web_history_prepared"
10
11
12def build_dataset(dataset):
13    # Launch the build of a Dataset using impersonation.
14    # This Dataset build will be done as the end-user.
15    with dataiku.WebappImpersonationContext() as context:
16        local_client = dataiku.api_client()
17        project = local_client.get_default_project()
18        outdataset = project.get_dataset(dataset_to_build)
19        outdataset.build()
20
21st.title('Impersonation Demo')
22request_headers = dict(st.context.headers)
23auth_info = dataiku.api_client().get_auth_info_from_browser_headers(request_headers)
24st.subheader(f"Welcome: {auth_info.get('authIdentifier')}")
25
26st.button("Build the dataset", on_click=build_dataset, args=[dataset_to_build])
Wrapping Up#
Congratulations! You know how to use and implement impersonation for web applications. Permissions and impersonation are critical points for web application security.