

Advanced setup: Code Studio template creation
This tutorial guides users on creating and configuring a Code Studio template to utilize a preferred web framework. It covers the necessary steps to set up a development environment, install required packages, and start the backend server. The template can be applied during both development and production phases.
Prerequisites
For building the code studio template:
Admin permission
Container images based on Almalinux
A code env with Flask (or another Python web server)
Context
This tutorial will teach you how to create and configure a Code Studio template for Angular or Next.js. Most modern web frameworks are based on the same principle: they rely on separating the frontend and the backend.
The backend is where processing is done and serves the requested data through routes (API). Dataiku encourages using Python to interact, so a frequent choice is to implement the backend using Flask. FastAPI is supported too, but the following examples will focus on a Flask implementation.
The front part has two ways of working, depending on whether you are developing your application or if it is ready for production. Usually, when developing an application, it uses “dynamic” files, while a built application serves “static” files.
The Code Studio template in this tutorial can be used during the development and production phases. If you need, you can split the template into two different templates based on your process.
Building the Code Studio template
Go to the Code Studios tab in the Administration menu, click the “+Create code studio template” button, choose an appropriate name for the template, and click on the Definition tab.
Adding an editor to the template
Click the “+Add a block” button and choose the “Visual Studio Code” block type. This block allows you to edit the code in Visual Studio Code. The documentation provides more information. As shown in Figure 1, there is no specific need to configure this block. You don’t need to tick the “Launch for webapps” box. Ticking this box indicates to Dataiku that this block should be run when you publish our webapps. When a webapp is published, you don’t need a running Visual Studio Code. The Code Studio will run Visual Code Studio only when you run it in edition. This block won’t start when deploying the web application (see Publishing your angular application).
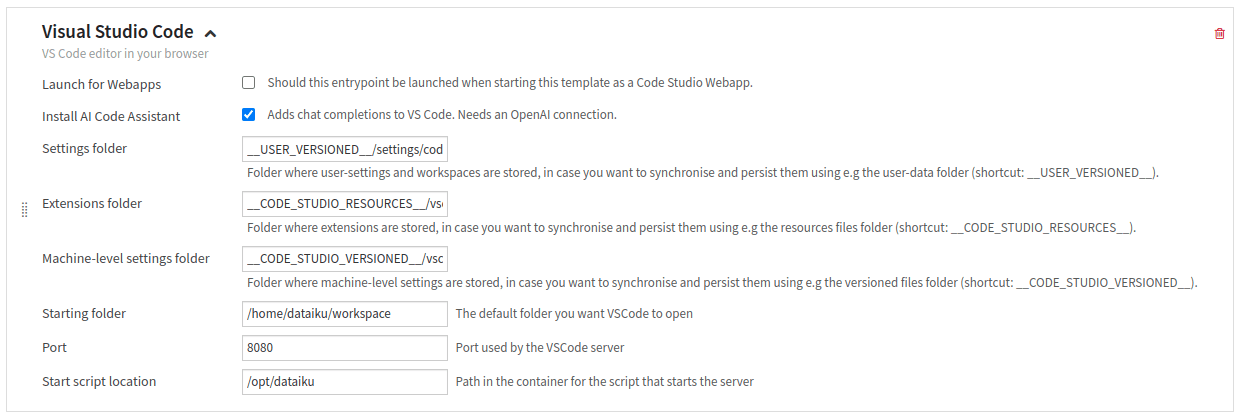
Figure 1: Configuring Visual Studio Code.
Installing the web framework
Click the “+Add a block” button and choose the “Append to Dockerfile” block type. This block allows you to add specific programs to Code Studio; more information is in the documentation.
Choose the tab for the framework you plan to use. Both options install Node.js and npm.
The Angular option also installs the Angular CLI; Next.js applications use the local Next.js version created by create-next-app.
In the “Dockerfile” block, enter the following:
USER root
RUN yum -y update && \
    yum -y install curl && \
    yum -y module install nodejs:20

RUN yum install -y npm && \
    mkdir -p /usr/local/lib/node_modules && \
    chown dataiku:dataiku -R /usr/local/lib/node_modules && \
    npm install npm@10 -g && \
    npm install pnpm -g && \
    npm install @angular/cli -g && \
    npm install yarn -g

RUN cd /opt/dataiku/code-server/lib/vscode/extensions && \
    npm init -y && \
    npm i typescript

RUN chown -R dataiku:dataiku /home/dataiku/.npm
In the “Dockerfile” block, enter the following:
USER root
RUN yum -y update && \
    yum -y install curl && \
    yum -y module install nodejs:20

RUN yum install -y npm && \
    mkdir -p /usr/local/lib/node_modules && \
    chown dataiku:dataiku -R /usr/local/lib/node_modules && \
    npm install npm@10 -g && \
    npm install pnpm -g && \
    npm install yarn -g

RUN cd /opt/dataiku/code-server/lib/vscode/extensions && \
    npm init -y && \
    npm i typescript

RUN chown -R dataiku:dataiku /home/dataiku/.npm
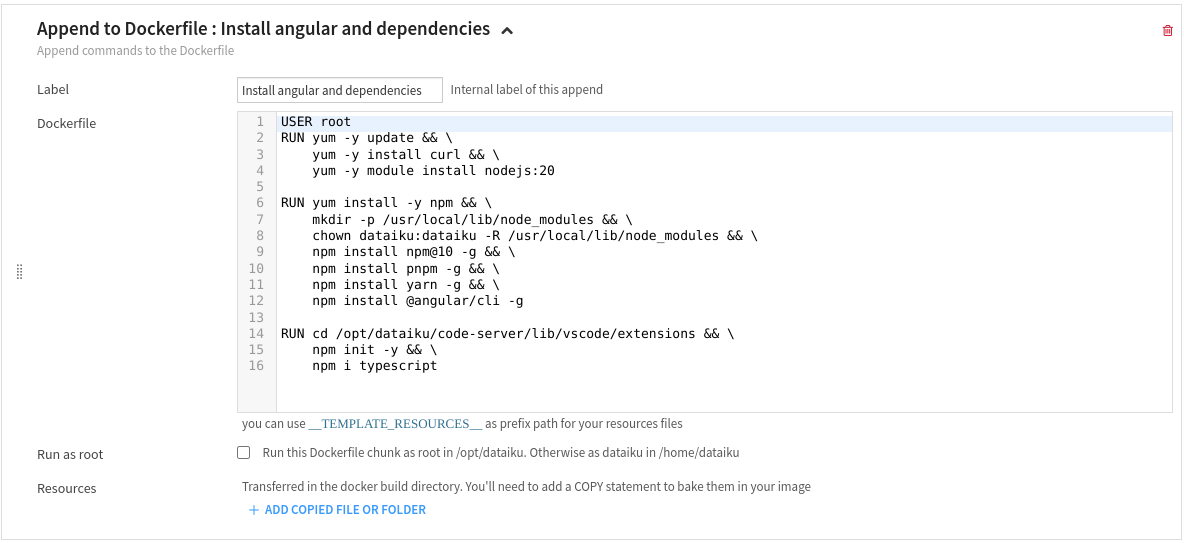
Figure 2: Append to Dockerfile block.
Figure 2
shows the “Append to Dockerfile” block configured for Angular. For Next.js,
configure the block using the instructions in the preceding Next.js tab; the
configuration is not shown in the figure. Both variants use npm version 10.
If you use another framework, adapt the template to install the required runtime and tools.
The final chown is required. The npm install commands above run as root and populate
/home/dataiku/.npm with root-owned files. Without the chown, every npm command in the Code Studio
fails with an EACCES error, because the Code Studio runs as the dataiku user and cannot use sudo.
Installing and using the backend
Selecting a code environment
Click the “+Add a block” button and choose the “Add Code Environment” block type. This block allows you to add a specific code environment that is usable in the Code Studio. For the “Code environment” block, choose the code-env with Flask, as shown in Figure 3. You can find more information on this block in the documentation.

Figure 3: Add Code Environment for the backend.
Creating a helper function
You will rely on a helper function to start the backend.
In the resources tab, click + Add, select Create file…, and choose a relevant filename,
such as run_the_backend.sh (for example).
The command can take various forms depending on the Python package you choose for your server.
Suppose you use Flask (as the tutorial does), and your backend is stored in the project-lib-versioned/my-app directory.
You could also store your backend in another location, like code_studio-versioned, for example.
Then the command to enter could be the following (if you choose to use Flask):
#!/bin/sh

source /opt/dataiku/python-code-envs/flask/bin/activate
cd /home/dataiku/workspace/project-lib-versioned/my-app/
flask run
This script contains three parts:
The first line of this command activates the code-env you previously defined. You must reuse the exact name you used for the backend code environment.
The second line positions the shell in the directory where your backend is.
The third line runs Flask to provide the backend.
Figure 4 represents this stage.

Figure 4: Helper function for starting the backend.
Creating an entry point to run the backend
Back to the Definition tab, click the “+Add a block” button, and choose the “Add an Entrypoint” block type. The purpose of this block is to serve the backend, meaning start a flask server and expose the port of the Flask server to allow communication with the frontend.
Tick “Launch for Webapps” and “Expose port.”
The backend is required when the web app is either in development or production, so you must tick the “Launch for Webapps” box.
“Expose port” exposes the port specified in “Exposed port” to Dataiku.
It would help if you also chose a meaningful name (
backend, for example) for the “Expose port label” field.The “Expose HTML service” box remains unchecked. If you check this box, a new tab named
backend(if you previously chose this name) will appear in the running Code Studio. As the purpose of this block is to serve backend stuff, there is no need to have an HTML tab in the Code Studio.Then, choose an appropriate “Exposed port” and “Proxied subpath,” which will be used afterward.
Finally, you have to use the previously defined helper function by copying it into the code studio block (“Scripts” part) and activating it (“Entrypoint” part).
Figure 5 shows a recap of all those steps.
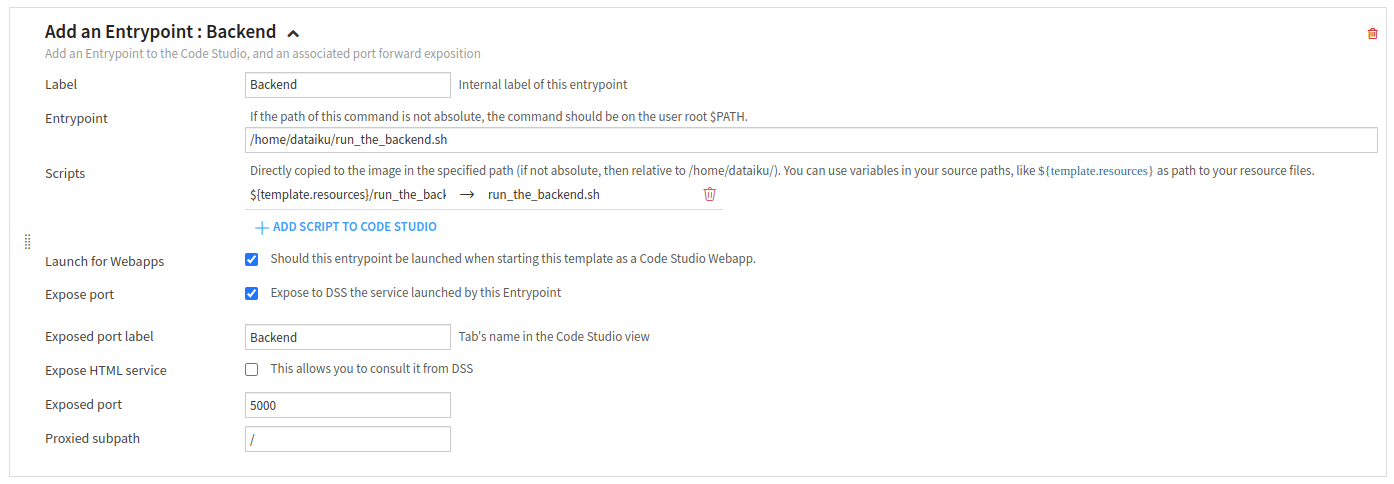
Figure 5: Configured entrypoint block for the backend.
Creating and using the frontend
Click the “+Add a block” button and choose the “Add an Entrypoint” block type. The purpose of this block is to run the frontend in development mode.
So you need to see the result of your development –> tick the “Expose HTML service.”
You need to have a tab in the running Code Studio –> tick the “Expose port” and choose a valid name for the “Exposed port label.”
Choose the tab for the frontend framework:
Angular uses port 4200 by default. Enter 4200 in “Exposed port.”
In “Proxied subpath,” enter /$request_uri.
Next.js uses port 3000 in this tutorial. Enter 3000 in “Exposed port.”
and use Frontend as the exposed-port label.
In “Proxied subpath” enter /.
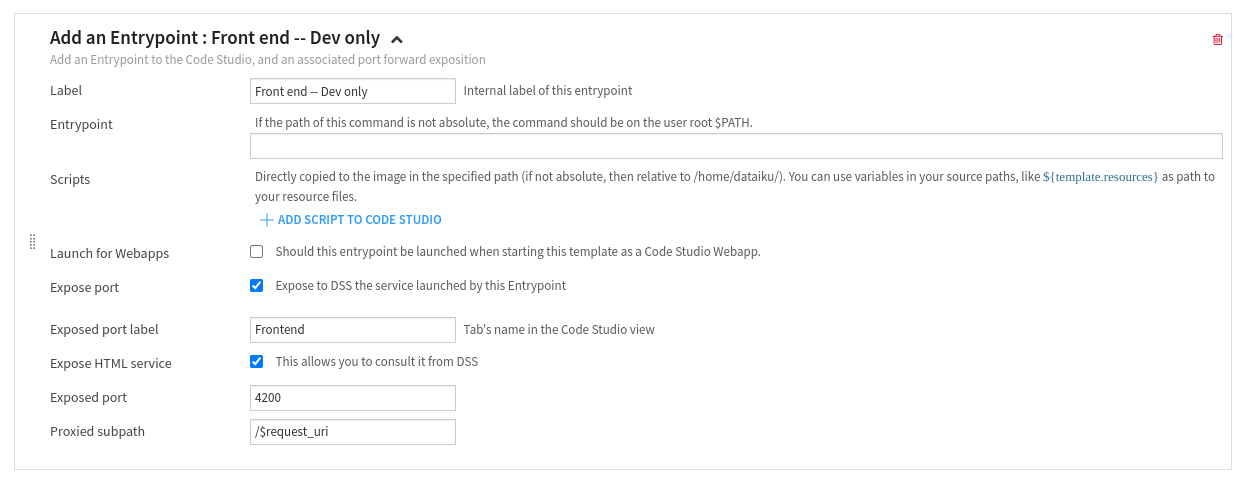
Figure 6: Configured Angular entrypoint block for the frontend. Look at the NextJS tab for NextJS specific configuration.
Preparing the Code Studio template to be published as a standalone web application
Most web frameworks allow users to build their applications after the development phase is finished.
Running the compiled frontend code is nothing more than serving the generated static-files directory.
You have to decide where your web application will be stored.
This tutorial assumes the frontend will be stored in the code_studio-resources directory.
If you configure a backend, you also need a path to serve it. This tutorial uses server for that path.
Click the “+Add a block” button and choose the “NGINX” block type to create a web server that serves the generated static files. If you need assistance configuring an NGINX server, please refer to the nginx documentation.
Configure the two locations as follows:
In Location #1, configure the backend proxy. Enter
/server/in “Path”, select “Non-regular expression priority match” for “Path match mode”, and select “Proxy” for “Mode”. Enter5000in “Proxy port”, which is the port specified in “Exposed port” when you created the backend entrypoint. Enter/in “Proxy path”.In Location #2, configure the static files. Enter
/in “Path”, select “Non-regular expression priority match” for “Path match mode”, and select “Custom settings” for “Mode”. Configure the custom settings according to your frontend framework.
ng build creates a dist directory. Enter the following in Custom Settings:
alias /home/dataiku/workspace/code_studio-resources/my_app/dist/;
try_files $uri $uri/ /index.html;
my_app refers to the Angular application created in the Angular application tutorial.
The Next.js static export creates an out directory. Enter the following in Custom Settings:
alias /home/dataiku/workspace/code_studio-resources/my_app/out/;
try_files $uri $uri/ /index.html;
my_app refers to the Next.js application created in the Next.js application tutorial.
Figure 7 shows an Angular NGINX configuration that serves the dist directory.
Keep in mind the custom settings for NextJS are slightly different.
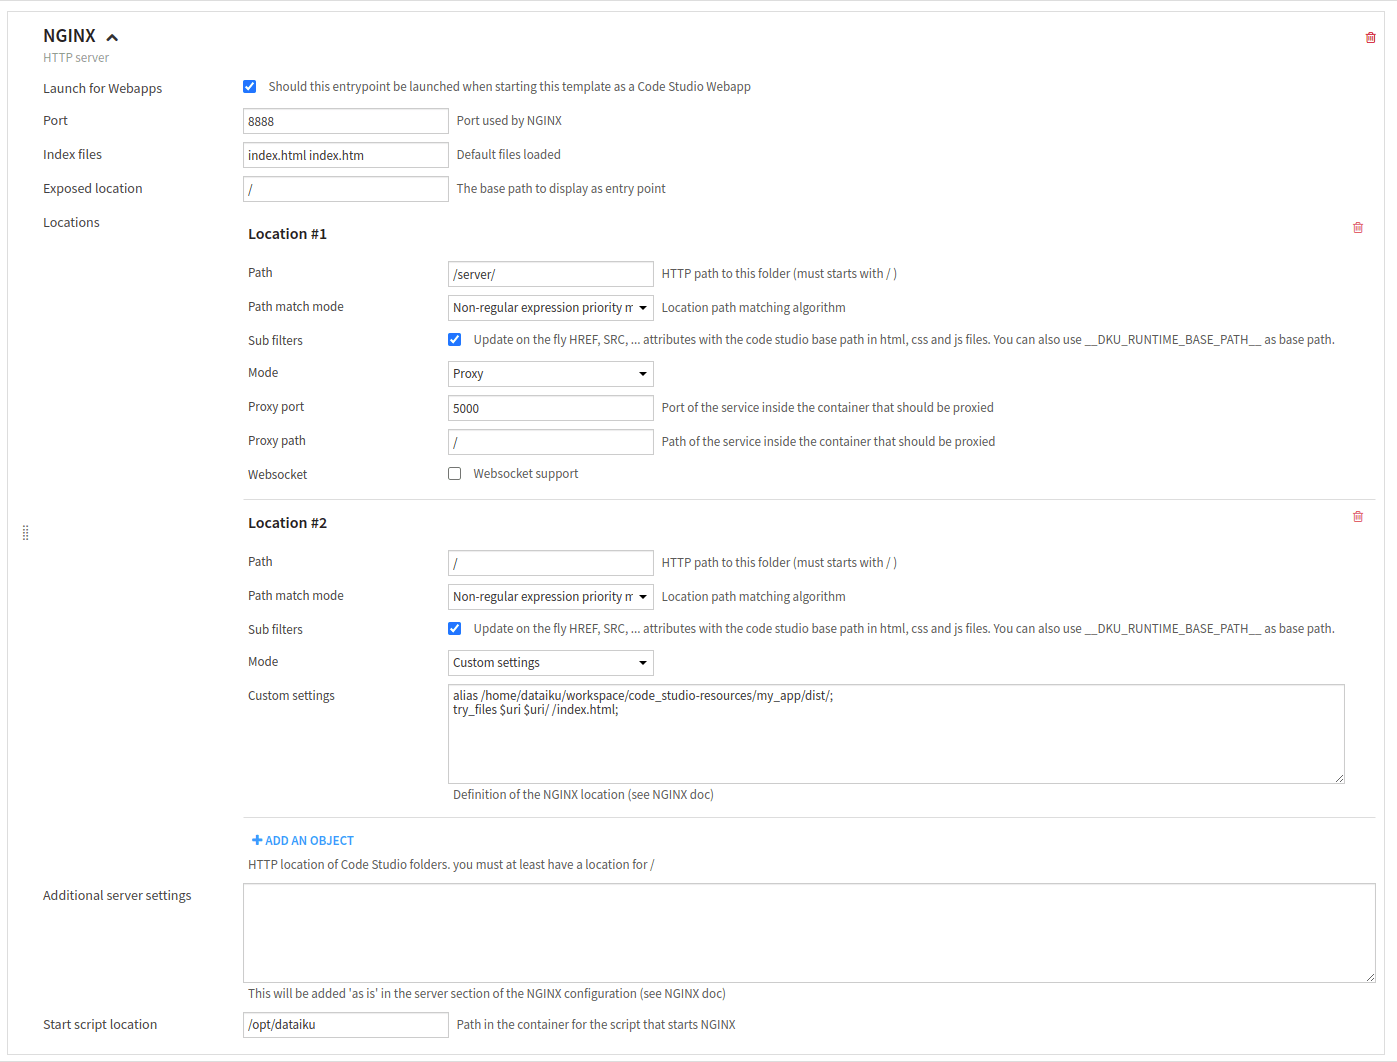
Figure 7: Configured NGINX block.
Wrapping up
Congratulations! You have configured a code studio template to use your framework. A quick summary of the choices you’ve made:
In the step Installing and using the backend, you have chosen to use a code environment named
flask. You also store your backend code in thebackendsubdirectory in theproject-lib-versioneddirectory. The name of the code environment is used when you want to run the backend to activate the Python environment. The location of your backend code is used when you need to run the backend. Finally, you use port 5000 to serve the backend API.In the step Preparing the Code Studio template to be published as a standalone web application, you have configured NGINX to serve the built frontend from the
code_studio-resourcesdirectory.
The frontend port and build directory depend on the framework you selected:
You chose port 4200 and configured NGINX to serve the dist directory.
You can now create your web application using the Angular application tutorial.
You chose port 3000 and configured NGINX to serve the out directory.
You can now create your web application using the Next.js application tutorial.
Keep in mind all the choices you have made.
You can also add two action blocks to help you while developing your web application:
One for knowing if the backend is running
One is for restarting the backend (in debug mode) if you made some changes in the backend that have yet to be considered.
Click the “+ Add a block” button and choose the “Add Custom Action” block type. This block allows running dedicated commands. Fill out the form:
“Name” field: “restart the backend”
“Icon” field: “fas fa-pastafarianism”
“Description” field: “Restart the backend in debug mode”
“Behavior”: “Run and don’t wait”
“Command line to execute”:
source /opt/dataiku/python-code-envs/flask/bin/activate && pkill flask && cd /home/dataiku/workspace/project-lib-versioned/my-app/ && flask --debug run"
Once this block is created, it will appear in the Action tab of the Code Studio, allowing the user to restart the backend in debug mode. Using the same principle, you can create an action to see if the backend is running by using the command line:
pgrep flask >/dev/null && echo "Flask backend is running" || echo "Flask backend is not running"
Figure 8 shows the integration of those two blocks.
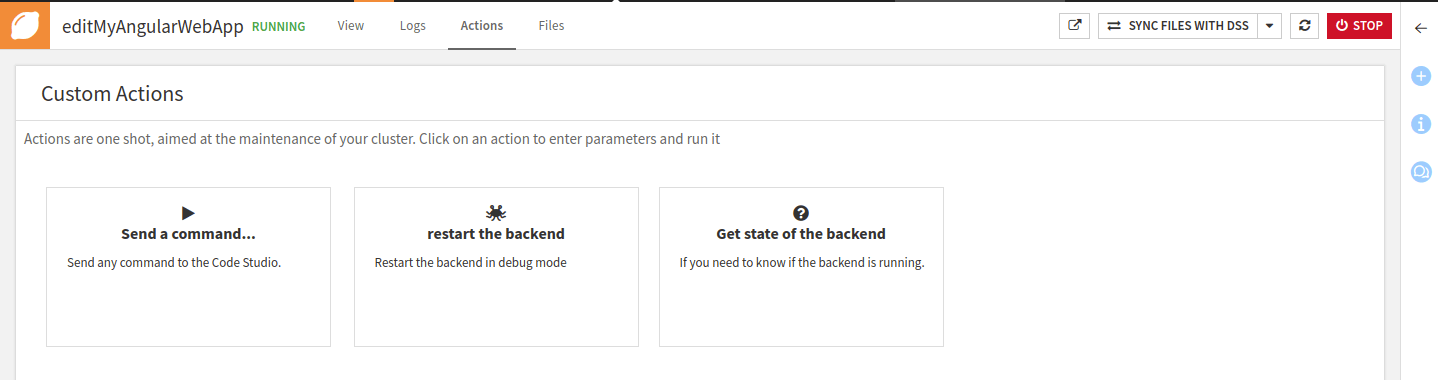
Figure 8: Custom actions.