

Creating a custom guardrail#
When using an agent, your company may want to control the LLM. There are various ways to do this. Custom guardrails are plugin components that allow the user to control the LLM. Custom Guardrails can, for example:
Rewrite the query before submitting it to the LLM.
Rewrite the response after having an answer from the LLM.
Ask an LLM to retry or rewrite its answer by providing additional context/instructions.
Add information into the trace of the LLM or in the audit log.
Act on a query to take action before calling the LLM.
This tutorial presents a simple use case for implementing a custom guardrail but explains how to implement other use cases.
Prerequisite#
Dataiku >= 13.4 (13.4.4 if you want to create your guardrail visually)
develop plugin permission
A connection to an LLM, preferably an OpenAi connection
Python >= 3.9
Introduction#
A custom guardrail is a plugin component that provides additional capability to an LLM. Depending on the context, there are four main ways to act, each configurable separately. In this tutorial, you will learn how to create a custom guardrail, configure it to tailor it to fit your needs and code the behavior.
To develop a Custom Guardrail, you must first create a plugin (or use an existing one).
Go to the main menu, click the Plugins menu, and select the Write your own from the Add plugin button.
Then, choose a meaningful name, such as toolbox.
Once the plugin is created, click the Create a code environment button and select Python as the default language.
Once you have saved the modification, go to the Summary tabs to build the plugin code environment.
The custom guardrail will use this code environment when it is used.
Click the + New component button, and choose the LLM Guardrail component in the provided list, as shown in Figure 1. Then, complete the form by choosing a meaningful Identifier and clicking the Add button.

Figure 1: New Guardrail component.#
Alternatively, you can select the Edit tab and, under the toolbox directory,
create a folder named python-guardrails.
This directory is where you will find and create your custom guardrail.
Under this directory, create a directory with a meaningful name representing your Guardrail component.
Creating the Guardrail#
A Guardrail is created by creating two files: guardrail.py and guardrail.json.
The JSON file contains the configuration file, and the Python file is where you will code the behavior of the Guardrail.
Configuring the LLM Guardrail#
Code 1 shows the global shape of the configuration file; highlighted lines are specific to the Guardrail component.
guardrail.json#/* This file is the descriptor for custom guardrail devadv-tutorial */
{
"meta": {
"label": "Custom guardrail tutorial",
"description": "This is the description of the custom guardrail devadv-tutorial"
},
// Whether this guardrail can operate on LLM queries
"operatesOnQueries": true,
// Whether this guardrail can operate on LLM responses
"operatesOnResponses": true,
// Whether this guardrail can retry processing of responses after a failure
"mayRequestRetryOnResponses": false,
// Whether this guardrail can reply directly to queries, skipping the rest of the guardrail pipeline
"mayRespondDirectlyToQueries": false,
/* params:
Dataiku will generate a form from this list of requested parameters.
Your component code can then access the value provided by users using the "name" field of each parameter.
Available parameter types include:
STRING, INT, DOUBLE, BOOLEAN, DATE, SELECT, TEXTAREA, PRESET and others.
For the full list and for more details, see the documentation: https://doc.dataiku.com/dss/latest/plugins/reference/params.html
Below is an example of a parameter field to allow choosing an LLM used to judge responses
*/
"params": [
]
}
All these four parameters are booleans.
Setting the operatesOnQuery parameter to true will trigger this guardrail on every input query before it is fed to the LLM.
Setting the operatesOnResponses parameter to true will trigger this guardrail on every response after the LLM inference happens.
Setting the mayRespondDirectlyToQueries parameter to true will indicate that the guardrail can respond directly to queries, skipping the rest of the pipeline.
Setting the mayRequestRetryOnResponses parameter to true will indicate that the guardrail can retry the processing of responses after a failure.
These parameters can also be configured via strings with two options BasedOnParameterName and BasedOnParameterValue.
For example, you can set operatesOnQueriesBasedOnParameterName and operatesOnQueriesBasedOnParameterValue.
Possible values for operatesOnQueriesBasedOnParameterName come from the param section.
In this tutorial, you will create a simple guardrail that can:
Add an instruction before calling the LLM.
Act on an LLM’s response and rewrite it before sending the response to the user.
Your guardrail will have two dedicated parameters: instruction for the first case,
LLM for rewriting the response, and an extraFormatting parameter for the second use case.
Code 2 shows the guardrail’s configuration.
guardrail.json#/* This file is the descriptor for custom guardrail devadv-tutorial */
{
"meta": {
"label": "Custom guardrail tutorial",
"description": "This is the description of the custom guardrail devadv-tutorial"
},
// Whether this guardrail can operate on LLM queries
"operatesOnQueriesBasedOnParameterName": "usesInstructions",
"operatesOnQueriesBasedOnParameterValue": "true",
// Whether this guardrail can operate on LLM responses
"operatesOnResponsesBasedOnParameterName": "rewriteAnswer",
"operatesOnResponsesBasedOnParameterValue": "true",
// Whether this guardrail can retry processing of responses after a failure
"mayRequestRetryOnResponses": false,
// Whether this guardrail can reply directly to queries, skipping the rest of the guardrail pipeline
"mayRespondDirectlyToQueries": false,
"params": [
{
"name": "usesInstructions",
"type": "BOOLEAN",
"label": "Operate on queries",
"defaultValue": "false"
},
{
"name": "instructions",
"type": "STRING",
"label": "Instruction to add to each query",
"defaultValue": "Please answer in one sentence.",
"visibilityCondition": "model.usesInstructions"
},
{
"name": "rewriteAnswer",
"type": "BOOLEAN",
"label": "Add extra formatting option to the answer",
"defaultValue": "false"
},
{
"name": "llm",
"type": "LLM",
"label": "LLM to use for rewriting",
"visibilityCondition": "model.rewriteAnswer"
},
{
"name": "extraFormatting",
"type": "STRING",
"label": "Additional instructions to format the answer",
"visibilityCondition": "model.rewriteAnswer"
}
]
}
Coding the Guardrail#
To code a guardrail, you must create a class derived from the BaseGuardRail class.
In this new class, the only mandatory function is process.
This is where you will code your guardrail.
You can access the plugin’s configuration by creating the set_config function.
Code 3 shows how to deal with these configuration parameters.
guardrail.py# def set_config(self, config, plugin_config):
self.usesInstructions = config.get('usesInstructions')
self.instructions = config.get('instructions', '')
self.rewriteAnswer = config.get('rewriteAnswer')
self.llm = config.get('llm', 'openai:toto:gpt-4o-mini')
self.extraFormatting = config.get('extraFormatting', '')
Code 4 shows a way to implement a guardrail, considering the configuration. Suppose you want to reduce the cost of an agent; you can activate the operatesOnQueries parameter and add “Please answer in one sentence” to each query sent to the LLM, as shown in Figure 2.
guardrail.py## This file contains the implementation of the custom guardrail devadv-tutorial
import logging
import dataiku
from dataiku.llm.guardrails import BaseGuardrail
class CustomGuardrail(BaseGuardrail):
def set_config(self, config, plugin_config):
self.usesInstructions = config.get('usesInstructions')
self.instructions = config.get('instructions', '')
self.rewriteAnswer = config.get('rewriteAnswer')
self.llm = config.get('llm', 'openai:toto:gpt-4o-mini')
self.extraFormatting = config.get('extraFormatting', '')
def process(self, input, trace):
logging.info("[------ GUARDRAIL PLUGIN -------------]")
if self.rewriteAnswer and ("completionResponse" in input):
logging.info("[-------- PLUGIN GUARDRAIL --------]: --> %s" % input["completionResponse"]["text"])
with trace.subspan("Devadvocate Guardrail Plugin") as sub:
logging.info("[-------- PLUGIN GUARDRAIL -------- SUB --------]")
llm = dataiku.api_client().get_default_project().get_llm(self.llm)
resp = llm.new_completion().with_message("This is the answer: %s --- %s" % (
input["completionResponse"]["text"], self.extraFormatting)).execute()
sub.append_trace(resp.trace)
if resp.success:
input["completionResponse"]["text"] = resp.text
elif self.usesInstructions and ("completionQuery" in input):
# do any processing and decide on an action here
question = input["completionQuery"]["messages"]
question[0]["content"] = "%s %s" % (question[0]["content"], self.instructions)
input["completionQuery"]["messages"] = question
return input
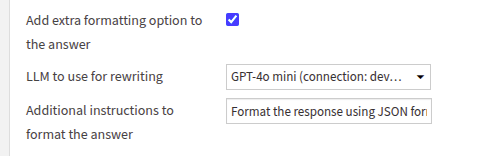
Figure 2: Option for changing the initial query.#
Suppose you want to ensure that your agent will respond using a JSON format; you can configure it, as shown in Figure 3.
Figure 3: Option for formatting the answer.#
If you want to see your guardrail in action, you can create a code agent (or a visual one if you prefer) with the code provided in Code 5. Then, add your guardrail in your agent’s Settings tab. Using the Quick test tab, you will see your guardrail modifying the query and the answer according to your settings.
code-agent.py
import dataiku
from dataiku.llm.python import BaseLLM
from dataikuapi.dss.llm import DSSLLMStreamedCompletionChunk, DSSLLMStreamedCompletionFooter
OPENAI_CONNECTION_NAME = "toto"
class MyLLM(BaseLLM):
def __init__(self):
pass
def process_stream(self, query, settings, trace):
prompt = query["messages"][0]["content"]
llm = dataiku.api_client().get_default_project().get_llm(f"openai:{OPENAI_CONNECTION_NAME}:gpt-4o-mini")
completion = llm.new_completion().with_message("You are an helpful assitant.", "system") \
.with_message(prompt)
completion.settings.update(settings)
for chunk in completion.execute_streamed():
if isinstance(chunk, DSSLLMStreamedCompletionChunk):
yield {"chunk": {"text": chunk.text}}
elif isinstance(chunk, DSSLLMStreamedCompletionFooter):
yield {"footer": chunk.data}
def process(self, query, settings, trace):
prompt = query["messages"][0]["content"]
resp_text = prompt
llm = dataiku.api_client().get_default_project().get_llm(f"openai:{OPENAI_CONNECTION_NAME}:gpt-4o-mini")
completion = llm.new_completion().with_message("You are an helpful assitant.", "system") \
.with_message(prompt)
completion.settings.update(settings)
llm_resp = completion.execute()
resp_text = llm_resp.text
return {"text": resp_text}
Conclusion#
Congratulations on finishing the tutorial on creating a custom guardrail in Dataiku. Creating a custom guardrail for a language model (LLM) greatly improves your ability to customize and refine responses based on your unique needs. Start by applying these specific guardrails to enhance your interactions with the LLM. This method ensures your queries remain precise and accurate, leading to responses that meet your expectations. The various configuration options allow for flexibility across different applications, enabling you to instruct the LLM to be brief or to follow particular formatting rules.
Here is the complete code of this tutorial:
guardrail.json
/* This file is the descriptor for custom guardrail devadv-tutorial */
{
  "meta": {
    "label": "Custom guardrail tutorial",
    "description": "This is the description of the custom guardrail devadv-tutorial"
  },

  // Whether this guardrail can operate on LLM queries
  "operatesOnQueriesBasedOnParameterName": "usesInstructions",
  "operatesOnQueriesBasedOnParameterValue": "true",
  // Whether this guardrail can operate on LLM responses
  "operatesOnResponsesBasedOnParameterName": "rewriteAnswer",
  "operatesOnResponsesBasedOnParameterValue": "true",

  // Whether this guardrail can retry processing of responses after a failure
  "mayRequestRetryOnResponses": false,
  // Whether this guardrail can reply directly to queries, skipping the rest of the guardrail pipeline
  "mayRespondDirectlyToQueries": false,

  "params": [
    {
      "name": "usesInstructions",
      "type": "BOOLEAN",
      "label": "Operate on queries",
      "defaultValue": "false"
    },
    {
      "name": "instructions",
      "type": "STRING",
      "label": "Instruction to add to each query",
      "defaultValue": "Please answer in one sentence.",
      "visibilityCondition": "model.usesInstructions"
    },
    {
      "name": "rewriteAnswer",
      "type": "BOOLEAN",
      "label": "Add extra formatting option to the answer",
      "defaultValue": "false"
    },
    {
      "name": "llm",
      "type": "LLM",
      "label": "LLM to use for rewriting",
      "visibilityCondition": "model.rewriteAnswer"
    },
    {
      "name": "extraFormatting",
      "type": "STRING",
      "label": "Additional instructions to format the answer",
      "visibilityCondition": "model.rewriteAnswer"
    }
  ]
}
guardrail.py
# This file contains the implementation of the custom guardrail devadv-tutorial
import logging
import dataiku
from dataiku.llm.guardrails import BaseGuardrail
class CustomGuardrail(BaseGuardrail):
    def set_config(self, config, plugin_config):
        self.usesInstructions = config.get('usesInstructions')
        self.instructions = config.get('instructions', '')
        self.rewriteAnswer = config.get('rewriteAnswer')
        self.llm = config.get('llm', 'openai:toto:gpt-4o-mini')
        self.extraFormatting = config.get('extraFormatting', '')
def process(self, input, trace):
logging.info("[------ GUARDRAIL PLUGIN -------------]")
if self.rewriteAnswer and ("completionResponse" in input):
logging.info("[-------- PLUGIN GUARDRAIL --------]: --> %s" % input["completionResponse"]["text"])
with trace.subspan("Devadvocate Guardrail Plugin") as sub:
logging.info("[-------- PLUGIN GUARDRAIL -------- SUB --------]")
llm = dataiku.api_client().get_default_project().get_llm(self.llm)
resp = llm.new_completion().with_message("This is the answer: %s --- %s" % (
input["completionResponse"]["text"], self.extraFormatting)).execute()
sub.append_trace(resp.trace)
if resp.success:
input["completionResponse"]["text"] = resp.text
elif self.usesInstructions and ("completionQuery" in input):
# do any processing and decide on an action here
question = input["completionQuery"]["messages"]
question[0]["content"] = "%s %s" % (question[0]["content"], self.instructions)
input["completionQuery"]["messages"] = question
return input