

Creating a custom tool
This tutorial outlines the creation of a custom tool. By default, Dataiku provides some native generic tools that are usable in Simple Visual Agents and in Code Agents As tools depend very much on a company’s business, Dataiku provides some generic tools and a way to create custom tools using Python.
Custom tools are the way to tailor tools to your company’s business. This tutorial relies on the same use case shown in Building and using an agent with Dataiku’s LLM Mesh and Langchain and LLM Mesh agentic applications. The use case involves retrieving customer information based on a provided ID and fetching additional data about the customer’s company utilizing an internet search. By the end of this tutorial, you will know how to create a custom tool and how to use it in a Visual agent.
Prerequisites
You know how to develop a plugin. In case you don’t, we recommend you to follow the Creating and configuring a plugin tutorial.
Dataiku >= 13.4
Develop plugins permission
An SQL Dataset named
pro_customers_sql. You can create this file by uploading thisCSV file.
Creating the plugin environment
To develop a custom tool, you must first create a plugin. Go to the main menu, click the Plugins menu, and select the Write your own from the Add plugin button.
Then, choose a meaningful name. For this tutorial we’ll use “toolbox”, so whenever “toolbox” is mentioned, and you named your plugin differently, replace “toolbox” with your own plugin name.
Once the plugin is created, click the Create a code environment button and select Python as the default language.
Then, navigate to the requirements.txt file, which you can find in the toolbox/code-env/python/spec directory.
In this file, add the ddgs requirement. Then click the Save All button in the top right.
Once you have saved the modification, go to the Summary tabs to build the plugin code environment. The custom tool plugin will use this code environment when the tool is used.
Head back to the Edit tab and create a new directory nested within the toolbox directory.
Name this new directory python-agent-tools.
This directory is where you code custom tools.
Usually, creating a new component is done by clicking the New component or Create your first component button and by choosing the Agent tool component. However, we will be making tools manualy in this tutorial.

Creating the first tool – Dataset Lookup
The first tool you will create is the dataset lookup tool. This tool is already provided by default in Dataiku, but for the sake of this tutorial, you will need to re-implement a new one. The default Dataiku tool is named Look up a record in a dataset. It is more configurable than the one you will create. However, understanding how to make a tool is the purpose of this tutorial. Once you know, you can adapt the tool to meet your needs.
Dataset lookup tool: used to execute SQL queries on the pro_customers_sql dataset
to retrieve customer information (name, role, company), given a customer ID.
Code 2 shows an implementation of this tool.
To create this tool, create a folder named dataset-lookup (for example) under the python-agent-tools directory.
In this folder, create two files: tool.json and tool.py.
The tool.json file contains the description of the custom tool, like any other component,
and the tool.py contains the plugin’s code.
Code 1 shows a possible configuration of this tool, and Code 2 shows how to implement it.
tool.json¶{
"id": "dataset-lookup",
"meta": {
"label": "Dataset Lookup",
"description": "Provide a name, job title and company of a customer, given the customer's ID"
},
"params" : [
]
}
Attention
The SQL query might be written differently depending on your SQL Engine.
tool.py¶from dataiku.llm.agent_tools import BaseAgentTool
import logging
import dataiku
from dataiku import SQLExecutor2
from dataiku.sql import Constant, toSQL, Dialects
class DatasetLookupTool(BaseAgentTool):
def set_config (self, config, plugin_config):
self.logger = logging.getLogger(__name__)
self.config = config
self.plugin_config = plugin_config
def get_descriptor(self, tool):
return {
"description": """Provide a name, job title and company of a customer, given the customer's ID""",
"inputSchema": {
"title": "Input for a customer id",
"type": "object",
"properties": {
"id": {
"type": "string",
"description": "The customer Id"
}
}
}
}
def invoke(self, input, trace):
self.logger.setLevel(logging.DEBUG)
self.logger.debug(input)
args = input["input"]
customerId = args["id"]
dataset = dataiku.Dataset("pro_customers_sql")
table_name = dataset.get_location_info().get('info', {}).get('quotedResolvedTableName')
executor = SQLExecutor2(dataset=dataset)
cid = Constant(str(customerId))
escaped_cid = toSQL(cid, dialect=Dialects.POSTGRES) # Replace by your DB
query_reader = executor.query_to_iter(
f"""SELECT "name", "job", "company" FROM {table_name} WHERE "id" = {escaped_cid}""")
for (name, job, company) in query_reader.iter_tuples():
return {"output" : f"""The customer's name is "{name}", holding the position "{job}" at the company named "{company}"."""}
return {"output" : f"No information can be found about the customer {customerId}"}
def load_sample_query(self, tool):
return {"id": "fdouetteau"}
Once the plugin is saved, you can find the new tool in Dataiku.
To find your new tool, go to a project where you planned to use the tool,
go to the GenAI menu, select Agent Tools, and then click the New agent tool button.
Your tool should be on the list, so you will be able to find a tool like the one shown in
Figure 1.
If your tool is not on the list, you may need to reload Dataiku to force Dataiku to reload the plugin.
The title and the description come from the label and the description highlighted in
Code 1.

Fig. 1: Custom tool visible in the list.
Choose your custom tool, and then at the bottom of the modal, set a meaningful name for this tool, such as “Get Customer Info”, and click the Create button. Your tool is ready for Dataiku to use. However, you should enter an additional description, as shown in Figure 2. For example, you could enter the following description: “Use this tool when you need to retrieve information about a customer ID. The expected output is the name, the job title, and the company.” This helps the LLM to understand in which circumstance this tool should be used.
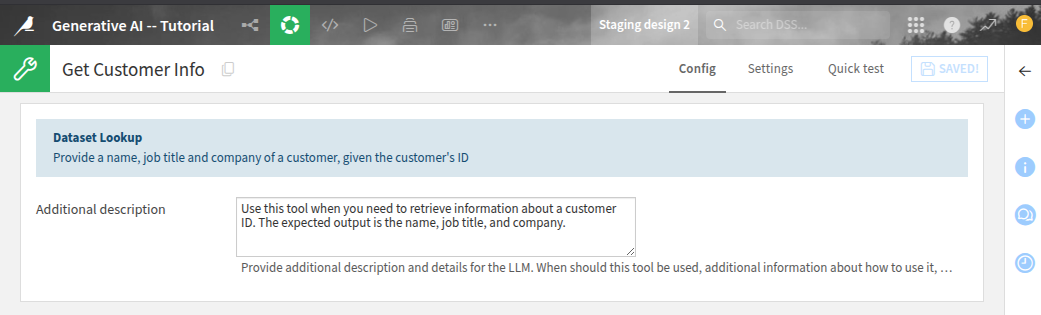
Fig. 2: Creation of a tool.
If you want to see your tool in action, provide the data you want to use, and click the Run button. If everything goes well, you should go to something similar to Figure 3.
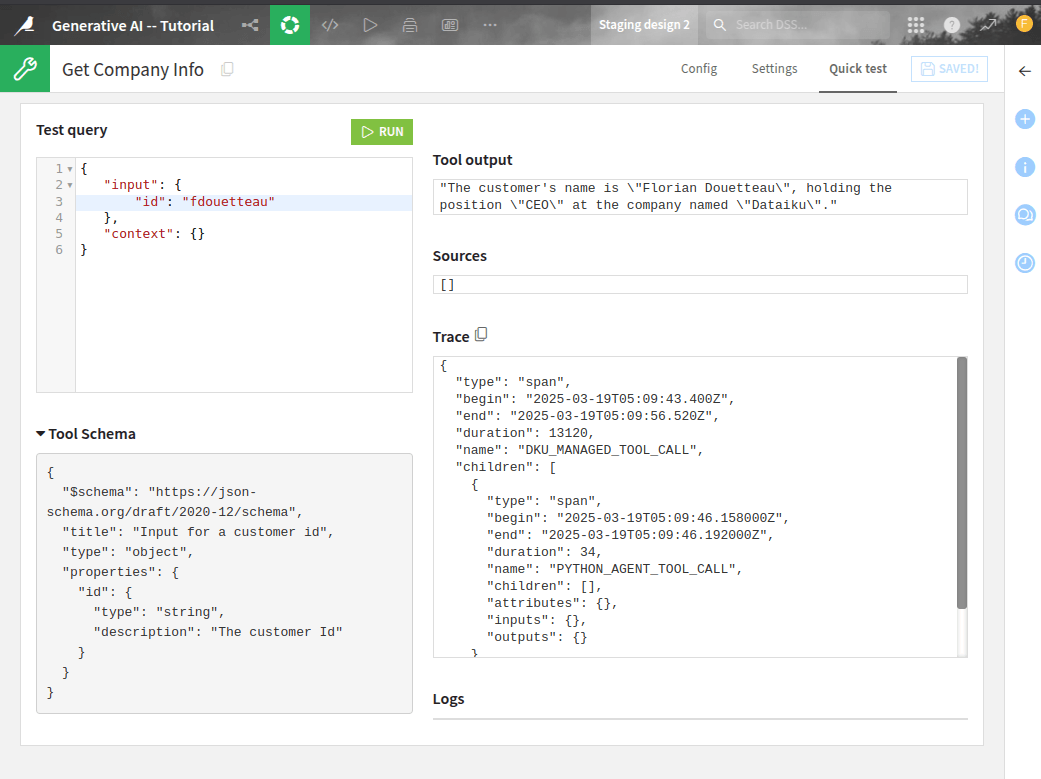
Fig. 3: Testing a tool.
The inputSchema, emphasized in Code 2,
is mandatory.
Dataiku uses it to provide the correct input to the tool.
You can find this inputSchema under the Run button, in the Tool Descriptor tab,
as shown in Figure 4.
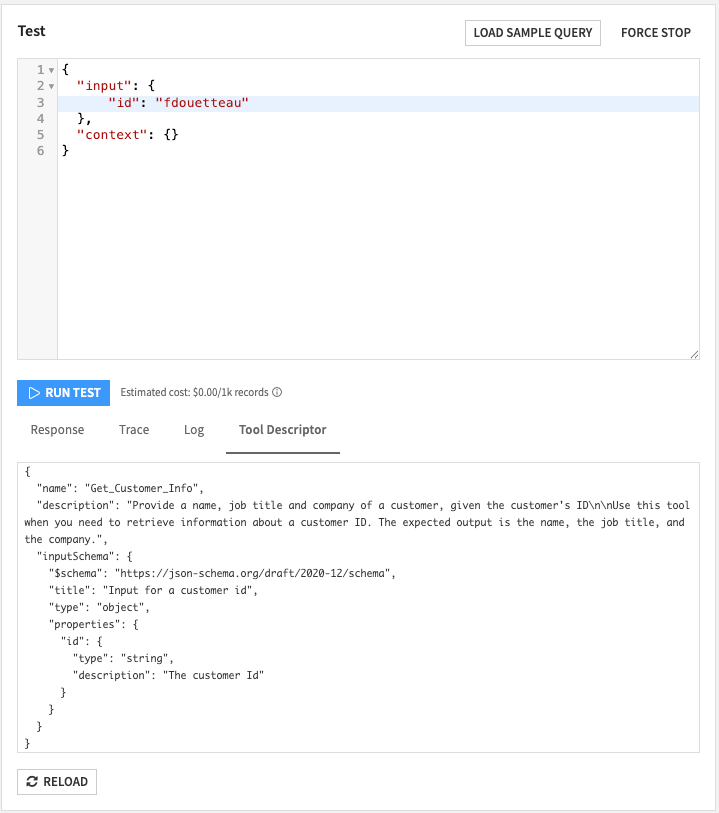
Fig. 4: Schema a tool.
Using the tool with code
After creating your custom tool, you can use it in any context where an LLM is applicable.
To list all tools that have been defined in a project,
you can use the list_agent_tools().
import dataiku

client = dataiku.api_client()
project = client.get_default_project()

project.list_agent_tools()
Running this code snippet will provide a list of all tools defined in the project. You should see your tool in this list:
[{'id': 'REDaiQN',
    'type': 'Custom_agent_tool_toolbox_internet-search',
    'name': 'Get Company Info'},
{'id': 'SOy7zKq',
    'type': 'Custom_agent_tool_toolbox_dataset-lookup',
    'name': 'Get Customer Info'}]
Once you know the tool’s ID, you can use it to call the tool, as shown in the code below:
tool = project.get_agent_tool('SOy7zKq')
tool.run({"id":"fdouetteau"})
{'output': 'The customer's name is "Florian Douetteau", holding the position "CEO" at the company named "Dataiku".',
 'trace': {'type': 'span',
  'begin': '2025-05-20T13:26:07.797Z',
  'end': '2025-05-20T13:26:07.841Z',
  'duration': 44,
  'name': 'DKU_MANAGED_TOOL_CALL',
  'children': [{'type': 'span',
    'begin': '2025-05-20T13:26:07.802000Z',
    'end': '2025-05-20T13:26:07.839000Z',
    'duration': 37,
    'name': 'PYTHON_AGENT_TOOL_CALL',
    'children': [],
    'attributes': {},
    'inputs': {},
    'outputs': {}}],
  'attributes': {'toolProjectKey': 'PROGRAMMATICRAGWITHDATAIKUSLLMMESHANDLANGCHAIN',
   'toolId': 'SOy7zKq',
   'toolType': 'Custom_agent_tool_devadv-plugin'}},
 'sources': []}
Wrapping up
Congratulations! You now know how to create a custom tool and declare it usable by Dataiku. You can now create a second tool (for searching over the internet) and follow the Leveraging a custom tool in a Visual Agent tutorial. Below, you will find a possible implementation of this tool.
Creating the second tool – Internet search
The second tool you will create is also provided by Dataiku, which uses Google to search for information on the Internet. In this tutorial, you will make a “Get Company Info” tool that uses the DuckDuckGo search engine. The process to create the second tool is the same as the previous one.
Create a folder named internet-search (for example) under the python-agent-tools,
and create also the two files: tool.json and tool.py.
You will find a default implementation in codes
3
and 4, respectively.
Code 3: Internet Search – tool.json
tool.json¶{
"id": "internet-search",
"meta": {
"label": "Internet search",
"description": "Provide general information about a company, given the company's name."
},
"params" : [
]
}
Code 4: Internet Search – tool.py
tool.py¶from dataiku.llm.agent_tools import BaseAgentTool
import logging
import dataiku
from ddgs import DDGS
class InternetSearchTool(BaseAgentTool):
def set_config (self, config, plugin_config):
self.logger = logging.getLogger(__name__)
self.config = config
self.plugin_config = plugin_config
def get_descriptor(self, tool):
return {
"description": """Provide general information about a company, given the company's name.""",
"inputSchema": {
"title": "Input for a company",
"type": "object",
"properties": {
"company": {
"type": "string",
"description": "The company you need info on"
}
}
}
}
def invoke(self, input, trace):
self.logger.info(input)
args = input["input"]
company_name = args["company"]
with DDGS() as ddgs:
results = list(ddgs.text(f"{company_name} (company)", max_results=1))
if results:
return {"output" : f"Information found about {company_name}: {results[0]['body']}"}
return {"output": f"No information found about {company_name}"}
def load_sample_query(self, tool):
return {"company": "Dataiku"}
After creating the second tool, return to your project and follow the steps as previously explained how to use your tool, either through the GenAI interface or through code.
When creating an Agent Tool in the GenAI section, you will have to use this payload for testing a call to your plugin tool.
{
"input": {
    "company": "dataiku"
},
"context": {}
}
Reference documentation
Functions
|
Get a handle to interact with a specific tool |
|
|
|
Execute a tool call |