

Deploying a model to an edge device with AWS IoT Greengrass#
In this tutorial you will see how to set up a Raspberry Pi edge device, connect it to AWS IoT Greengrass, package a Dataiku Saved Model as a python function, then deploy it as an inferencing component to the edge device via Greengrass.
Prerequisites#
Dataiku >= 13.1.0
A Project in which you already deployed a Saved Model version trained on the Bank Marketing Dataset
An AWS account and the minimum IAM permissions to provision IoT Greengrass resources (listed here)
A Raspberry Pi device with Raspberry Pi OS that you can SSH into
Introduction#
For some use cases, you may want to deploy a model to an edge device for inference rather than as an API service endpoint.
With edge deployment often comes device resource constraints, sporadic connectivity, and deployment orchestration challenges.
To solve these challenges, you can use one of the many Dataiku Saved Model export options and then distribute the model using an edge deployment service.
AWS IoT Greengrass is a popular open-source edge runtime and cloud service for building, deploying, and managing device software.
In this tutorial you will see how to set up a Raspberry Pi edge device, connect it to AWS IoT Greengrass, package a Dataiku Saved Model as a Python function, and deploy it as an inferencing component to the edge device via Greengrass. This tutorial contains a no-code plugin approach and a full-code custom Python approach.
Dataset and model#
This tutorial is based on a model trained on the Bank Marketing Dataset
to predict whether a given client will subscribe to a term deposit (column y).
You should already have it in your Flow as a Saved Model version.
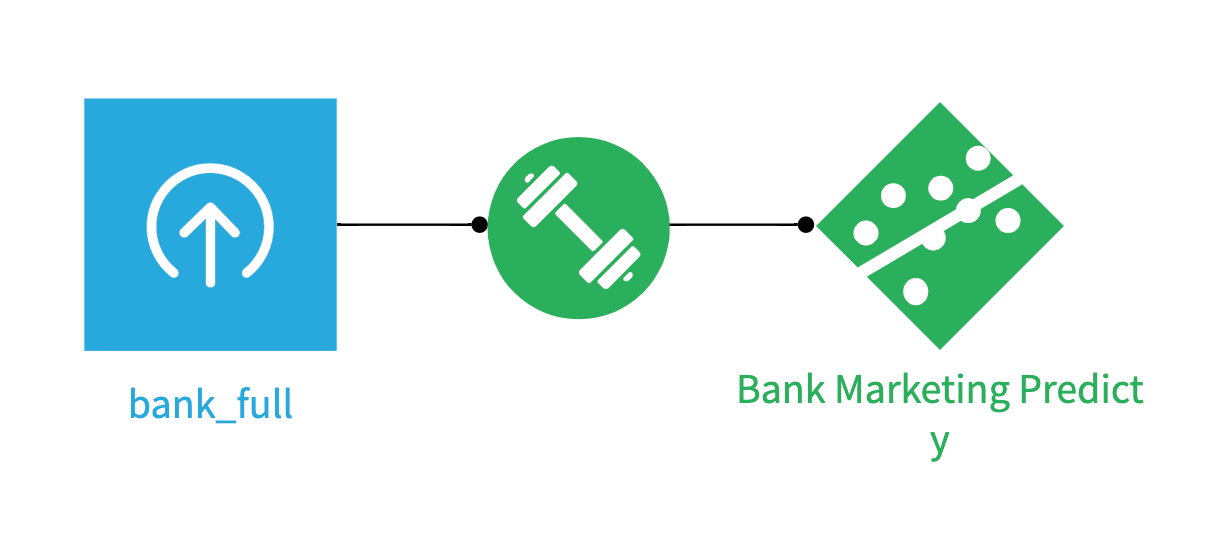
Figure 1 – Dataiku Flow with Saved Model#
Setting up the Edge Device (Raspberry Pi) as a Core Device and Thing in AWS IoT Greengrass#
Note
These instructions roughly follow the AWS IoT Greengrass Developer Guide, Version 2. Check that guide for differences in setup (e.g. a Windows edge device instead of Raspberry Pi) and troubleshooting help.
SSH into the edge device (where
usernameis your Linux user andpi-ip-addressis your Raspberry Pi IP address, which you can find withping raspberry.localif connected on the same network).ssh username@pi-ip-addressInstall the Java runtime, which AWS IoT Greengrass Core software requires.
sudo apt install default-jdk
When the installation is complete, run the following command to verify that Java runs on your Raspberry Pi.
java -versionThe command prints the version of Java that runs on the device. The output might look similar to the following example.
openjdk version "17.0.13" 2024-10-15
OpenJDK Runtime Environment (build 17.0.13+11-Debian-2deb12u1)
OpenJDK 64-Bit Server VM (build 17.0.13+11-Debian-2deb12u1, mixed mode, sharing)
Update the Linux kernel parameters by opening this file.
sudo nano /boot/firmware/cmdline.txt
Verify that the
/boot/firmware/cmdline.txtfile contains the following kernel parameters. If it doesn’t contain these parameters or it contains these parameters with different values, update the file to contain these parameters and values.cgroup_enable=memory cgroup_memory=1 systemd.unified_cgroup_hierarchy=0
If you updated the
/boot/firmware/cmdline.txtfile, reboot the Raspberry Pi to apply the changes (then SSH back into it).sudo reboot ssh username@pi-ip-address
Install the AWS CLI.
sudo apt install awscli
Add your AWS credentials to the Raspberry Pi environment. Ensure you have the minimum permissions listed here.
export AWS_ACCESS_KEY_ID=AKIAIOSFODNN7EXAMPLE
export AWS_SECRET_ACCESS_KEY=wJalrXUtnFEMI/K7MDENG/bPxRfiCYEXAMPLEKEY
export AWS_SESSION_TOKEN=AQoDYXdzEJr1K...o5OytwEXAMPLE=
export AWS_DEFAULT_REGION=us-east-2
Make sure you’re in the user home directory.
cd ~
Download the AWS IoT Greengrass Core software.
curl -s https://d2s8p88vqu9w66.cloudfront.net/releases/greengrass-nucleus-latest.zip > greengrass-nucleus-latest.zip
Unzip the AWS IoT Greengrass Core software to a folder on your device. In this case, we used
GreengrassInstaller.unzip greengrass-nucleus-latest.zip -d GreengrassInstaller && rm greengrass-nucleus-latest.zip
Launch the AWS IoT Greengrass Core software installer. We use the Greengrass thing name
DataikuGreengrassRaspberryPi, the thing group nameDataikuGreengrassRaspberryPiGroup, and theus-east-2region. Feel free to change these.sudo -E java -Droot="/greengrass/v2" -Dlog.store=FILE \ -jar ./GreengrassInstaller/lib/Greengrass.jar \ --aws-region us-east-2 \ --thing-name DataikuGreengrassRaspberryPi \ --thing-group-name DataikuGreengrassRaspberryPiGroup \ --thing-policy-name GreengrassV2IoTThingPolicy \ --tes-role-name GreengrassV2TokenExchangeRole \ --tes-role-alias-name GreengrassCoreTokenExchangeRoleAlias \ --component-default-user ggc_user:ggc_group \ --provision true \ --setup-system-service true \ --deploy-dev-tools true
Running this command should print out several messages. Check that the last four lines look like this:
Successfully configured Nucleus with provisioned resource details!
Creating a deployment for Greengrass first party components to the thing group
Configured Nucleus to deploy aws.greengrass.Cli component
Successfully set up Nucleus as a system service
Confirm that the Greengrass CLI was installed (it may take a minute).
/greengrass/v2/bin/greengrass-cli help
Check the status of your new core device Thing (
DataikuGreengrassRaspberryPi).aws greengrassv2 list-effective-deployments --core-device-thing-name DataikuGreengrassRaspberryPi
You should see JSON. Look for this key pair to confirm that the deployment succeeded:
"coreDeviceExecutionStatus": "SUCCEEDED".You’ll also see
DataikuGreengrassRaspberryPiin the AWS Console under Greengrass -> Core devices.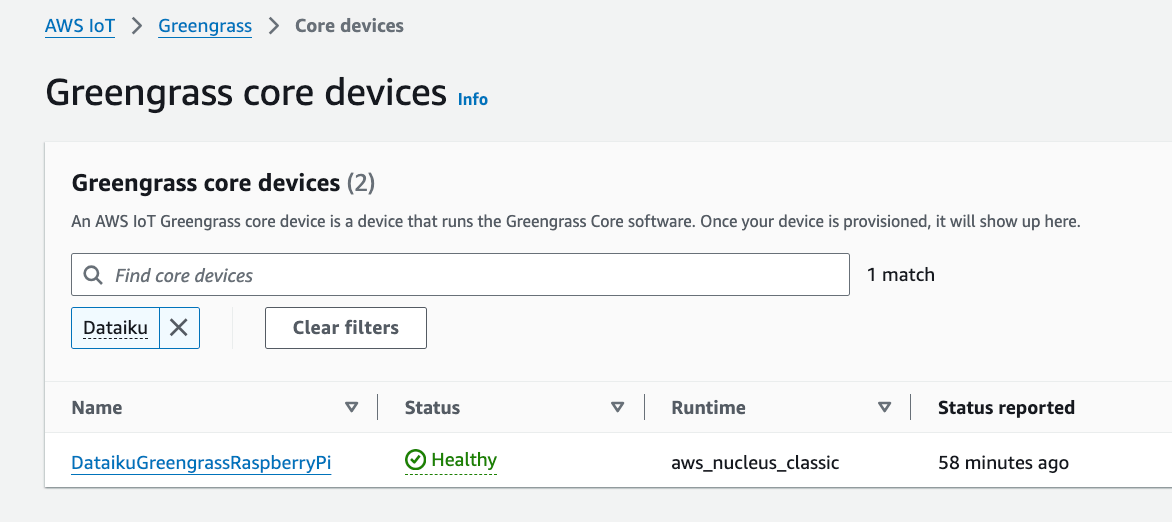
Figure 2 – Greengrass Core Device#
In the AWS console, create a new IAM policy (you can call it
DataikuGreengrassComponentArtifactPolicy), and grant thes3:GetObjectpermission on an S3 bucket that Dataiku has write access to (replaceDKU_S3_BUCKETwith your bucket name).{ "Version": "2012-10-17", "Statement": [ { "Effect": "Allow", "Action": [ "s3:GetObject" ], "Resource": "arn:aws:s3:::DKU_S3_BUCKET/*" } ] }
Attach this policy to the IAM Role
GreengrassV2TokenExchangeRolethat you created earlier. This way, your IoT devices can pull down the model component artifacts from S3.Finally, copy a CSV of sample records to the Raspberry Pi filesystem in the
/dataiku_scoring_datasubdirectory. Make sure to name the fileinput_data_for_scoring.csv. Our model scoring component will look for this specific file name in this particular location on the device. You can, of course, customize this yourself later on.You can start by exporting the training dataset locally - here, I’m taking just the first 100 records to keep things speedy.
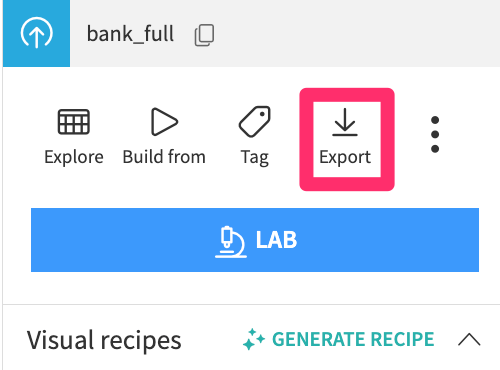
Figure 3 – Dataiku Dataset Export#
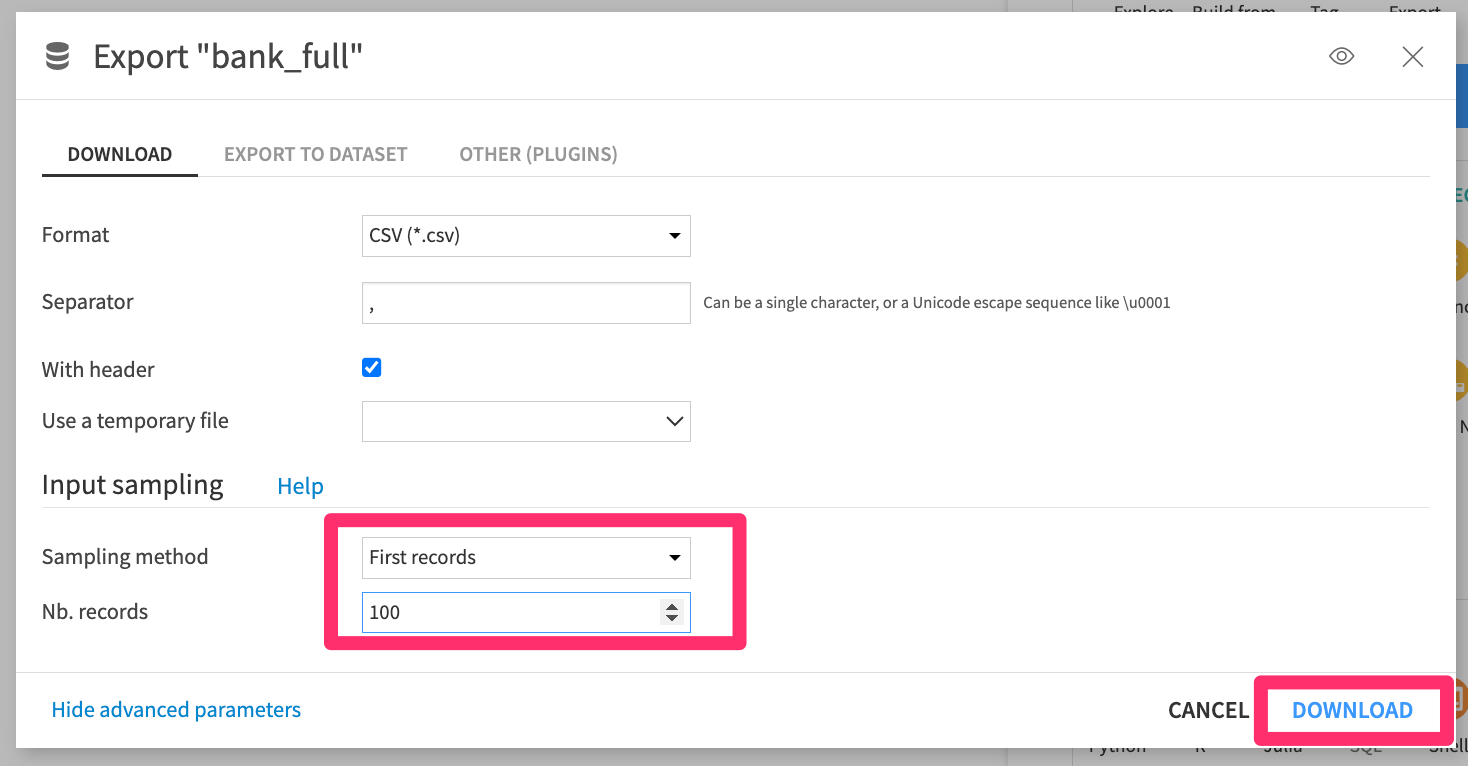
Figure 4 – Dataiku Dataset Export Sampling#
On the Raspberry Pi, create the
/dataiku_scoring_data directoryand open up permissions.sudo mkdir /dataiku_scoring_data sudo chmod -R 777 /dataiku_scoring_data
Rename the exported file as
input_data_for_scoring.csv, then scp it from your local machine to the Raspberry Pi.scp ~/Downloads/input_data_for_scoring.csv username@pi-ip-address:/dataiku_scoring_data
Deploying a Dataiku Model as a Component to Greengrass Devices#
Now that the Raspberry Pi has been set up as a Core Device and Thing in IoT Greengrass, we’ll now take our Dataiku Saved Model, wrap it into a scoring service, turn that scoring service into a Greengrass component, then deploy the component to our device.
The scoring service, called score_edge.py,
will read a CSV file from a known path on the device (/dataiku_scoring_data/input_data_for_scoring.csv),
load the trained model, and produce an enriched output file,
also on the device (/dataiku_scoring_data/output_data_with_predictions.csv), with the prediction results.
The script will essentially be a CLI tool that will accept four arguments:
the path to the input file,
the path to the exported model to use for scoring,
the desired path for the generated output file,
an optional flag to generate the predicted probabilities for each class.
We’ll now use the Dataiku APIs and AWS Greengrass SDKs to deploy a Dataiku Saved Model to an edge device service.
Important
Installing the plugin and configuring AWS credentials requires Dataiku Administrator privileges.
Install this plugin. It will prompt you to build a plugin code environment.
Go to the plugin Settings > AWS configuration presets and enter the AWS Access Key ID, Secret Access Key, Session Token (if required), and AWS region. These credentials should have
"greengrass:*"on"Resource": "*"permissions to create, delete, modify, and list Greengrass components and deployments.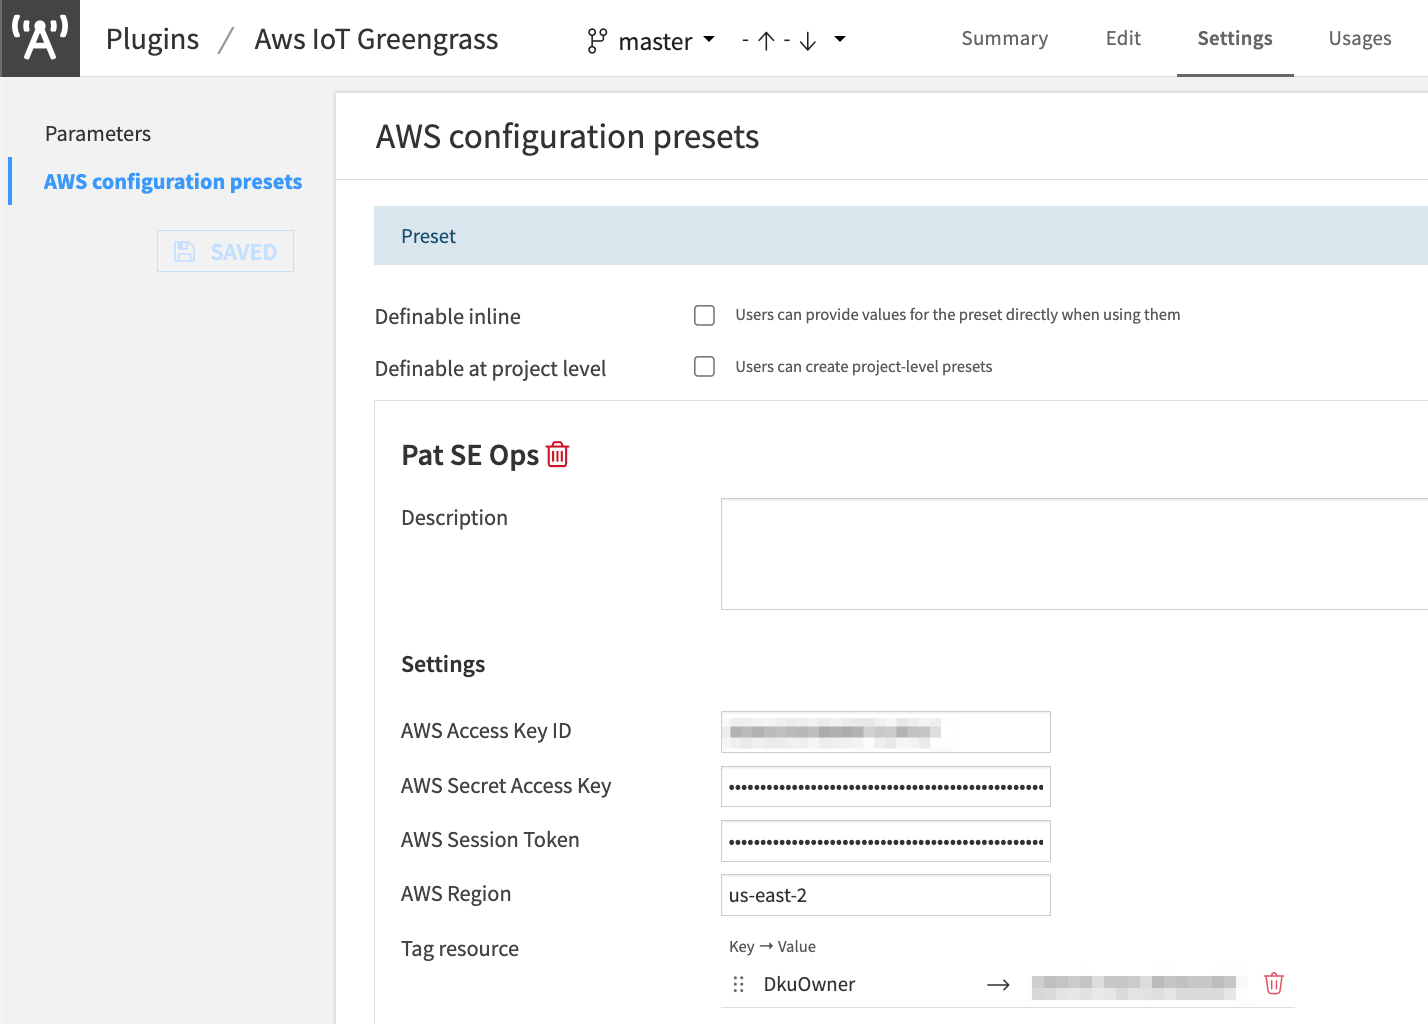
Figure 5 – Plugin AWS Configuration Presets#
Click + Recipe > AWS IoT Greengrass > Deploy to Greengrass Devices.
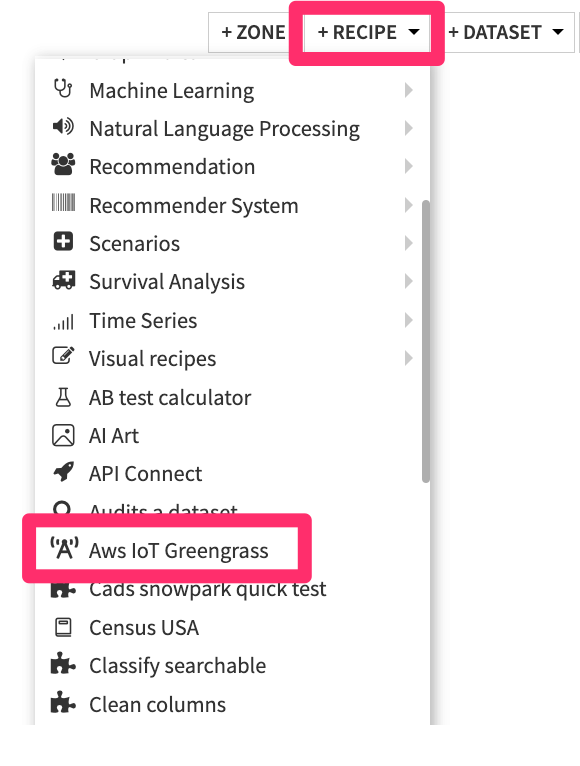
Figure 6 – Find Plugin Recipe#
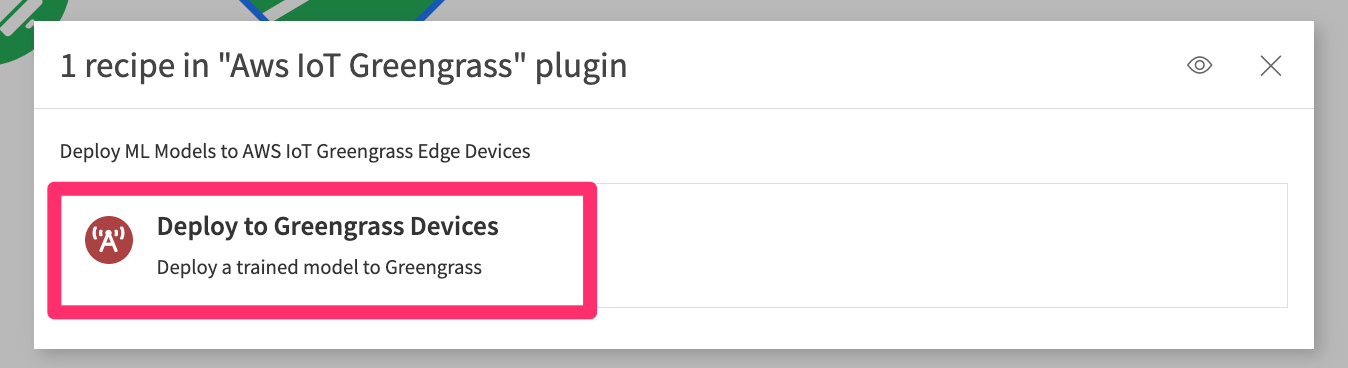
Figure 7 – Create Plugin Recipe#
Choose your Saved Model as an input, and create a new folder in an S3 connection (this connection should link to the bucket on which your Greengrass device has
S3:GetOjectpermission).
Figure 8 – Plugin Recipe Input/Output#
Choose your AWS configuration in the plugin recipe settings and enter the ARN for the Greengrass Thing (or Thing Group) just created. You can find this in the AWS console (e.g.,
arn:aws:iot:REGION:AWS_ACCOUNT:thing/DataikuGreengrassRaspberryPi).You can leave the component name and version as
DataikuScoreEdgeand1.0.0or change them.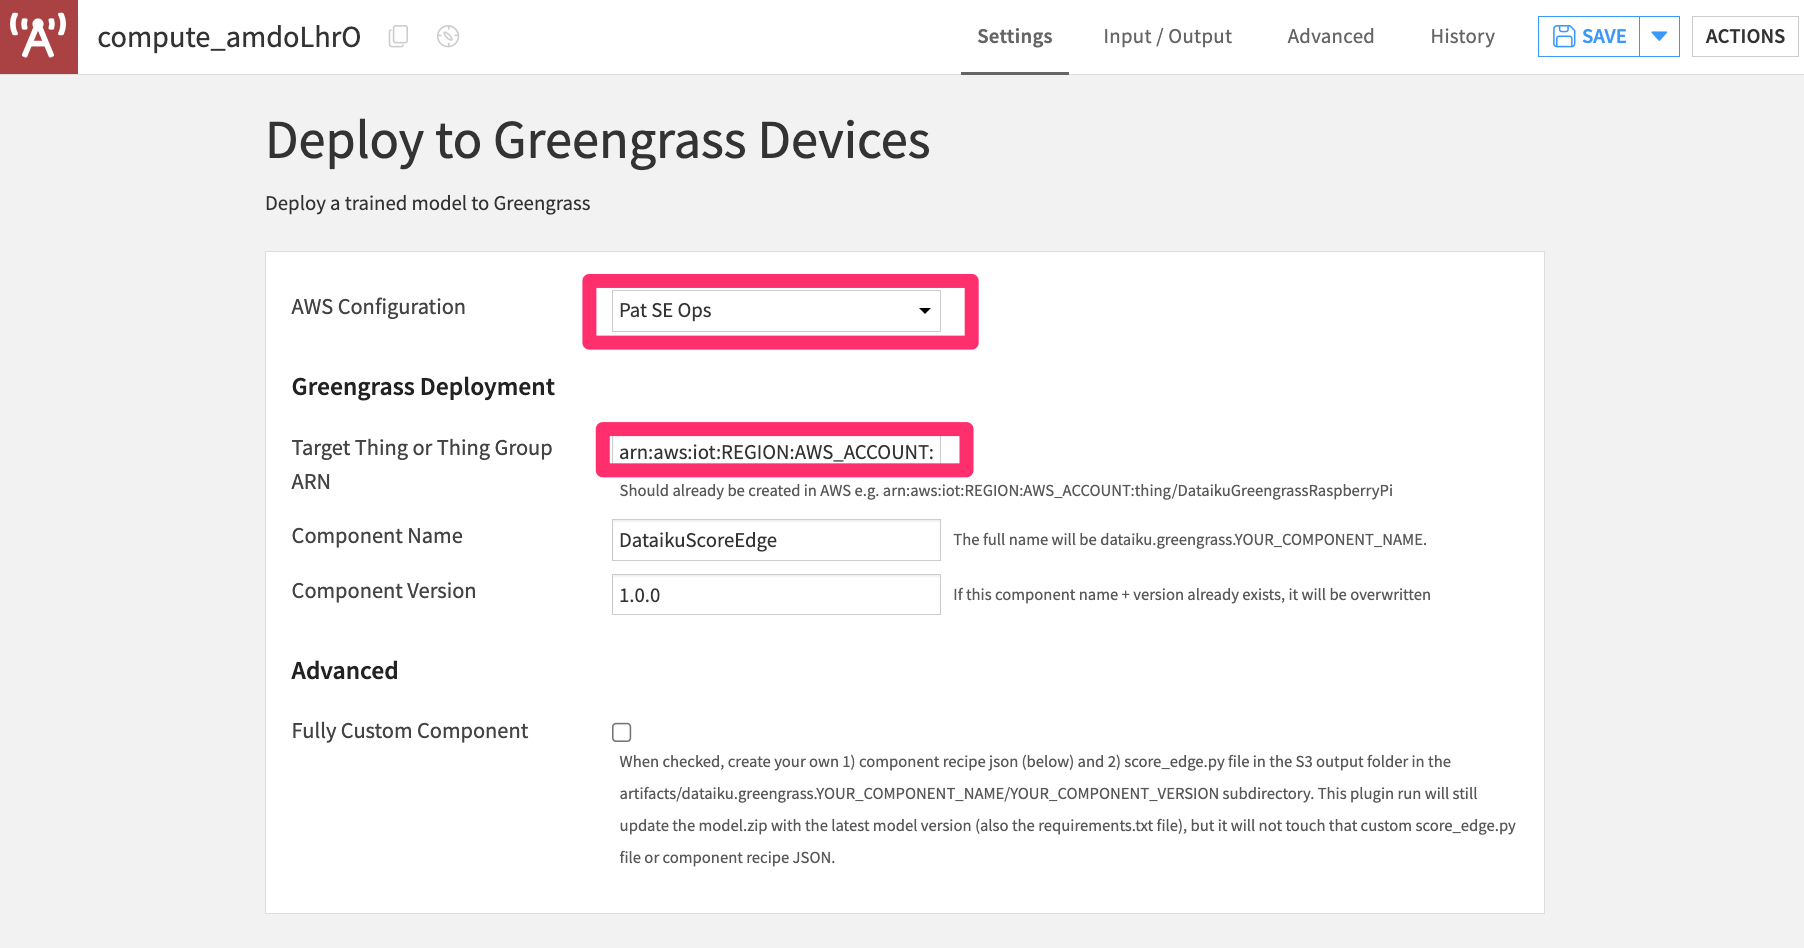
Figure 9 – Plugin Recipe Settings#
The plugin, by default, will create the scoring component we described earlier.
Note
If you’d like to customize the component, check Fully Custom Component, write your component recipe JSON directly in the plugin recipe, and upload your
score_edge.pyfile to the output S3 folder, specifically in the subdirectoryartifacts/dataiku.greengrass.YOUR_COMPONENT_NAME/YOUR_COMPONENT_VERSION. The plugin will handle packaging the Dataiku Saved model and uploading it to the S3 directory asmodel.zipand output therequirements.txtfile.AWS has documentation and a tutorial on custom Greengrass components.
Run the recipe, and check out the output folder. You should see a file
greengrass_component_deployment_status.txtwith the deployment status details. Look for"coreDeviceExecutionStatus": "SUCCEEDED"when deploying to a Thing, and"deploymentStatus": "ACTIVE"when deploying to a Thing Group.
Figure 10 – Dataiku Flow with Greengrass Deployment#
You should see
model.zip,score_edge.py, andrequirements.txtin the output folder in the subpathartifacts/dataiku.greengrass.YOUR_COMPONENT_NAME/YOUR_COMPONENT_VERSION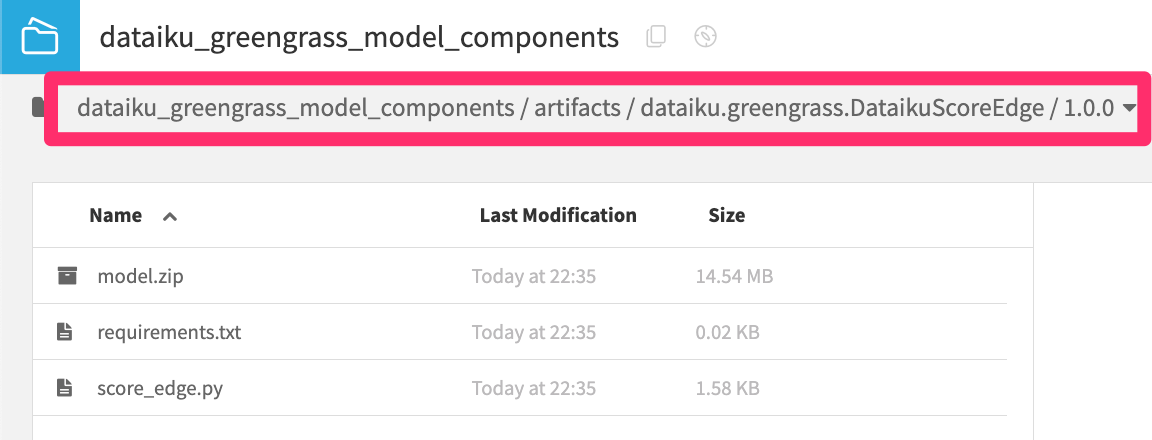
Figure 11 – Output Folder with Component Files#
Create a Python code environment and install the
boto3package to interact with AWS resources. We’ve tested this with Python 3.9 and Pandas 2.2 core packages; you can feel free to try others.Import the necessary packages.
import dataiku
import pandas as pd
import boto3
import json
import zipfile
import tempfile
import time
import re
Set variables to point to your Saved Model and S3 folder, and define the new Greengrass component. Then, get your AWS credentials.
saved_model_id = "YOUR_SAVED_MODEL_ID" # Must be a Binary Classification, Multiclass, or Regression model
s3_folder_name = "YOUR_OUTPUT_S3_FOLDER" # Create this folder in your flow beforehand. Must be S3
target_device_arn = "arn:aws:iot:REGION:AWS_ACCOUNT:thing/DataikuGreengrassRaspberryPi" # Target Greengrass Thing or Thing Group ARN
component_name = "dataiku.greengrass.DataikuScoreEdge" # Name of the Greengrass component
component_version = "1.0.0" # Greengrass component version
Set your AWS credentials, then get a boto3 session and GreengrassV2 client.
# AWS credentials (Please fill in with your keys)
aws_access_key = ""
aws_secret_access_key = ""
aws_session_token = ""
aws_region = "us-east-2"

# Get AWS boto3 session and Greengrass V2 client
boto_session = boto3.Session(
    aws_access_key_id=aws_access_key_id,
    aws_secret_access_key=aws_secret_access_key,
    aws_session_token=aws_session_token,
    region_name=aws_region
)
greengrassv2_client = boto_session.client('greengrassv2')
Get a Dataiku API client and project handle.
# Get a Dataiku API client
client = dataiku.api_client()
project = client.get_default_project()
Get your output S3 folder path and set the path for generated Greengrass component artifacts.
# Get the output S3 folder to hold Greengrass component artifacts
s3_folder = dataiku.Folder(s3_folder_name)
s3_folder_info = s3_folder.get_info()
s3_bucket = s3_folder_info['accessInfo']['bucket']

# Get the output S3 folder root path
s3_bucket_path_to_component = "s3://" + s3_bucket + s3_folder_info['accessInfo']['root']

# Get the S3 folder path to store Greengrass component artifacts
s3_path_artifacts_prefix = f'artifacts/{component_name}/{component_version}/'
Package the input Saved Model as a Python function, upload the .zip file to the S3 folder artifact path, and unzip it.
# Get the input saved model active version details
model = project.get_saved_model(saved_model_id)
latest_model_version = model.get_active_version()
model_version_details = model.get_version_details(latest_model_version['id'])

# Get a python export of the active model version as a stream
with model_version_details.get_scoring_python_stream() as stream:

    # Upload the raw .zip python export to the S3 folder
    model_export_full_zip_s3_path = s3_path_artifacts_prefix + 'model_export_full.zip'
    s3_folder.upload_stream(model_export_full_zip_s3_path, stream)

    # Then take that raw .zip file from S3 as a stream
    with s3_folder.get_download_stream(model_export_full_zip_s3_path) as stream_2:

        # Create a temporary file to store the zip contents
        with tempfile.NamedTemporaryFile(mode='wb', delete=False) as temp:
            temp.write(stream_2.read())
            temp.flush()

    # Unzip the raw .zip file
    with zipfile.ZipFile(temp.name) as zip_file:
        # Upload all extracted files from the .zip to S3
        for file_name in zip_file.namelist():
            with zip_file.open(file_name) as extracted_file:
                file_full_zip_s3_path = s3_path_artifacts_prefix + file_name
                s3_folder.upload_stream(file_full_zip_s3_path, extracted_file)
Delete the initial raw .zip python model export and the generated sample.py script.
s3_folder.delete_path(model_export_full_zip_s3_path)
sample_py_s3_path = s3_path_artifacts_prefix + 'sample.py'
s3_folder.delete_path(sample_py_s3_path)
Create a new
score_edge.pyscript and upload it to the S3 folder artifact path.# New scoring .py script - works for Classification models score_edge_py_class_text = """ import click import pandas as pd from dataikuscoring import load_model @click.command() @click.option("-i", "--input-file", type=click.Path(exists=True), help="Path to the input file") @click.option("-o", "--output-file", type=click.File(mode='w'), help="Path to the generated output file") @click.option("-m", "--model-file", type=click.Path(exists=True), help="Path to the model to use for predictions") @click.option("--proba", is_flag=True, help="Output predicted probability columns for each class") def score(input_file, output_file, model_file, proba): \""" Scoring CLI: computes predictions from CSV file records using a trained model exported from Dataiku. \""" # Load model: model = load_model(model_file) # Load input file data in a pandas DataFrame df = pd.read_csv(input_file, sep=None, engine='python') if proba: # Compute probabilities for each class predictions = model.predict_proba(df) for label in predictions.keys(): proba_col = f"proba_{label}" df[proba_col] = predictions[label] else: # Compute predictions df["predictions"] = model.predict(df) df_length = len(df.index) print(f"Made {df_length} predictions") print("First 5 predictions....") print(df.head(5)) print(f"Saving predictions to {output_file}") # Write result to output file df.to_csv(output_file) if __name__ == "__main__": score() """ score_edge_py_s3_path = s3_path_artifacts_prefix + 'score_edge.py' # Write the new score_edge.py script to the S3 folder with s3_folder.get_writer(score_edge_py_s3_path) as score_edge_py_writer: score_edge_py_writer.write(score_edge_py_class_text.encode('utf8'))
Get the paths to the 3 component files in S3 (
score_edge.py,requirements.txt, andmodel.zip).score_edge_py_full_s3_path = s3_bucket_path_to_component + "/" + score_edge_py_s3_path requirements_txt_full_s3_path = s3_bucket_path_to_component + "/" + s3_path_artifacts_prefix + 'requirements.txt' model_zip_full_s3_path = s3_bucket_path_to_component + "/" + s3_path_artifacts_prefix + 'model.zip'
Create a new Greengrass component defining the component name/version, Python run script, edge device scoring input/output files, and the artifact files you just uploaded to S3.
# Create the Greengrass component recipe JSON
dataiku_scoring_greengrass_component_recipe_json = {
  "RecipeFormatVersion": "2020-01-25",
  "ComponentName": component_name,
  "ComponentVersion": component_version,
  "ComponentDescription": "An AWS IoT Greengrass component to score a record using an ML model trained in Dataiku and exported as a python function.",
  "ComponentPublisher": "Dataiku",
  "ComponentConfiguration": {
    "DefaultConfiguration": {
      "InputFile": "/dataiku_scoring_data/input_data_for_scoring.csv",
      "OutputFile": "/dataiku_scoring_data/output_data_with_predictions.csv"
    }
  },
  "Manifests": [
    {
      "Platform": {
        "os": "linux"
      },
      "Lifecycle": {
        "Install": {
          "Script": "python3 -m venv dataiku-scoring-env && . dataiku-scoring-env/bin/activate && pip3 install -r {artifacts:path}/    requirements.txt && pip3 install click pandas"
        },
        "Run": ". dataiku-scoring-env/bin/activate && python3 -u {artifacts:path}/score_edge.py --input-file {configuration:/    InputFile} --output-file {configuration:/OutputFile} --model-file {artifacts:path}/model.zip --proba"
      },
      "Artifacts": [
        {
          "URI": score_edge_py_full_s3_path
        },
        {
          "URI": requirements_txt_full_s3_path
        },
        {
          "URI": model_zip_full_s3_path
        }
      ]
    }
  ]
}

# Convert JSON to bytes
dataiku_scoring_greengrass_component_recipe_bytes = json.dumps(dataiku_scoring_greengrass_component_recipe_json).encode('utf-8')

# Create the new Greengrass component version
create_component_version_response = greengrassv2_client.create_component_version    (inlineRecipe=dataiku_scoring_greengrass_component_recipe_bytes)
Note
If this component name and version already exists you’ll need to use a different name or version or delete the component version with
delete_component_version_response = greengrassv2_client.delete_component(arn="YOUR_COMPONENT_VERSION_AWS_ARN")Check the component - run this until you see
"componentState": "DEPLOYABLE".# Get the generated component version ARN component_arn = create_component_version_response['arn'] # Check the component to see if it is deployable or failed (or still building) component_description = greengrassv2_client.describe_component(arn=component_arn)
Deploy the component to your edge device.
# Create the Greengrass component deployment json
dataiku_scoring_greengrass_component_deployment_json = {
    component_name: {
      "componentVersion": component_version
    }
}

# Convert to bytes
dataiku_scoring_greengrass_component_deployment_bytes = json.dumps(dataiku_scoring_greengrass_component_deployment_json).encode    ('utf-8')

# Deploy the new Greengrass component to the target Thing or Thing Group ARN
create_deployment_response = greengrassv2_client.create_deployment(targetArn=target_device_arn,     components=dataiku_scoring_greengrass_component_deployment_json)
Get the status of the deployment - run this until you see
"coreDeviceExecutionStatus": "COMPLETED" or "SUCCEEDED".# target_device_name = re.search('.*thing\/(.*)', target_device_arn).group(1) target_device_effective_deployments = greengrassv2_client.list_effective_deployments(coreDeviceThingName=target_device_name) ['effectiveDeployments']
Your model is now deployed to the edge device!
If you return to the Raspberry Pi, check out the newly-created
/dataiku_scoring_data/output_data_with_predictions.csvfile. You should see new columnms:y,proba_no, andproba_yes!head /dataiku_scoring_data/output_data_with_predictions.csv,age,job,marital,education,default,balance,housing,loan,contact,day,month,duration,campaign,pdays,previous,poutcome,y,proba_no,proba_yes 0,58,management,married,tertiary,no,2143,yes,no,unknown,5,may,261,1,-1,0,unknown,no,0.7902615833178168,0.20973841668218327 1,44,technician,single,secondary,no,29,yes,no,unknown,5,may,151,1,-1,0,unknown,no,0.9492253983155636,0.05077460168443629 2,33,entrepreneur,married,secondary,no,2,yes,yes,unknown,5,may,76,1,-1,0,unknown,no,0.9776448216311145,0.022355178368885495 3,47,blue-collar,married,unknown,no,1506,yes,no,unknown,5,may,92,1,-1,0,unknown,no,0.9399339872642072,0.0600660127357929 4,33,unknown,single,unknown,no,1,no,no,unknown,5,may,198,1,-1,0,unknown,no,0.7108691615326147,0.28913083846738563 5,35,management,married,tertiary,no,231,yes,no,unknown,5,may,139,1,-1,0,unknown,no,0.9303409148558117,0.06965908514418874 6,28,management,single,tertiary,no,447,yes,yes,unknown,5,may,217,1,-1,0,unknown,no,0.9183141566941998,0.08168584330580009 7,42,entrepreneur,divorced,tertiary,yes,2,yes,no,unknown,5,may,380,1,-1,0,unknown,no,0.8124177326615576,0.18758226733844252 8,58,retired,married,primary,no,121,yes,no,unknown,5,may,50,1,-1,0,unknown,no,0.9897293390906106,0.010270660909389544
You can also check the deployment logs.
sudo tail -f /greengrass/v2/logs/dataiku.greengrass.DataikuScoreEdge.log
2025-02-04T14:37:47.470Z [INFO] (Copier) dataiku.greengrass.DataikuScoreEdge: stdout. age           job  marital  education  ... poutcome   y  proba_no proba_yes. {scriptName=services.dataiku.greengrass.DataikuScoreEdge.lifecycle.Run, serviceName=dataiku.greengrass.DataikuScoreEdge, currentState=RUNNING}
2025-02-04T14:37:47.470Z [INFO] (Copier) dataiku.greengrass.DataikuScoreEdge: stdout. 0   58    management  married   tertiary  ...  unknown  no  0.790262  0.209738. {scriptName=services.dataiku.greengrass.DataikuScoreEdge.lifecycle.Run, serviceName=dataiku.greengrass.DataikuScoreEdge, currentState=RUNNING}
2025-02-04T14:37:47.471Z [INFO] (Copier) dataiku.greengrass.DataikuScoreEdge: stdout. 1   44    technician   single  secondary  ...  unknown  no  0.949225  0.050775. {scriptName=services.dataiku.greengrass.DataikuScoreEdge.lifecycle.Run, serviceName=dataiku.greengrass.DataikuScoreEdge, currentState=RUNNING}
2025-02-04T14:37:47.471Z [INFO] (Copier) dataiku.greengrass.DataikuScoreEdge: stdout. 2   33  entrepreneur  married  secondary  ...  unknown  no  0.977645  0.022355. {scriptName=services.dataiku.greengrass.DataikuScoreEdge.lifecycle.Run, serviceName=dataiku.greengrass.DataikuScoreEdge, currentState=RUNNING}
2025-02-04T14:37:47.472Z [INFO] (Copier) dataiku.greengrass.DataikuScoreEdge: stdout. 3   47   blue-collar  married    unknown  ...  unknown  no  0.939934  0.060066. {scriptName=services.dataiku.greengrass.DataikuScoreEdge.lifecycle.Run, serviceName=dataiku.greengrass.DataikuScoreEdge, currentState=RUNNING}
2025-02-04T14:37:47.473Z [INFO] (Copier) dataiku.greengrass.DataikuScoreEdge: stdout. 4   33       unknown   single    unknown  ...  unknown  no  0.710869  0.289131. {scriptName=services.dataiku.greengrass.DataikuScoreEdge.lifecycle.Run, serviceName=dataiku.greengrass.DataikuScoreEdge, currentState=RUNNING}
2025-02-04T14:37:47.473Z [INFO] (Copier) dataiku.greengrass.DataikuScoreEdge: stdout. {scriptName=services.dataiku.greengrass.DataikuScoreEdge.lifecycle.Run, serviceName=dataiku.greengrass.DataikuScoreEdge, currentState=RUNNING}
2025-02-04T14:37:47.474Z [INFO] (Copier) dataiku.greengrass.DataikuScoreEdge: stdout. [5 rows x 19 columns].
Wrapping up#
From this starting point, you can swap the Bank Marketing model with your own use case. You can customize the scoring script and Greengrass component recipe to do something different on an edge device.