

Creating a custom LLM Connection#
This tutorial provides a step-by-step guide for creating a custom LLM connection in Dataiku. It details the process of setting up a plugin, configuring a parameter set to handle API keys securely, and coding the behavior of the LLM connection. Finally, users learn how to enable and test the connection within the Dataiku environment to ensure proper functionality.
Prerequisites#
Dataiku 14.1
Develop plugin permission
Python 3.9
Introduction#
Sometimes, you must use a custom/self-hosted/pre-configured LLM for your project. Dataiku offers many LLM connections, but some may want their personalized LLM Connection. Some configurations can be done in the connection setting, but if you need a specific configuration that is not present in Dataiku, you must use the plugin’s component: LLM Connection. In this tutorial, you will learn how to create a new LLM Connection. This connection will rely on the Python OpenAI SDK. Attentive users may use this tutorial to set up any new connection without too much trouble by relying on an SDK.
To create an LLM Connection,
you must first create a plugin (or use an existing one).
Go to the main menu, click the Plugins menu, and select the Write your own from the Add plugin button.
Then choose a meaningful name, such as tutorial-llm-connection.
Once the plugin is created, click the Create a code environment button and select Python as the default language.
If you need specific packages, you should add them in the requirements.txt file,
located in the code-env/python/spec of your plugin.
For this tutorial, you will need the openai package.
Add it to requirements.txt, click the Save all button, return to the Summary tab,
select the container you want to use (or select All containers), and click the Build new environment button.
Click the Create your first component button, and choose the Custom Python LLM in the provided list,
as shown in Fig. 1.
Then, complete the form by giving it a meaningful name, like custom-chat-plugin,
and selecting the Text completion as a starter code.

Figure 1 – New LLM connection component.#
Alternatively, you can select the Edit tab and, under the tutorial-llm-connection directory,
create a folder named python-llms.
This directory is where you will find and create your custom LLM connection.
Under this directory, create a directory with a meaningful name (custom-chat-plugin, for this tutorial)
representing your LLM connection component.
Creating the Connection#
A LLM connection is created by creating two files: llm.json and llm.py.
The JSON file is the configuration file, and the Python file is where you will code the behavior of your LLM connection.
Configuring the LLM Connection#
There is nothing specific to the LLM connection’s configuration. However, as using an LLM may require a personal API key, you might need to configure your plugin to ask for one. You could ask the user for their API key when creating the connection, but if you choose to do this, all users using the connection will also use the API key of the connection’s creator.
Hopefully, Dataiku provides a mechanism to overcome this behavior: Parameter set. We highly recommend using a parameter set when sharing confidential information such as API Key, SSH key, …
Creating a Parameter set#
To create a Parameter set, select the Summary tab, click the New component button,
and choose the Parameter set from the provided list,
as shown in Fig. 2.
Then, complete the form by giving it a meaningful name, like parameter-custom-llm.
Select parameter-set.json in the parameter-sets/parameter-custom-llm folder.
Code 1 shows the configuration of the parameter set.

Figure 2 – New parameter set component.#
{
    "meta" : {
        // label: name of the parameter set as displayed, should be short
        "label": "Parameter set devadv-parameter-custom-llm",
        // description: longer string to help end users understand what these parameter correspond to
        "description": "Long text to see where it is used",
        // icon: must be one of the FontAwesome 5.15.4 icons, complete list here at https://fontawesome.com/v5/docs/
        "icon": "fas fa-puzzle-piece"
    },

    /* if users are allowed to fill the values for an instance of this parameter
       set directly in the plugin component using it, as opposed to only be allowed
       to select already defined presets (default value, can be changed in plugin
       settings)
    */
    "defaultDefinableInline": true,
    /* if users are allowed to define presets at the project level in addition
       to the instance level (default value, can be changed in plugin settings) */
    "defaultDefinableAtProjectLevel": true,

    "pluginParams": [
    ],

    "params": [
        {
            "name": "param_set_api_key",
            "label": "OpenAI API Key",
            "type": "CREDENTIAL_REQUEST",
            "credentialRequestSettings": {
                "type": "SINGLE_FIELD"
            },
            "description": "The OpenAI api key",
            "mandatory": true

        }
    ]
}
Once you have configured your parameter set, you will need to add a new preset.
Select the Settings tab, select the Parameter set parameter-custom-llm on the left panel,
and click the Add preset button.
Choose a name, OpenAI, for example, and click the Create button.
You may want to fill out the form, but it is not mandatory.
As shown in Fig. 3, the user can enter their API key in the “Credentials” tab of their “Profile & Settings” page.

Figure 3 – Where to enter a credential for a parameter set.#
Using the Parameter set#
You can now use this parameter set in the LLM connection configuration file (python-llms/custom-chat-plugin/llm.json).
Code 2 shows the configuration file’s global shape.
The highlighted line shows how we connect the parameter set with the LLM connection.
/* This file is the descriptor for custom LLM custom-chat-plugin */
{
  "meta" : {
    // label: name of the LLM as displayed, should be short
    "label": "Custom LLM custom-chat-plugin",

    // description: longer string to help end users understand what this LLM does.
    "description": "This is the description of the custom LLM custom-chat-plugin",

    // icon: must be one of the FontAwesome 5.15.4 icons, complete list here at https://fontawesome.com/v5/docs/
    "icon": "fas fa-magic"
  },

  "params": [
      {
        "name": "model",
        "label": "Model",
        "type": "STRING"
      },
      {
          "type": "PRESET",
          "name": "api_key",
          "label": "Which openai api key to use",
          "parameterSetId": "parameter-custom-llm"
      }

  ]
}
Coding the custom LLM Connection#
Coding an LLM Connection follows the same principle as coding an agent.
See also
If you need help on coding an agent, you will find some explanations in the Agent section in Concepts and examples, or you can follow this tutorial.
To access the configuration entered by the user, you must define the set_config function,
as shown in Code 3.
The highlighted line shows how to retrieve a value from a parameter set. You first need to access the plugin’s parameter (api_key in our example), then retrieve the value from the parameter set (param_set_api_key).
# This file is the implementation of custom LLM custom-chat-plugin
from dataiku.llm.python import BaseLLM
from openai import OpenAI
from dataiku.llm.python.types import CompletionSettings, SingleCompletionQuery, CompletionResponse
from dataikuapi.dss.llm_tracing import SpanBuilder


class MyLLM(BaseLLM):
    def __init__(self):
        pass

    def set_config(self, config: dict, plugin_config: dict) -> None:
        self.config = config
        self.model = config.get("model", None)
        self.api_key = config.get('api_key').get('param_set_api_key')
        self.client = OpenAI(api_key=self.api_key)

    def process(self, query: SingleCompletionQuery, settings: CompletionSettings,
                trace: SpanBuilder) -> CompletionResponse :
        messages = query["messages"]

        conversation = []
        for message in messages:
            role = message["role"]
            if "content" in message:
                content = message["content"]
                conversation.append({"role": role, "content": content})
            else:
                parts = message.get("parts")
                if parts:
                    content = []
                    for part in parts:
                        type = part['type']
                        if type == 'TEXT':
                            content.append({ "type": "text", "text": part["text"]})
                        elif type == 'IMAGE_INLINE':
                            image_url = f"data:image/jpeg;base64,{part['inlineImage']}"
                            content.append({ "type": "image_url", "image_url": image_url})
                        elif type == 'IMAGE_URI':
                            content.append({ "type": "image_url", "image_url": part["imageUrl"]})
                    conversation.append({"role": role, "content": content})

        response = self.client.responses.create(
            model=self.model,
            input=conversation
        )

        return {
            "text": response.output_text,
            "promptTokens": 46, # Optional
            "completionTokens": 10, # Optional
            "estimatedCost": 0.13, # Optional
            "toolCalls": [], # Optional
        }
Enabling the custom LLM Connection#
The next step is to create a new Dataiku connection. Go to the Administration panel, select the Connections tab, and click the New connection button. In the LLM Mesh section, you will find Custom LLM connection; click on it to create a new connection.
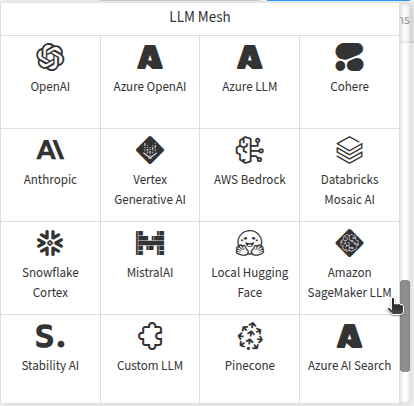
Figure 4 – Custom LLM connection in the connections menu.#
Fill out the form by providing a valid connection name, selecting your plugin name, clicking the Add model button, and filling out the form as shown in Fig. 5.
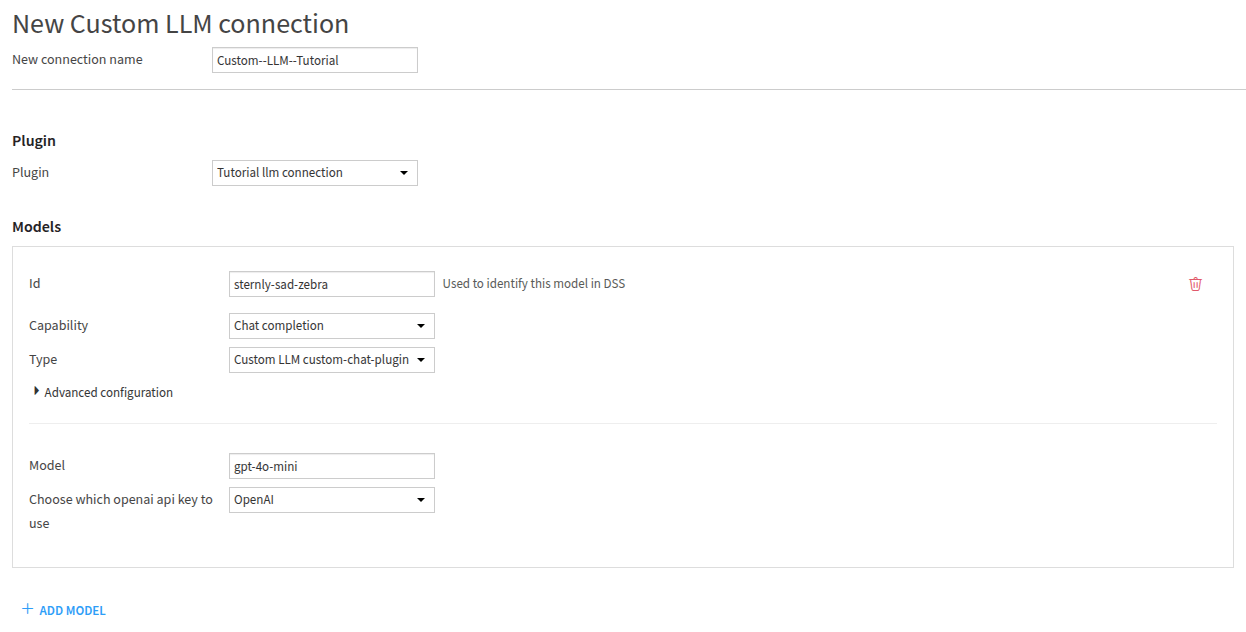
Figure 5 – New connection form.#
Testing the connection#
You can use the connection now that it has been created (and made available for everyone,
except if you changed the security setting in the previous form).
You can use Code 4 to test if everything is OK.
The LLM_ID is built this way: custom:<connection-name>:<model_id>.
If you need help retrieving a valid LLM_ID, you can use this code sample.
import dataiku

LLM_ID = "" ## Fill with your LLM_ID

client = dataiku.api_client()
project = client.get_default_project()
llm = project.get_llm(LLM_ID)
completion = llm.new_completion()
completion.with_message("How to code an agent in Dataiku?")
resp = completion.execute()
print(resp.text)
Wrapping up#
Congratulations on finishing the tutorial for creating a custom LLM connection.
You now know how to create, configure, and use a custom LLM connection.
Of course, your LLM connection can use a different provider; you just need to adapt the process function.
It is also possible to process asynchronously, with or without a stream.
You will find more information on this subject on this page: Creating your code agent.
Here is the complete code of the custom LLM Connection (and the parameter set):
llm.json
/* This file is the descriptor for custom LLM custom-chat-plugin */
{
  "meta" : {
    // label: name of the LLM as displayed, should be short
    "label": "Custom LLM custom-chat-plugin",

    // description: longer string to help end users understand what this LLM does.
    "description": "This is the description of the custom LLM custom-chat-plugin",

    // icon: must be one of the FontAwesome 5.15.4 icons, complete list here at https://fontawesome.com/v5/docs/
    "icon": "fas fa-magic"
  },

  "params": [
      {
        "name": "model",
        "label": "Model",
        "type": "STRING"
      },
      {
          "type": "PRESET",
          "name": "api_key",
          "label": "Which openai api key to use",
          "parameterSetId": "parameter-custom-llm"
      }

  ]
}
llm.py
# This file is the implementation of custom LLM custom-chat-plugin
from dataiku.llm.python import BaseLLM
from openai import OpenAI
from dataiku.llm.python.types import CompletionSettings, SingleCompletionQuery, CompletionResponse
from dataikuapi.dss.llm_tracing import SpanBuilder


class MyLLM(BaseLLM):
    def __init__(self):
        pass

    def set_config(self, config: dict, plugin_config: dict) -> None:
        self.config = config
        self.model = config.get("model", None)
        self.api_key = config.get('api_key').get('param_set_api_key')
        self.client = OpenAI(api_key=self.api_key)

    def process(self, query: SingleCompletionQuery, settings: CompletionSettings,
                trace: SpanBuilder) -> CompletionResponse :
        messages = query["messages"]

        conversation = []
        for message in messages:
            role = message["role"]
            if "content" in message:
                content = message["content"]
                conversation.append({"role": role, "content": content})
            else:
                parts = message.get("parts")
                if parts:
                    content = []
                    for part in parts:
                        type = part['type']
                        if type == 'TEXT':
                            content.append({ "type": "text", "text": part["text"]})
                        elif type == 'IMAGE_INLINE':
                            image_url = f"data:image/jpeg;base64,{part['inlineImage']}"
                            content.append({ "type": "image_url", "image_url": image_url})
                        elif type == 'IMAGE_URI':
                            content.append({ "type": "image_url", "image_url": part["imageUrl"]})
                    conversation.append({"role": role, "content": content})

        response = self.client.responses.create(
            model=self.model,
            input=conversation
        )

        return {
            "text": response.output_text,
            "promptTokens": 46, # Optional
            "completionTokens": 10, # Optional
            "estimatedCost": 0.13, # Optional
            "toolCalls": [], # Optional
        }
parameter-set.json
{
    "meta" : {
        // label: name of the parameter set as displayed, should be short
        "label": "Parameter set devadv-parameter-custom-llm",
        // description: longer string to help end users understand what these parameter correspond to
        "description": "Long text to see where it is used",
        // icon: must be one of the FontAwesome 5.15.4 icons, complete list here at https://fontawesome.com/v5/docs/
        "icon": "fas fa-puzzle-piece"
    },

    /* if users are allowed to fill the values for an instance of this parameter
       set directly in the plugin component using it, as opposed to only be allowed
       to select already defined presets (default value, can be changed in plugin
       settings)
    */
    "defaultDefinableInline": true,
    /* if users are allowed to define presets at the project level in addition
       to the instance level (default value, can be changed in plugin settings) */
    "defaultDefinableAtProjectLevel": true,

    "pluginParams": [
    ],

    "params": [
        {
            "name": "param_set_api_key",
            "label": "OpenAI API Key",
            "type": "CREDENTIAL_REQUEST",
            "credentialRequestSettings": {
                "type": "SINGLE_FIELD"
            },
            "description": "The OpenAI api key",
            "mandatory": true

        }
    ]
}
Reference documentation#
Classes#
|
Entry point for the DSS API client |
|
A handle to interact with a project on the DSS instance. |
|
A handle to interact with a DSS-managed LLM. |
A handle to interact with a completion query. |
Functions#
|
Run the completion query and retrieve the LLM response. |
Get a handle to the current default project, if available (i.e. |
|
|
Get a handle to interact with a specific LLM |
Create a new completion query. |
|
|
Add a message to the completion query. |