

Building your MCP Server in Dataiku#
Model Context Protocol (MCP) shows significant promise as a foundational standard for the future of agentic AI applications. It is designed to make AI systems more dynamic, modular, and composable.
Prerequisites#
Dataiku >= 14.0
Create Code Studio templates - permission
Python >= 3.10
A code Environment (named
mcp_py310)with the following packages:mcp #tested with 1.9.4
Introduction#
In this tutorial, you will publish Agents built in Dataiku as MCP Tools within an MCP Server. A similar process can be used to publish any Dataiku functionality as MCP Tools. You will use Dataiku Code Studios to publish the MCP server as a headless webapp in Dataiku.
To start, we need an Agent.
You can pick any agent you have or build one using the Creating and using a Code Agent
or Creating a custom agent tutorials.
This tutorial uses the Agent built using the tutorial Creating and using a Code Agent,
which exposes two tools: one to search the Table, which contains a mapping of Company Names and their CEOs,
and another tool that uses ddgs to provide company information.
Name this agent in your project company_info
Converting the agent into an Agent Tool#
In the Dataiku Project, select Agent Tools in the GenAI menu,
create a new tool of type LLM Mesh Query, select the Agent (company_info),
and provide a meaningful full name, such as get_company_info.
In the tool config, select the agent (company_info)
and provide detailed information about the agent using the Purpose and Additional Description configuration.
Figure 1 represents the agent configuration.
# Purpose
This tool provides information about companies.

# Additional description
It can take a company name or a CEO's name as input and get information associated with it.
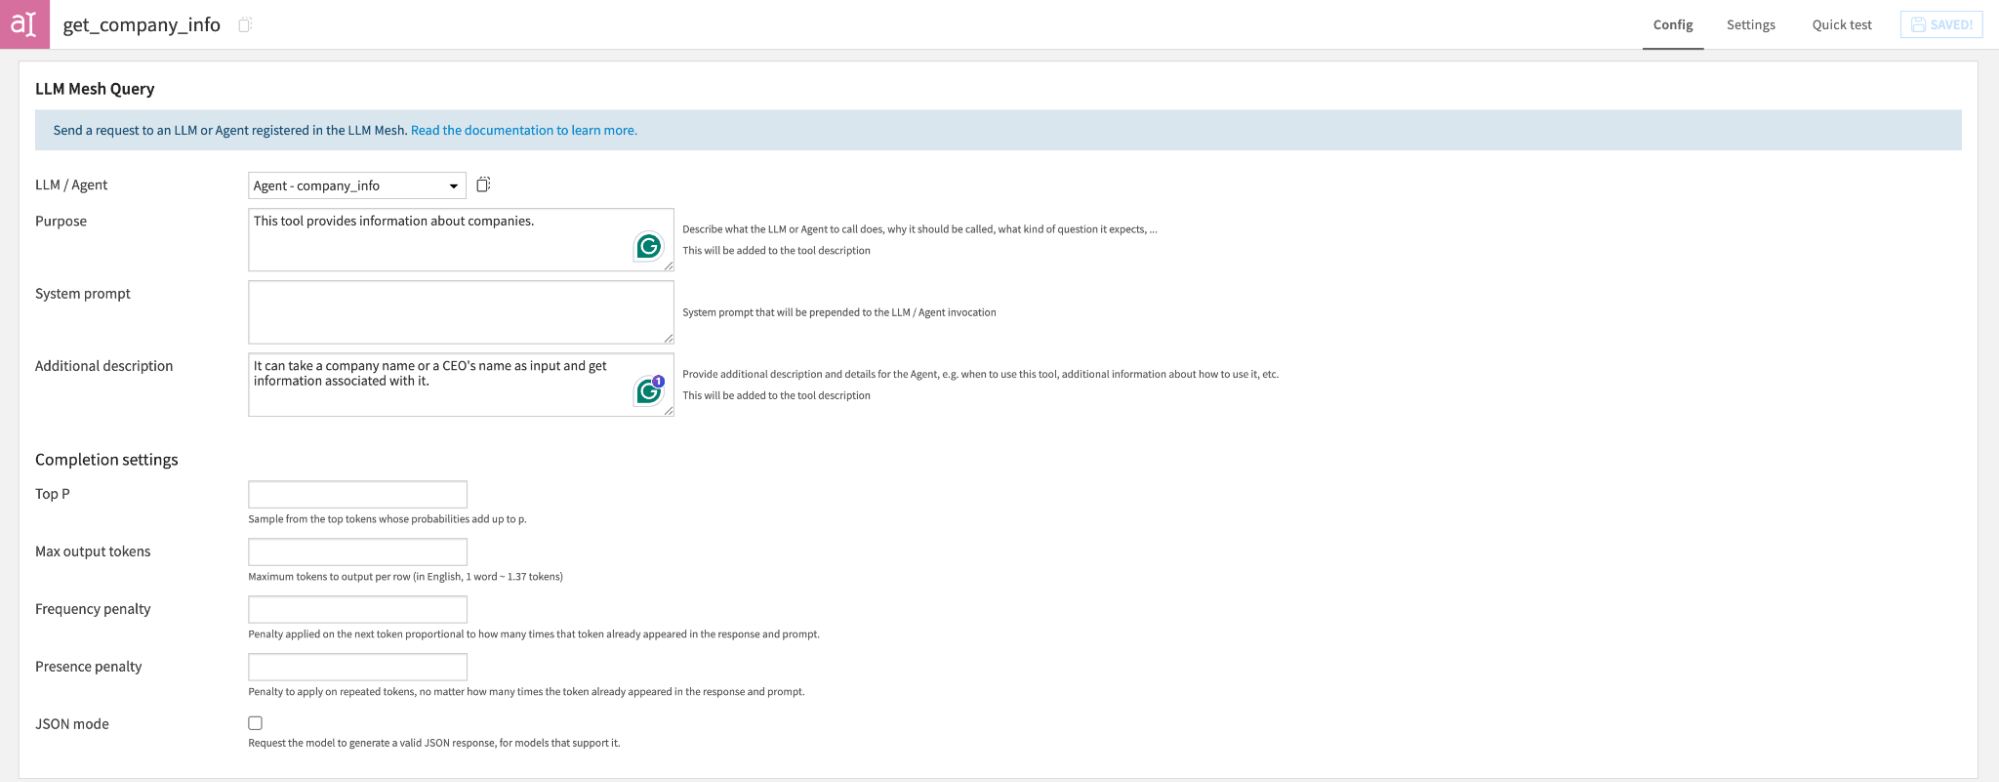
Fig. 1 - Configured LLM Mesh Query Tool#
Generating the MCP Server Code#
Now we have the Agent ready as an Agent Tool.
In this step, we will create an MCP Server File using Python and the MCP Python SDK to set up a server.
We will add an MCP tool that can call get_company_info Agent Tool.
To access the Agent tool using Python, you will need the Tool ID.
The tool ID of the Agent Tool can be accessed from the tool browser URL or using Python,
as demonstrated in Code 1.
import dataiku

client = dataiku.api_client()
project = client.get_default_project()

project.list_agent_tools()
Go to Libraries, and under the python folder, let’s create a folder mcp.
Under that, create a file using a name such as company_info_mcp.py.
Paste the code provided in Code 2, replacing the Tool ID with your Tool ID.
# Import required libraries
import dataiku
from mcp.server.fastmcp import FastMCP

# Define all the Variables
MCP_SERVER_NAME="Company Info"
MCP_SERVER_INSTRUCTIONS="This server provides a tool which can query the web to get company info"
HOST="0.0.0.0"
PORT=58000

TOOL_ID="" ## Fill with your agent's ID

# MCP Object Initialization
mcp = FastMCP(name=MCP_SERVER_NAME,
              instructions=MCP_SERVER_INSTRUCTIONS,
              host=HOST,
              port=PORT
    )

# MCP Tool which connects to Agent Tool
@mcp.tool()
async def get_company_info(query: str) -> str:
    """
    This tool provides information about companies.
    It can take a company name or a CEO's name as input and get information associated with it.
    Args:
        query: User query

    Returns:
        Generated response as a string.
    """

    client = dataiku.api_client()
    tool = client.get_default_project().get_agent_tool(TOOL_ID)
    output = tool.run({"question": query})
    return output['output']['response']

# Run the server
if __name__ == "__main__":
    mcp.run(transport='streamable-http')
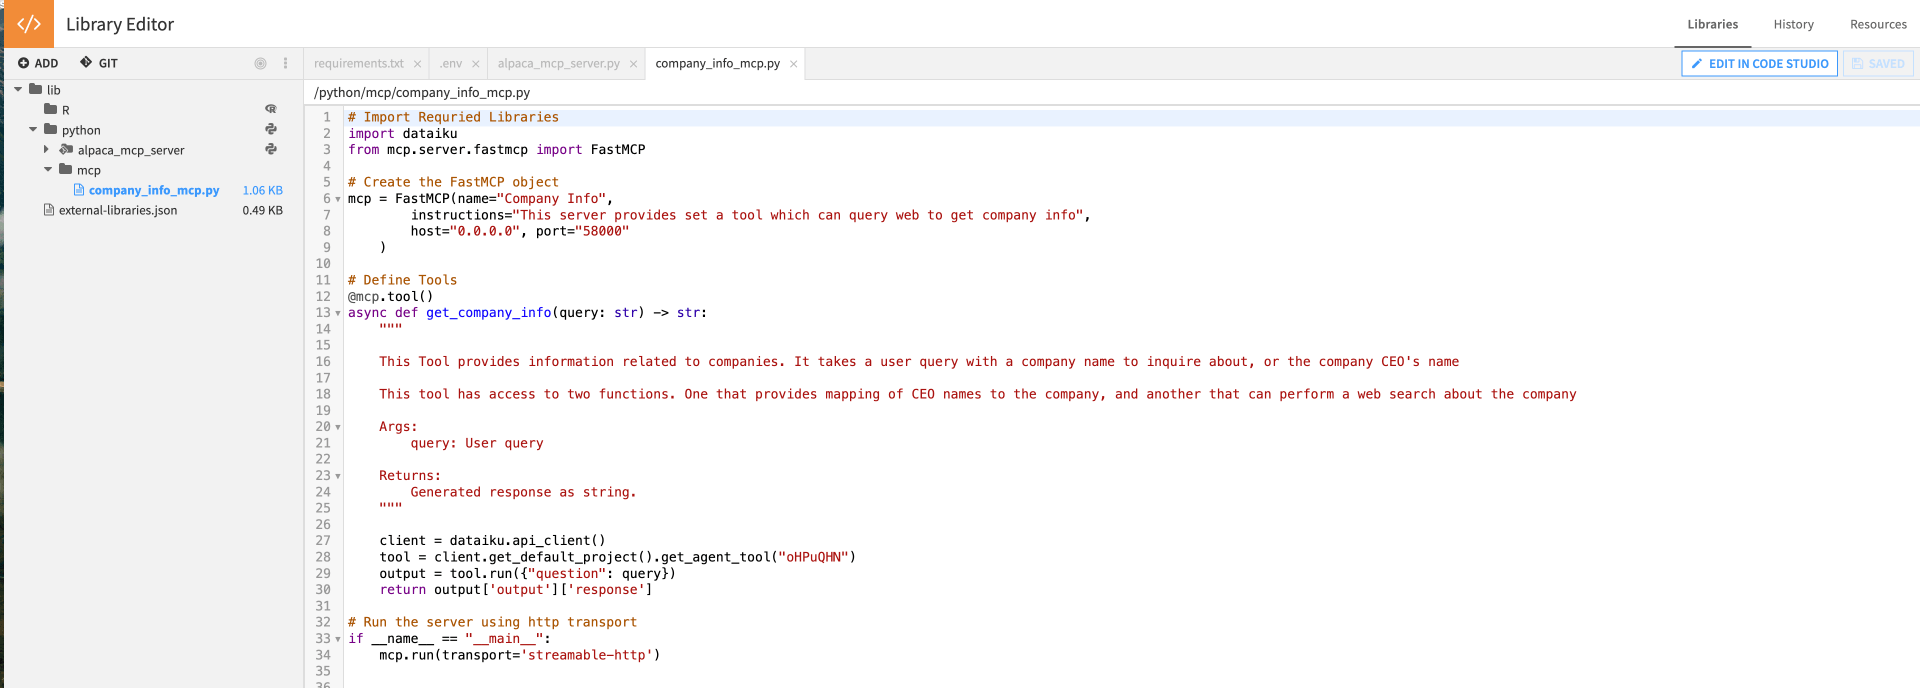
Fig. 2 - MCP Server Code File#
Building the Code Studio Template#
We will use Dataiku Code Studios to host the MCP Server as a headless webapp. Go to the Code Studios tabs in the Administration menu, click the Create code studio template button, and choose an appropriate name for the template. We will need the MCP server file and the code environment with the MCP SDK within the Code Studio Container to run the server.
Selecting a code environment#
Go to the Definition Tab. Click the Add a block button and choose the Add Code Environment block type. This block allows you to add a specific code environment that is usable in the Code Studio. For the Code environment block, choose the code environment you previously built for this MCP server, as shown in Figure 3.
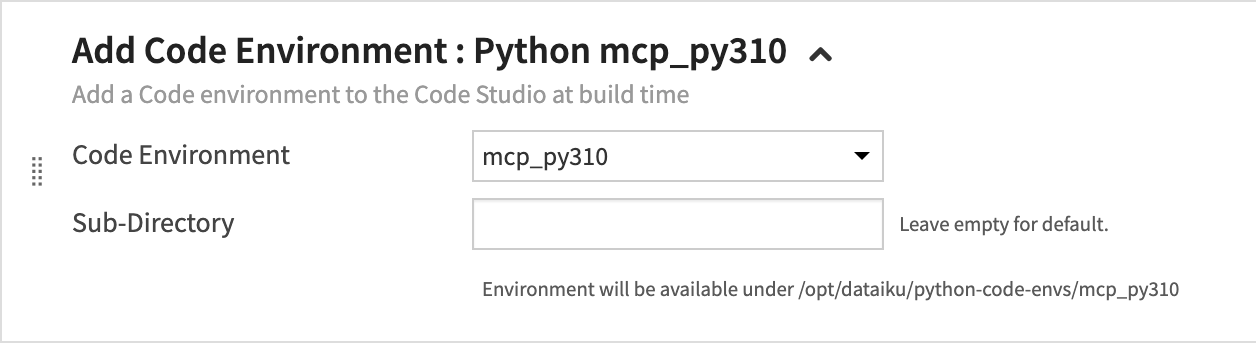
Fig. 3 - Configured Code Environment Block#
Creating a helper function#
To start the MCP Server, you will rely on a helper function.
In the resources tab, click the Add button (located on top left),
select Create file…, and choose a relevant filename, run_mcp_server_1.sh (for example).
Paste the code provided in Code 3.
run_mcp_server_1.sh)##!/bin/sh
source /opt/dataiku/python-code-envs/mcp_py310/bin/activate
cd /home/dataiku/workspace/project-lib-versioned/python/mcp
python company_info_mcp.py
This script contains three parts:
The first line of this command activates the code environment you previously defined.
The second line positions the shell in the directory where your MCP server file is.
The third line runs the MCP server.

Fig 4 - Shell script code under Code Studios Resources Tab#
Creating an entry point to run the MCP Server#
Back to the Definition tab, click the Add a block button, and choose the Add an Entrypoint block type. This block serves the MCP Server, meaning it starts the server and exposes its port.
Use the previously defined helper function by copying it into the code studio block (Scripts part) and activating it (Entrypoint part).
Entrypoint:
/home/dataiku/run_mcp_server_1.shClick Add scripts to code studio.
Source file:
${template.resources}/run_mcp_server_1.shTarget file:
run_mcp_server_1.sh
Tick Launch for Webapps and Expose port.
Launch for Webapps is required to launch the server as an accessible API inside and outside Dataiku.
Expose port – Enter the Port used in the MCP Server File. (i.e. 58000 if you have not modified the code we provided)
It would help if you also chose a meaningful name (MCP Server 1, for example) for the Expose port label field.
Then, choose the Exposed port you have defined in the MCP Server Code.
Proxied subpath – any path added here will be suffixed to the server URL.
Save and Build the Code Studio.
Figure 5 shows a recap of all those steps.
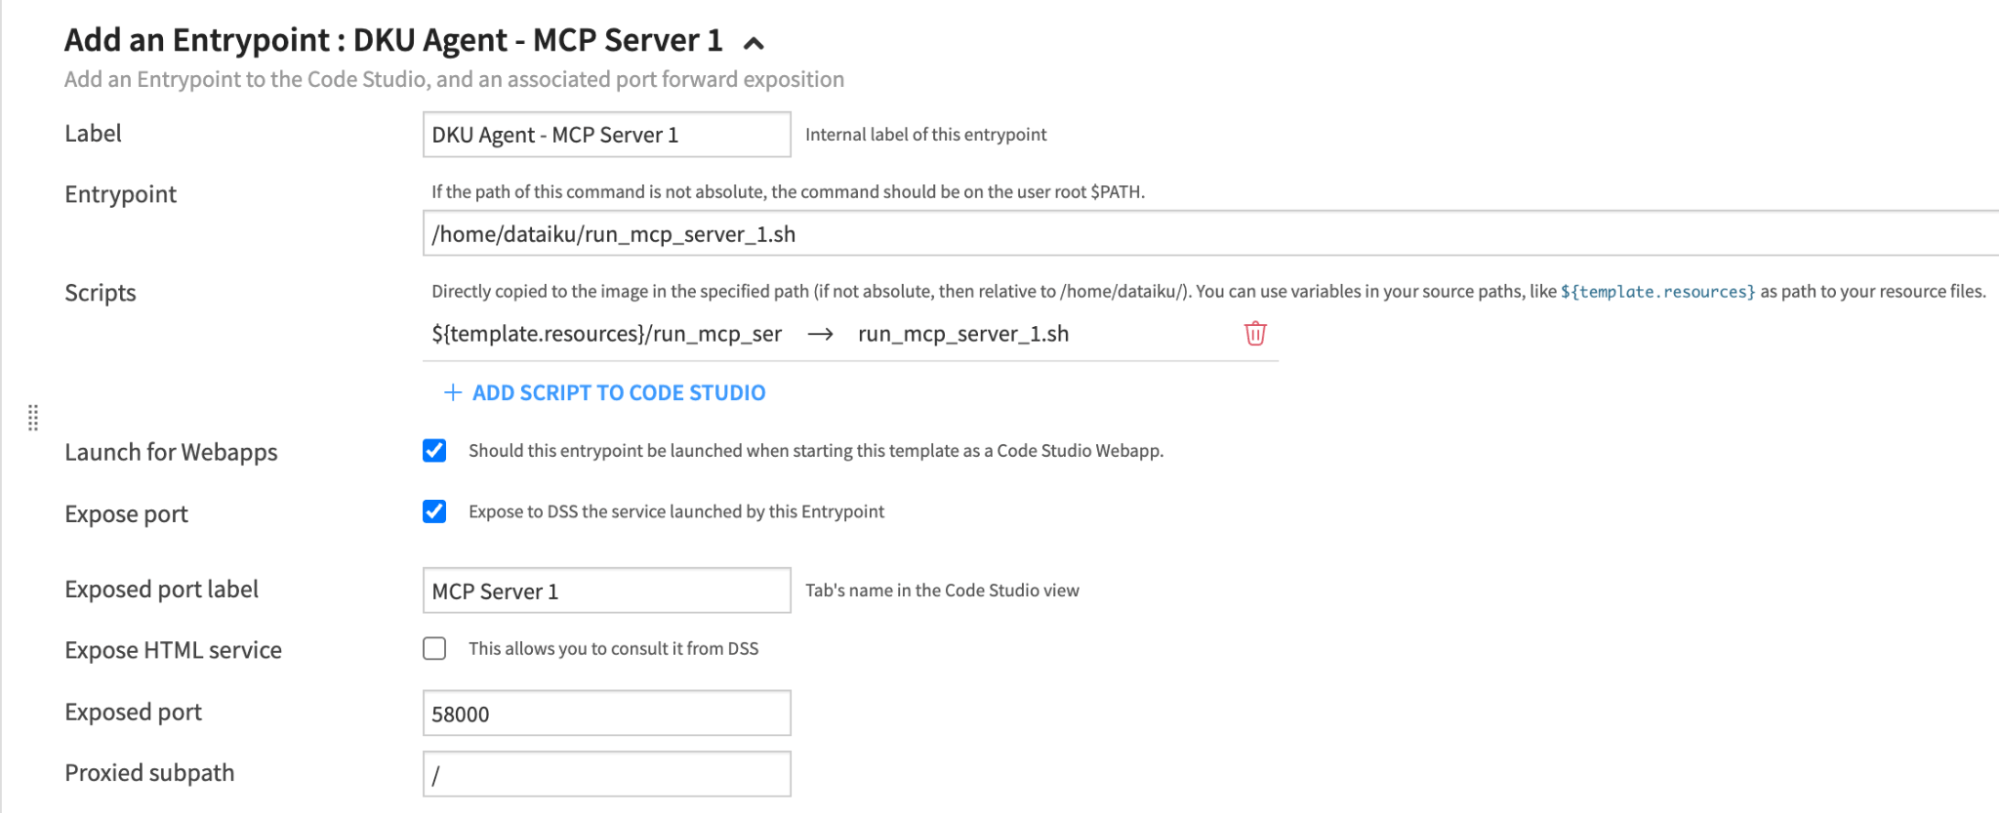
Fig. 5 - Configured Entry Point Block for the MCP Server#
Launching the Webapp#
Go to Project > Code > Code Studios and create a new Code Studio Instance. Once created (no need to start the Code Studio), publish it as a webapp. Under the webapp settings (Edit), enable API Access and Authentication. Click Save and View Webapp.

Fig. 6 - Webapp configuration with API Access and Authentication Enabled#
Since this is a headless webapp with no UI, the view tab of the App may show “Not found” message.
Once the backend is up, the MCP Server will be accessible in the URL format
https://<DATAIKU_HOST>/webapps/<PROJECT_KEY>/<WEBAPP_ID>/mcp
For example- https://dataiku-dummy-host.io/webapps/MCPSERVERS/QwFomH6/mcp
Note
The WEBAPP_ID is the first seven characters (before the underscore) in the webapp URL.
For example, if the webapp URL in Dataiku is /projects/HEADLESS/webapps/kUDF1mQ_api/view,
the WEBAPP_ID is kUDF1mQ and the PROJECT_KEY is HEADLESS.
Testing using MCP Inspector#
You will set up MCP Inspector locally on your Desktop to test the remote accessibility of the Dataiku-hosted MCP server. To test the MCP Server, you first need to create a Dataiku API Key for authentication. Go to your Dataiku Profile & Settings and then API Keys Tab. Generate a new key.
Use the command below in your terminal to start the MCP inspector. It will automatically open a Tab in the browser (or you can copy and paste the printed URL in the browser). You can find detailed instructions on setting up MCP Inspector here.
npx @modelcontextprotocol/inspector
In the MCP Inspector Interface, select Transport—Streamable HTTP, provide the server URL.
Under Bearer Token enter Bearer <your-dataiku-apikey>. Replace <your-dataiku-apikey> with your Dataiku API key
Then click Connect, as shown in Figure 7.
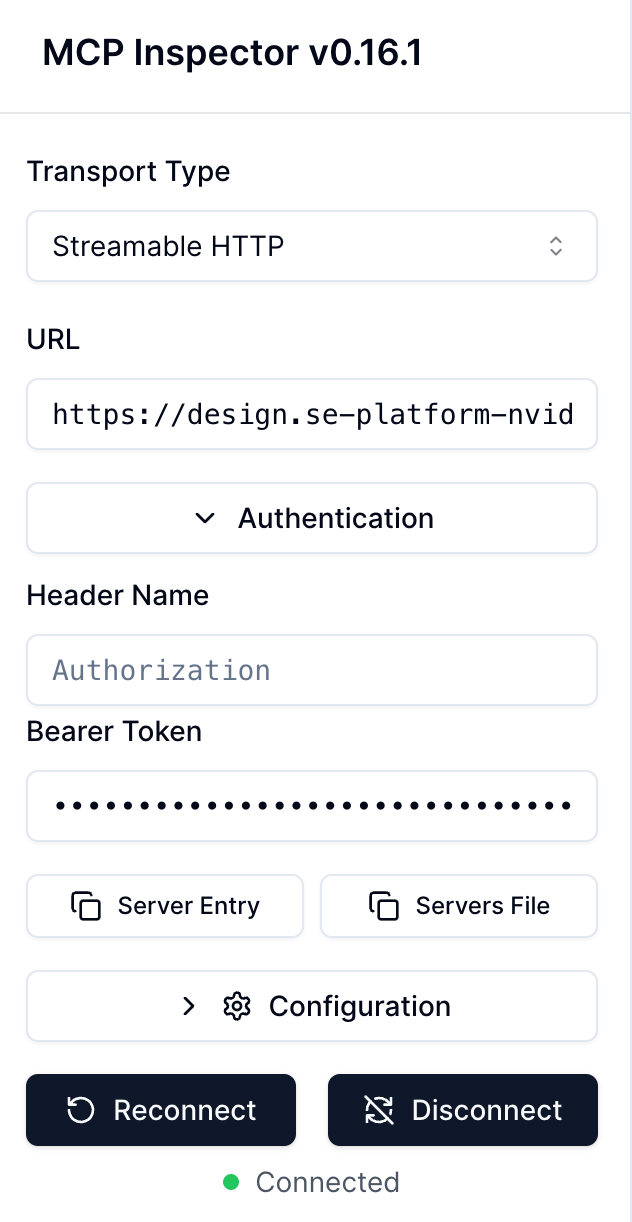
Fig. 7 - Configured MCP Inspector#
Go to the Tools Tab, and click List Tools. You should see the Agent published as MCP Server tool. Run the tool to test it.
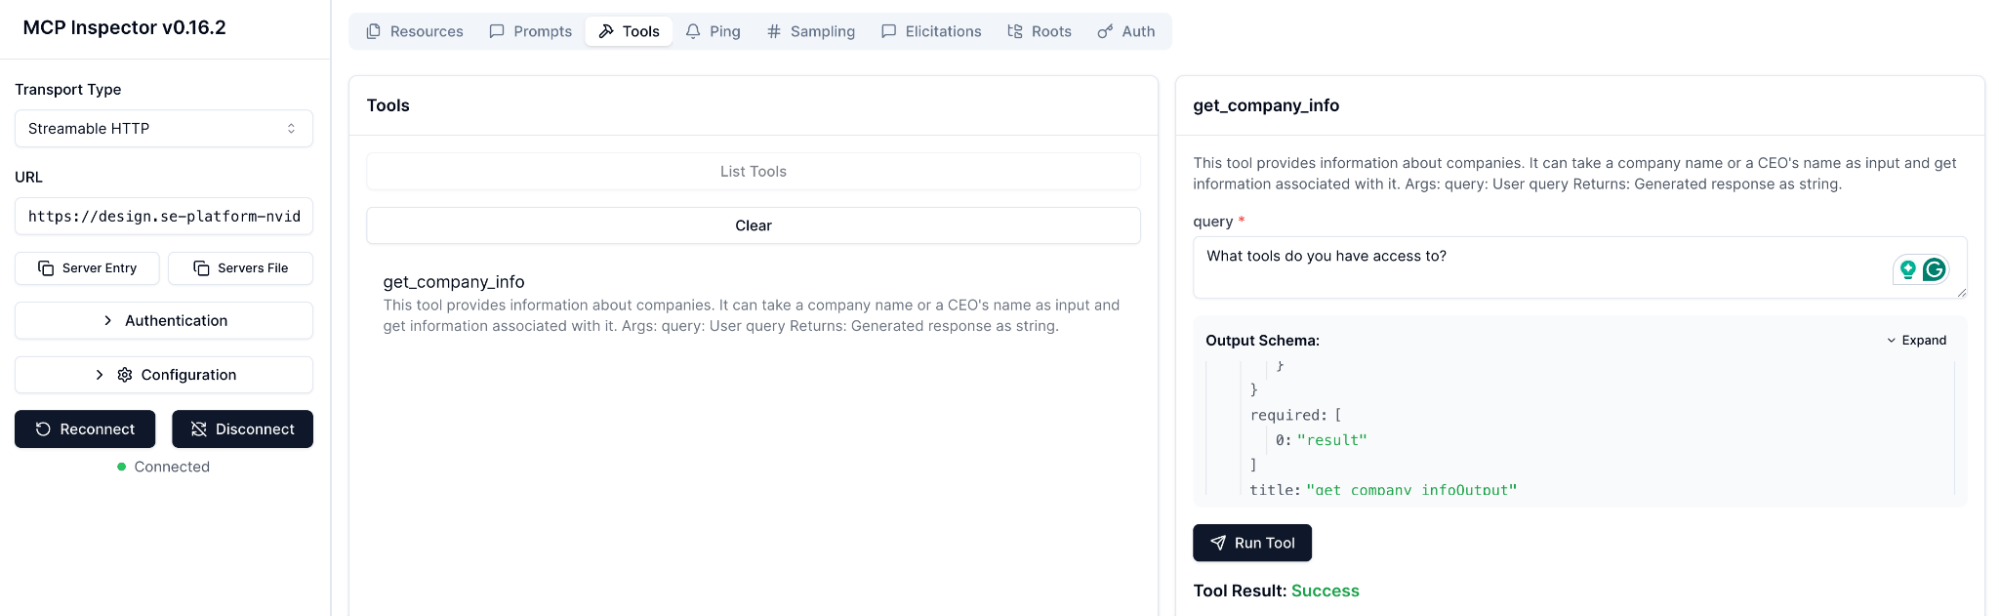
Fig. 8 - Listed MCP Server Tools of the MCP Server configured in Dataiku#
Wrapping Up#
Congratulations, you have successfully configured your first MCP Server in Dataiku. Similar directions can be followed to configure any third-party MCP Server in Dataiku. You can also access remote MCP servers in Dataiku using Python Recipe or Code Agent.
This tutorial also demonstrates how to make an MCP server support HTTP Transport. Some MCP servers support HTTP Transport by default, which further simplifies the process of setting it up in Dataiku.