Simple scoring application#
Prerequisites#
Dataiku >= 12.1
- “Use” permission on a code environment using Python >= 3.9 with the following packages:
dash(tested with version2.11.1)dash-bootstrap-components(tested with version1.4.2)
- Access to an existing project with the following permissions:
“Read project content”
“Write project content”
Access to a model deployed as an API endpoint for scoring
Introduction#
In this tutorial, you will learn how to request an API endpoint.
This endpoint can be a deployed model or anything else connected to an API endpoint.
This tutorial uses the model from the MLOps training (from Learning projects > Real-time APIs)
and a deployed API endpoint named predict_fraud.
It provides an API endpoint to predict the authorized flag from the provided data (transaction from credit card).
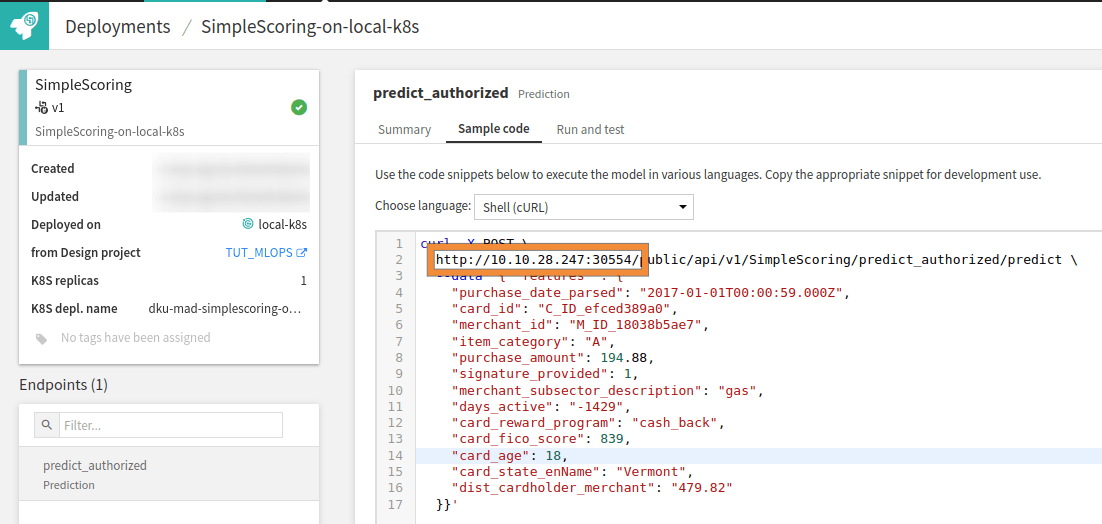
To follow the tutorial, you must know the URL where the endpoint is deployed. You can find this URL in the Local Deployer > API services and select the tab Sample code from your deployment, and note the URL as shown in Fig. 1

Figure 1: Where to find the URL of an API endpoint.#
Once the URL is known, you are ready to start the tutorial. Please start with an empty Dash webapp. To create an empty Dash webapp, please refer to this mini-tutorial.
Building the webapp#
You will rely on the method dataikuapi.APINodeClient.predict_record()
from the dataikuapi package to use the API endpoint.
This method requires having an identifier of the endpoint to query and a Python dictionary of features.
Before using this method, you need to obtain a dataiku.APINodeClient. This process is shown in
Code 1.
dataiku.APINodeClient# client = dataikuapi.APINodeClient(url, name)
record_to_predict = eval(data)
prediction = client.predict_record("predict_fraud", record_to_predict)
You need the endpoint’s URL and the deployed endpoint’s name to instantiate the client.
So you will create a form for the user to enter this data.
And, as features must be supplied to use the dataikuapi.APINodeClient.predict_record() method,
you will include this data entry in the form.
Code 2 shows a possible implementation of such a form.
# Content for entering API endpoint information
api_information = html.Div([
dbc.Row([
dbc.Label("Endpoint URL", html_for="endpoint_url", width=2),
dbc.Col(dbc.Input(id="endpoint_url",
placeholder="Please enter the endpoint URL (http://<IP_Address>:<Port>)"),
width=10)
]),
dbc.Row([
dbc.Label("Endpoint name", html_for="endpoint_name", width=2),
dbc.Col(dbc.Input(id="endpoint_name",
placeholder="Please enter the name of the endpoint"),
width=10)
])
])
# Content for entering feature values
data = dbc.Row([
dbc.Label("Data to score", html_for="features", width=2),
dbc.Col(dbc.Textarea(id="features", class_name="mb-3"), width=10)])
# Send button
send = dbc.Row([
dbc.Col(dbc.Button("Score it", id="score_button", color="primary", n_clicks=0),
width=2)],
justify="end")
# Content for displaying the result
result = dbc.Row([
dbc.Label("Prediction", width=2),
dbc.Label(id="prediction_result", width=10),
])
# build your Dash app
app.layout = html.Div([
api_information,
data,
send,
result
], className="container-fluid mt-3")
Code 3 is responsible for using the input data and predicting the result. A few error handlings are done in this callback to give some feedback to the user when something goes wrong.
@app.callback(
Output("prediction_result", "children"),
Input("score_button", "n_clicks"),
State("endpoint_url", "value"),
State("endpoint_name", "value"),
State("features", "value"),
prevent_initial_call=True
)
def score(_nclicks, url, name, data):
if url and name:
try:
            client = dataikuapi.APINodeClient(url, name)

            record_to_predict = eval(data)
            prediction = client.predict_record("predict_fraud", record_to_predict)
return prediction \
.get('result', {'prediction': 'No result was found'}) \
.get('prediction', 'No prediction was made.')
except SyntaxError:
return "Parse error in feature"
except Exception:
return "Error"
else:
return "Unable to reach the endpoint"
Testing the webapp#
Code 4 is the complete code of the webapp. You can now test the webapp by entering the URL previously noted and the name. If you have deployed your API based on the referenced project, you can enter the following:
{
"purchase_date_parsed": "2017-01-01T00:00:59.000Z",
"card_id": "C_ID_efced389a0",
"merchant_id": "M_ID_18038b5ae7",
"item_category": "A",
"purchase_amount": 194.88,
"signature_provided": 1,
"merchant_subsector_description": "gas",
"days_active": "-1429",
"card_reward_program": "cash_back",
"card_fico_score": 839,
"card_age": 18,
"card_state_enName": "Vermont",
"dist_cardholder_merchant": "479.82"
}
The webapp should display 1 as a result or an error message
if you did not enter the correct address/name for the API endpoint.
Complete code and conclusion#
Congratulations! You now have a functional webapp that helps you to use an API endpoint.
You can go further by doing a specific form for your data.
If you want to do so, the tutorial “How to create a form for data input?” could be helpful.
You can display the probabilities of the prediction.
You may also send the result to another endpoint using the requests API.
Code 4: Complete code of the webapp
import dash
import dash_bootstrap_components as dbc
from dash.dependencies import Input, Output, State
from dash import html
import dataikuapi
# use the style of examples on the Plotly documentation
app.config.external_stylesheets = [dbc.themes.BOOTSTRAP]
# Content for entering API endpoint information
api_information = html.Div([
    dbc.Row([
        dbc.Label("Endpoint URL", html_for="endpoint_url", width=2),
        dbc.Col(dbc.Input(id="endpoint_url",
                          placeholder="Please enter the endpoint URL (http://<IP_Address>:<Port>)"),
                width=10)
    ]),
    dbc.Row([
        dbc.Label("Endpoint name", html_for="endpoint_name", width=2),
        dbc.Col(dbc.Input(id="endpoint_name",
                          placeholder="Please enter the name of the endpoint"),
                width=10)
    ])
])

# Content for entering feature values
data = dbc.Row([
    dbc.Label("Data to score", html_for="features", width=2),
    dbc.Col(dbc.Textarea(id="features", class_name="mb-3"), width=10)])

# Send button
send = dbc.Row([
    dbc.Col(dbc.Button("Score it", id="score_button", color="primary", n_clicks=0),
            width=2)],
    justify="end")

# Content for displaying the result
result = dbc.Row([
    dbc.Label("Prediction", width=2),
    dbc.Label(id="prediction_result", width=10),
])

# build your Dash app
app.layout = html.Div([
    api_information,
    data,
    send,
    result
], className="container-fluid mt-3")
@app.callback(
    Output("prediction_result", "children"),
    Input("score_button", "n_clicks"),
    State("endpoint_url", "value"),
    State("endpoint_name", "value"),
    State("features", "value"),
    prevent_initial_call=True
)
def score(_nclicks, url, name, data):
    if url and name:
        try:
            client = dataikuapi.APINodeClient(url, name)

            record_to_predict = eval(data)
            prediction = client.predict_record("predict_fraud", record_to_predict)
            return prediction \
                .get('result', {'prediction': 'No result was found'}) \
                .get('prediction', 'No prediction was made.')
        except SyntaxError:
            return "Parse error in feature"
        except Exception:
            return "Error"
    else:
        return "Unable to reach the endpoint"

