

Voilà: your first web application#
In this tutorial, you will learn how to build your first Voilà web application. To be able to create a Voilà application, you will first need to configure a Code Studio template and then code your application using this application. Once the application is designed, you can publish it as a web application.
Prerequisites#
Dataiku >= 13.0
Administrator permission to build the template
Building the Code Studio template#
Go to the Code Studios tab in the Administration menu, click the +Create Code Studio template button, and choose a meaningful label (
voila_template, for example).Click on the Definition tab.
Add a new JupyterLab server block. This block will allow you to edit your Voilà application in a dedicated Code Studio.
- Add a new Voila block, and
Choose Generate a dedicated code env for the Code env mode
Choose latest voila version + DSS for the Package versions
Choose 3.9 for the Python versions
as shown in Figure 1.
Click the Save button.
Click the Build button to build the template.
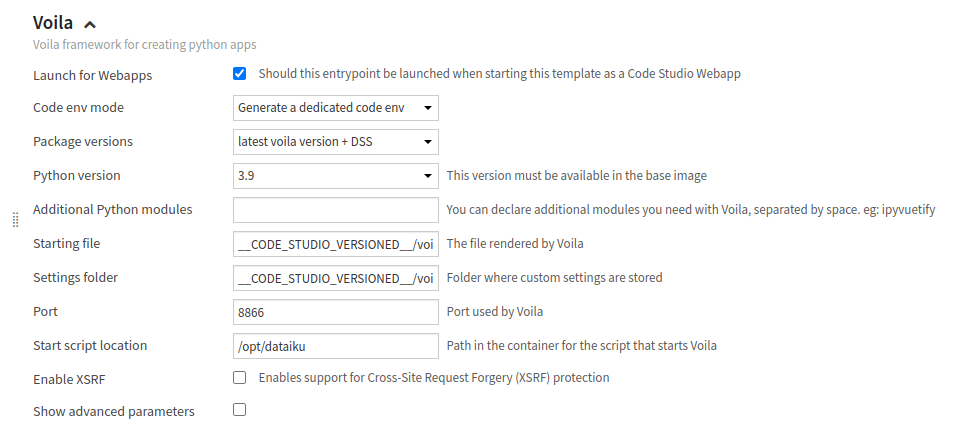
Figure 1: Code Studio – Voila block.#
Your Code Studio template is ready to be used in a project. If you need a specific configuration for a block, please refer to the documentation.
Creating a new Voilà application#
Before creating your Voilà application, you must download this CSV file,
upload it to your instance, and use a Sync recipe to create an SQL Dataset named pro_customers_sql.
Create a new project, click on </> > Code Studios.
Click the +New Code Studio, choose the previously created template, choose a meaningful name, click the Create button, and then click the Start Code Studio button.
To edit the code of your Voilà application, click the Jupyter Lab tabs.
Select the
voilasubdirectory in thecode_studio-versioneddirectory. Dataiku provides a sample application in the fileapp.ipynb.Select the
DSS Codeenv - pyenv-voilakernel. This step is not mandatory, as the voilà application will use the kernel defined in the code studio template. It just helps you to debug your application. To select the correct kernel, click on the Kernel menu (in the Jupyter Lab tab), choose Change Kernel…, and select the kernel.Replace the provided code with the code shown in Code 1.
If everything goes well, you should have a running Voilà application like the one shown in Figure 2
import dataiku
from dataiku import SQLExecutor2
from dataiku.sql import Constant, toSQL, Dialects

DATASET_NAME = "pro_customers_sql"


def get_customer_info(id):
    dataset = dataiku.Dataset(DATASET_NAME)
    table_name = dataset.get_location_info().get('info', {}).get('quotedResolvedTableName')
    executor = SQLExecutor2(dataset=dataset)
    cid = Constant(str(id))
    escaped_cid = toSQL(cid, dialect=Dialects.POSTGRES)  # Replace by your DB
    query_reader = executor.query_to_iter(
        f"""SELECT "name", "job", "company" FROM "{table_name}" WHERE "id" = {escaped_cid}""")
    for (name, job, company) in query_reader.iter_tuples():
        return f"""The customer's name is "{name}", holding the position "{job}" at the company named "{company}" """
    return "No information can be found"


import ipywidgets as widgets
import os

label = widgets.Label(value="Enter the customer ID")
text = widgets.Text(placeholder="fdouetteau", continuous_update=False)

result = widgets.Label(value="")


def callback(customerId):
    result.value = get_customer_info(customerId.get('new', ''))


text.observe(callback, 'value')

display(widgets.VBox([widgets.HBox([label, text]), result]))
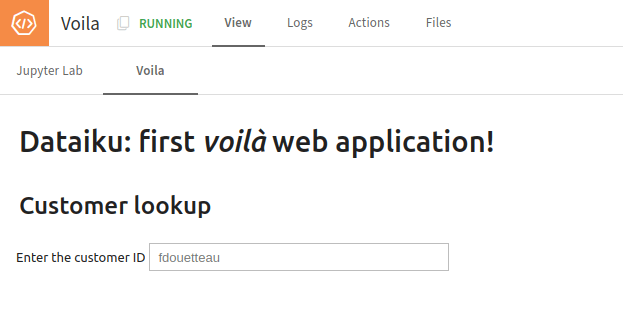
Figure 3: First Voilà application.#
Wrapping up#
You now have a running Voilà application. You can customize it a little to fit your needs. When happy with the result, click the Publish button in the right panel. Then, your Voilà application is available for all users who can use it without running the Code Studio.
You can download the Jupyter lab notebook here