

Importing serialized scikit-learn pipelines as Saved Models for MLOps#
This tutorial shows how to save a model trained using code into a native Dataiku object for model management. It uses a simple tabular dataset and a scikit-learn pipeline. As long as the intermediate assets are saved, this model development could occur inside or outside Dataiku. Similar pipelines could accommodate other frameworks and data types.
Teams and organizations can have bespoke model pipelines and rules that are not fully integrated with Dataiku. This tutorial shows how to bring models via code into the platform for model lifecycle management as first-class citizens, similar to its automated machine learning models. This last-mile integration is a key feature of Dataiku’s MLOps capabilities. It allows for the inspection, evaluation, deployment and governance of models trained using code.
Prerequisites#
Dataiku >= 12.0
Access to a project with “write project content” permissions
A Python code environment with the
scikit-learn,mlflowandprotobuf(not for Python 3.10+) packages installed
Note
This tutorial was tested using python==3.9, scikit-learn==1.0.2, mlflow==2.9.2 and protobuf==3.16.0 but other versions could work.
Overview of the steps#
This tutorial covers model development in three simplified steps. Each of the scripts focuses on one of the following:
Preparing the data, i.e. all steps before model development
Creating the model object, i.e. the model development
Saving the model as a Dataiku object, i.e. what happens after
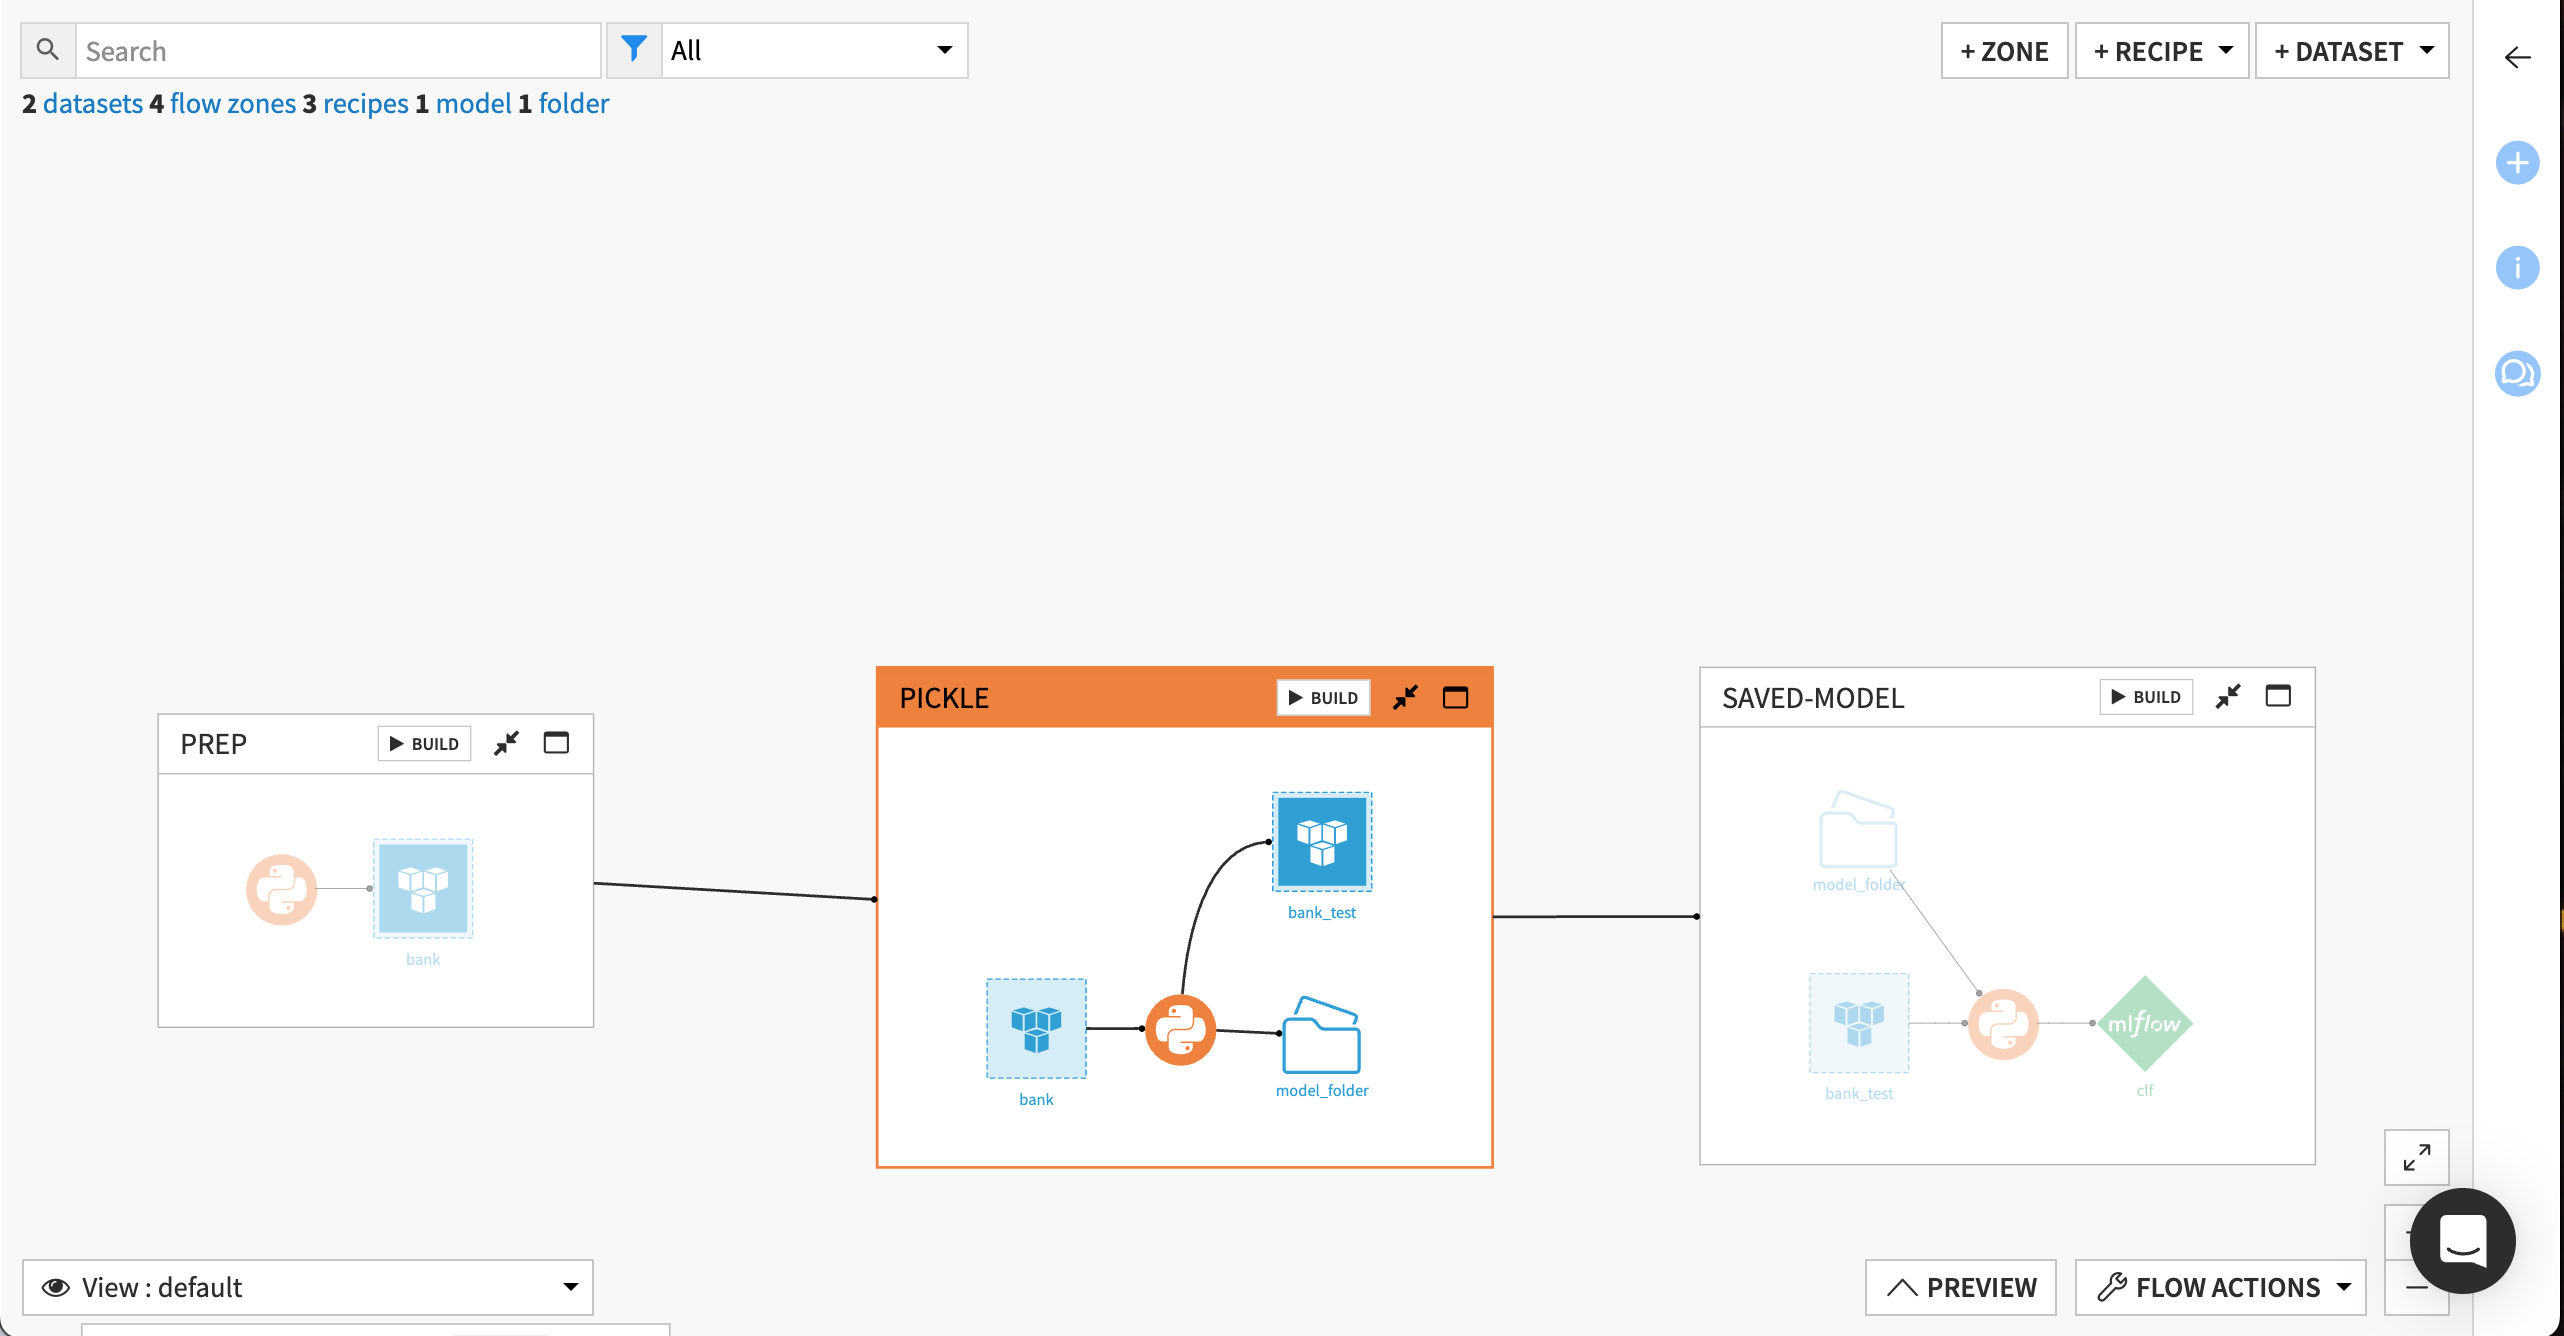
Here are the steps represented as a Dataiku project flow.
Step 1: Pre-modeling tasks#
To kick off this process, you’ll need two things:
the model artifact, a serialized version of the trained model object
an evaluation dataset that is needed to monitor model performance and provide other metrics
Pipelines running outside Dataiku could produce this model artifact. Here, you’ll start from scratch with some data and progress towards that model object within the platform. For simplicity and completeness, you’ll generate it from the easily accessible UCI Bank Marketing dataset.
Create a Python recipe to create the initial dataset (bank). The script below prepares the data before model development. It defines the URL to download the data archive and stores the relevant CSV as a pandas dataframe. Using that dataframe and the Dataiku APIs, this step saves the schema and the file contents to a Dataiku dataset.
Python script - Step 1
# Libraries
import io
import requests
import zipfile
import pandas as pd
import dataiku

BANK_DATA_URL = 'https://archive.ics.uci.edu/static/public/222/bank+marketing.zip'

with requests.get(BANK_DATA_URL, stream=True) as r:
    archive = zipfile.ZipFile(io.BytesIO(r.content))
    archive.extractall()

bank_zip = [archive.open(name) for name in archive.namelist() \
    if name == 'bank.zip']

with zipfile.ZipFile(bank_zip[0]) as z:
    for filename in z.namelist():
        if filename == 'bank.csv':
            df = pd.read_csv(z.open(filename), sep=';')

DATASET = 'bank'
ds = dataiku.Dataset(DATASET)
ds.write_with_schema(df)
Step 2: Model development#
Next, you will use some standard scikit-learn code to create a model stored in a serialized format as a pickle. First, copy the following code in your project libraries that you will find at </> > Libraries.
Note
Code libraries also provide a way to integrate with a larger code base from outside Dataiku that might have modules and scripts required for model development. Read more about the ability to pull from an external code base here.
Under python/, create a directory named model_gen containing two files:
an empty
__init__.pyfilea
sk_pipeliner.pyscript with code to train a scikit-learn model and save the test set as an evaluation dataset
Copy this code into the second file, i.e. the non-empty Python script:
Python function
import pandas as pd
from sklearn.model_selection import train_test_split
from sklearn.pipeline import Pipeline, make_pipeline
from sklearn.impute import SimpleImputer
from sklearn.preprocessing import OneHotEncoder, StandardScaler
from sklearn.compose import ColumnTransformer
from sklearn.ensemble import RandomForestClassifier


def split_and_train_pipeline(df: pd.DataFrame, test_size: float):
    """
    Return a tuple made of:
    - evaluation data in a df
    - sklearn estimator
    """

    # Split
    num_features = ["age", "balance", "duration", "previous", "campaign"]
    cat_features = [
        "job",
        "marital",
        "education",
        "default",
        "housing",
        "loan",
        "contact",
        "poutcome",
    ]
    target = "y"
    cols = num_features + cat_features
    cols.append(target)

    df_train, df_test = train_test_split(
        df[cols], test_size=test_size, random_state=42, shuffle=True
    )
    X_train = df_train.drop(target, axis=1)
    y_train = df_train[target]

    num_pipeline = Pipeline(
        [
            ("imp", SimpleImputer(strategy="median")),
            ("sts", StandardScaler()),
        ]
    )
    transformers = [
        ("num", num_pipeline, num_features),
        ("cat", OneHotEncoder(handle_unknown="ignore"), cat_features),
    ]
    preprocessor = ColumnTransformer(transformers, remainder="drop")

    clf = RandomForestClassifier(
        n_estimators=40, n_jobs=-1, max_depth=6, min_samples_leaf=20
    )
    pipeline = make_pipeline(preprocessor, clf)
    pipeline.fit(X_train, y_train)

    return pipeline, df_test
Back in the project Flow, create a Python recipe with:
a single input: the
bankdataset created in the last steptwo outputs: a new dataset called
bank_test, which will serve as the evaluation dataset, and a new managed folder (model_folder) to host the model artifact. Take note of the folder id and add it to the code below for this step.
Note
Folder ids are a property of a managed folder, uniquely identifying it within a Dataiku project. It can be found on the page URL when the item is opened on the Dataiku UI (/projects/LLMM_TESTS/managedfolder/[FOLDER_ID]) and is composed of 8 random characters, e.g. L3dZ3p1n.
Replace the initial recipe content with code from this script. In conjunction with the function from the project libraries, this Python recipe creates the machine learning pipeline. It invokes the split_and_train_pipeline function from sk_pipeliner to train a model on the df dataframe obtained from the bank dataset. The pipeline object is stored as pipeline.pkl within a managed folder, which can be located on the Dataiku server, on cloud object storage or elsewhere. Additionally, the function returns a test dataset (df_test), which is saved as the bank_test dataset. The workflow also ensures that the evaluation dataset has the same schema as the dataset on which model training occurred.
Python script - Step 2
import dataiku
import pickle

from model_gen.sk_pipeliner import split_and_train_pipeline

df = dataiku.Dataset("bank") \
    .get_dataframe()

pipeline, df_test = split_and_train_pipeline(df, test_size=0.2)

bank_test = dataiku.Dataset("bank_test") \
    .write_with_schema(df_test)

FOLDER_ID = ""  # Enter your managed folder id here

model_folder = dataiku.Folder(FOLDER_ID)

with model_folder.get_writer("/pipeline.pkl") as writer:
    pickle.dump(pipeline, writer)
Step 3: Saving as a Dataiku object#
The final step is to convert the model artifact, i.e. the serialized pickle, into a Saved Model, a native Dataiku object. The immediate advantage is that Saved Models possess many post-training features like extensive model evaluation.
This part will create a new Saved Model on the flow from the scikit-learn pipeline. Saved Models can import models trained using code via one of the MLflow integrations. So, along the way, you’ll transform the scikit pipeline into an MLflow model via the Dataiku APIs.
A new Saved Model is not allowed as the output of a Python recipe, so it needs to be created programmatically first. As such, the following code needs to be run in a Dataiku Python notebook initially. Go to </> > Notebooks > New notebook > Write your own > Python and create a new notebook with the code environment specified in the prerequisites. Execute all lines to create a model flow item, convert the pickle and load its MLflow equivalent into the Dataiku Saved Model.
Python script - Step 3
import dataiku
import pickle
import mlflow

# Fill the models managed folder id below
MODEL_FOLDER_ID = ""
# Use name of the code environment from prerequisites
MLFLOW_CODE_ENV_NAME = ""

client = dataiku.api_client()
project = client.get_default_project()

# Use for Dataiku Cloud
# client._session.verify = False

# use or create SavedModel
SAVED_MODEL_NAME = "clf"
SAVED_MODEL_ID = None

for sm in project.list_saved_models():
    if SAVED_MODEL_NAME != sm["name"]:
        continue
    else:
        SAVED_MODEL_ID = sm["id"]
        print(
            "Found SavedModel {} with id {}".format(
                SAVED_MODEL_NAME, SAVED_MODEL_ID))
        break
if SAVED_MODEL_ID:
    sm = project.get_saved_model(SAVED_MODEL_ID)
else:
    sm = project.create_mlflow_pyfunc_model(
        name=SAVED_MODEL_NAME,
        prediction_type="BINARY_CLASSIFICATION")
    SAVED_MODEL_ID = sm.id
    print(
        "SavedModel not found, created new one with id {}".format(
            SAVED_MODEL_ID))

# Load model from pickle file
folder = dataiku.Folder(MODEL_FOLDER_ID)
with folder.get_download_stream("/pipeline.pkl") as f:
    model = pickle.load(f)

# Create MLflow model via a dummy experiment run
folder_api_handle = project.get_managed_folder(MODEL_FOLDER_ID)
mlflow_extension = project.get_mlflow_extension()
with project.setup_mlflow(managed_folder=folder_api_handle) as mf:
    mlflow.set_experiment("dummy_xpt")
    with mlflow.start_run(run_name="dummy_run") as run:
        mlflow.sklearn.log_model(sk_model=model, artifact_path="dummy_model")
        mlflow_extension.set_run_inference_info(
            run_id=run._info.run_id,
            prediction_type='BINARY_CLASSIFICATION',
            classes=list(model.classes_),
            code_env_name=MLFLOW_CODE_ENV_NAME)

# Deploy MLflow model as a saved model version
mlflow_extension.deploy_run_model(
    run_id=run._info.run_id,
    sm_id=SAVED_MODEL_ID,
    version_id="v01",
    evaluation_dataset="bank_test",
    target_column_name="y")
Let’s break down some parts of the script to understand the process.
This code block creates an empty model flow item (
clf). It checks whether such an object already exists, which will be helpful in subsequent runs. It specifies that the Saved Model holds MLflow models (create_mlflow_pyfunc_model()) for binary classification prediction.
for sm in project.list_saved_models():
    if SAVED_MODEL_NAME != sm["name"]:
        continue
    else:
        SAVED_MODEL_ID = sm["id"]
        print(
            "Found SavedModel {} with id {}".format(
                SAVED_MODEL_NAME, SAVED_MODEL_ID))
        break
if SAVED_MODEL_ID:
    sm = project.get_saved_model(SAVED_MODEL_ID)
else:
    sm = project.create_mlflow_pyfunc_model(
        name=SAVED_MODEL_NAME,
        prediction_type="BINARY_CLASSIFICATION")
The model is then deserialized from the pickle file (
pipeline.pkl) located in the managed folder.
folder = dataiku.Folder(MODEL_FOLDER_ID)
with folder.get_download_stream("/pipeline.pkl") as f:
    model = pickle.load(f)
Then, the deserialized model is logged as an MLflow model via experiment tracking–a dummy run functions as a conversion step.
with project.setup_mlflow(managed_folder=folder_api_handle) as mf:
    mlflow.set_experiment("dummy_xpt")
    with mlflow.start_run(run_name="dummy_run") as run:
        mlflow.sklearn.log_model(sk_model=model, artifact_path="dummy_model")
        mlflow_extension.set_run_inference_info(
            run_id=run._info.run_id,
            prediction_type='BINARY_CLASSIFICATION',
            classes=list(model.classes_),
            code_env_name=MLFLOW_CODE_ENV_NAME)
Finally, comparing the model results with the
evaluation_datasetbank_test,mlflow_extension.deploy_run_model()triggers the evaluation features, unlocking the explainability and interpretability visualizations in the Dataiku UI.
# Deploy MLflow model as a saved model version
mlflow_extension.deploy_run_model(
    run_id=run._info.run_id,
    sm_id=SAVED_MODEL_ID,
    version_id="v01",
    evaluation_dataset="bank_test",
    target_column_name="y")
Wrapping up#
If you want to add the last script in the flow, use the Create Recipe button on the notebook to create a Python recipe with model_folder and bank_test as inputs and the Dataiku model object (clf) as the output. You could use just this step to import pickled models into Dataiku. Of course, there are technical considerations and constraints during such an import. Among others, you’ll have to ensure the evaluation dataset has the same schema as the training dataset and the consistency of the Python packages used.