

Create a simple admin project dashboard using Dash.#
Prerequisites#
Some familiarity with HTML, CSS, and Dash for the front-end
Some familiarity with Python for the backend
An existing Dataiku Project in which you have the “Project admin” permissions
A Python code environment with
dashanddash-bootstrap-componentspackages installed (see the documentation for more details)
Note
This tutorial has been written using python==3.9, dash==2.7.0 and dash-bootstrap-components==1.2.1
but other versions could work.
Introduction#
In this tutorial, you will create a Dataiku webapp using Dash to showcase an administration dashboard of your Dataiku instance. The webapp backend will collect the data using the Dataiku public API.
Before digging into the details, be sure that you meet the prerequisites.
Create the Webapp#
From the project home page:
In the top navigation bar, go to </> > Webapps.
Click on + New Webapp on the top right, then select Code Webapp > Dash.
Select the An empty Dash app template and give a name to your newly created Webapp.

Fig. 1: Creation of a new Dash webapp.#
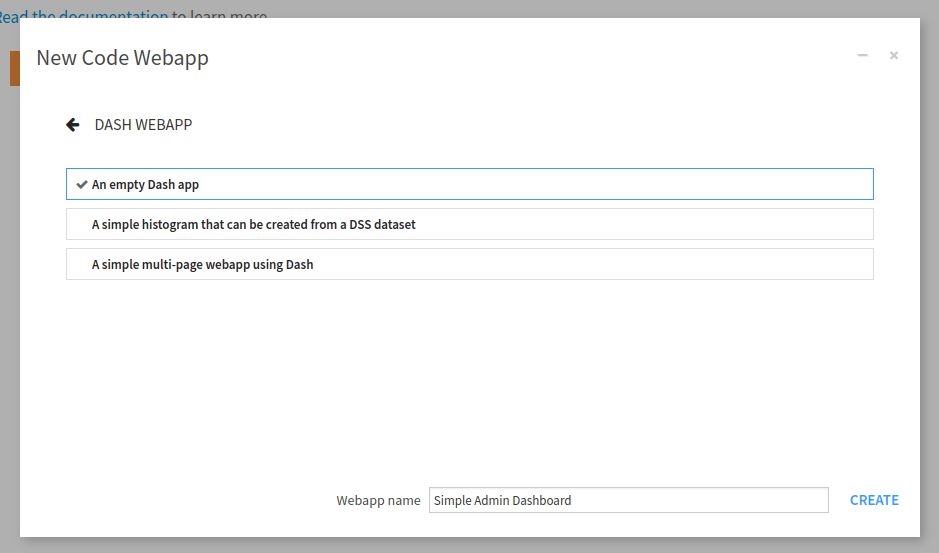
Fig. 2: New empty Dash Webapp.#
After a while, the Webapp should start. Whether your project environment contains Dash packages or not, you may either have a fail or success status message. If it fails, the project environment does not include the dash packages, so we must specify the Code Env the Webapp should use. Go to Settings, then Settings, change the value of “Code Env” (1) to “Select an environment,” and change the value of the “Environment” to the Code Env (2) with the prerequisite packages, shown in Fig. 3. Then click the Save button, and the Webapp should start. If it fails, you may have to change the settings in the Container field.
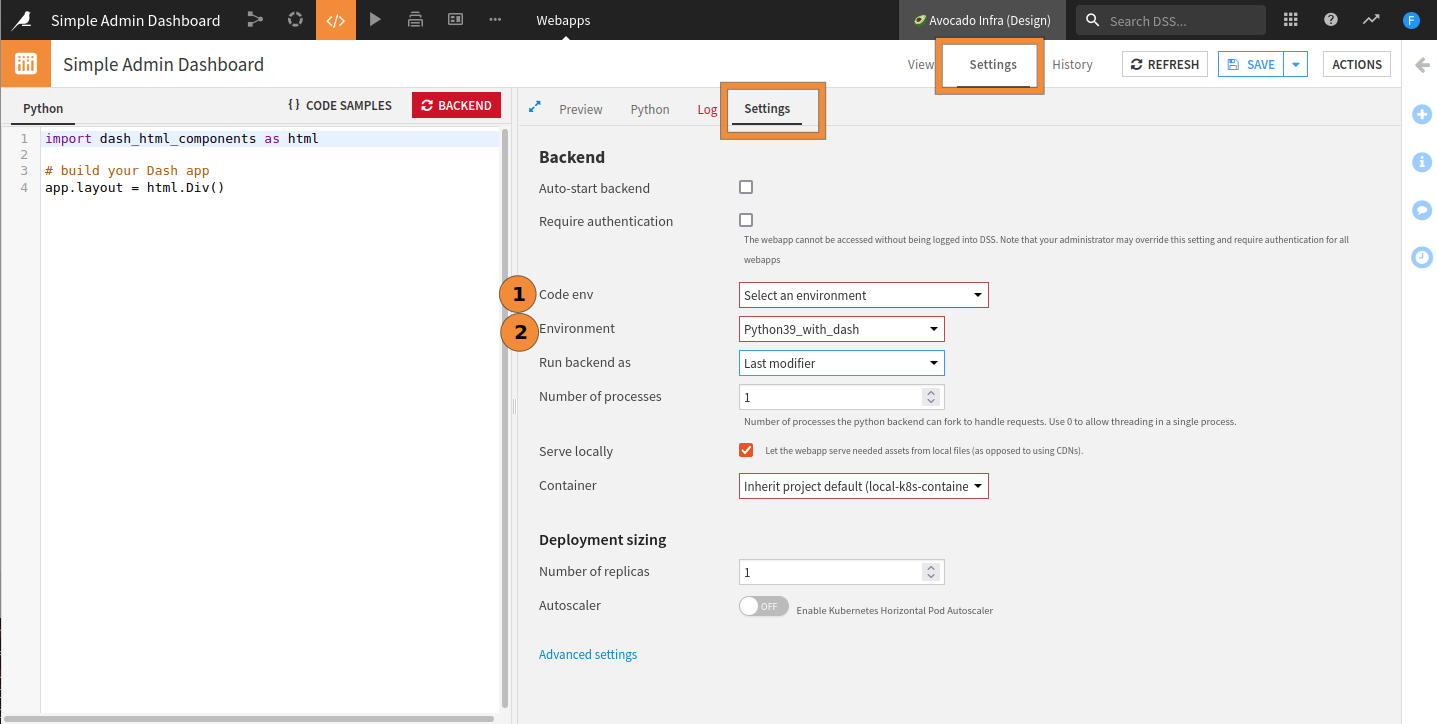
Fig. 3: Setting the default Code Env.#
Start with an empty template.#
In the “Python” tab, replace the existing code with Code 1. After clicking the Save button, you should have something similar to Fig. 4.
import dash
import dash_bootstrap_components as dbc
from dash import html

app.config.external_stylesheets = [dbc.themes.DARKLY]

app.layout = html.Div(className = 'document', children=[
    html.H1(children = "Dash Webapp: Admin dashboard tutorial")
])

Fig. 4: First template rendering.#
Setting the dashboard layout#
In this part, we will set up the global layout of our dashboard to look like Fig. 5.
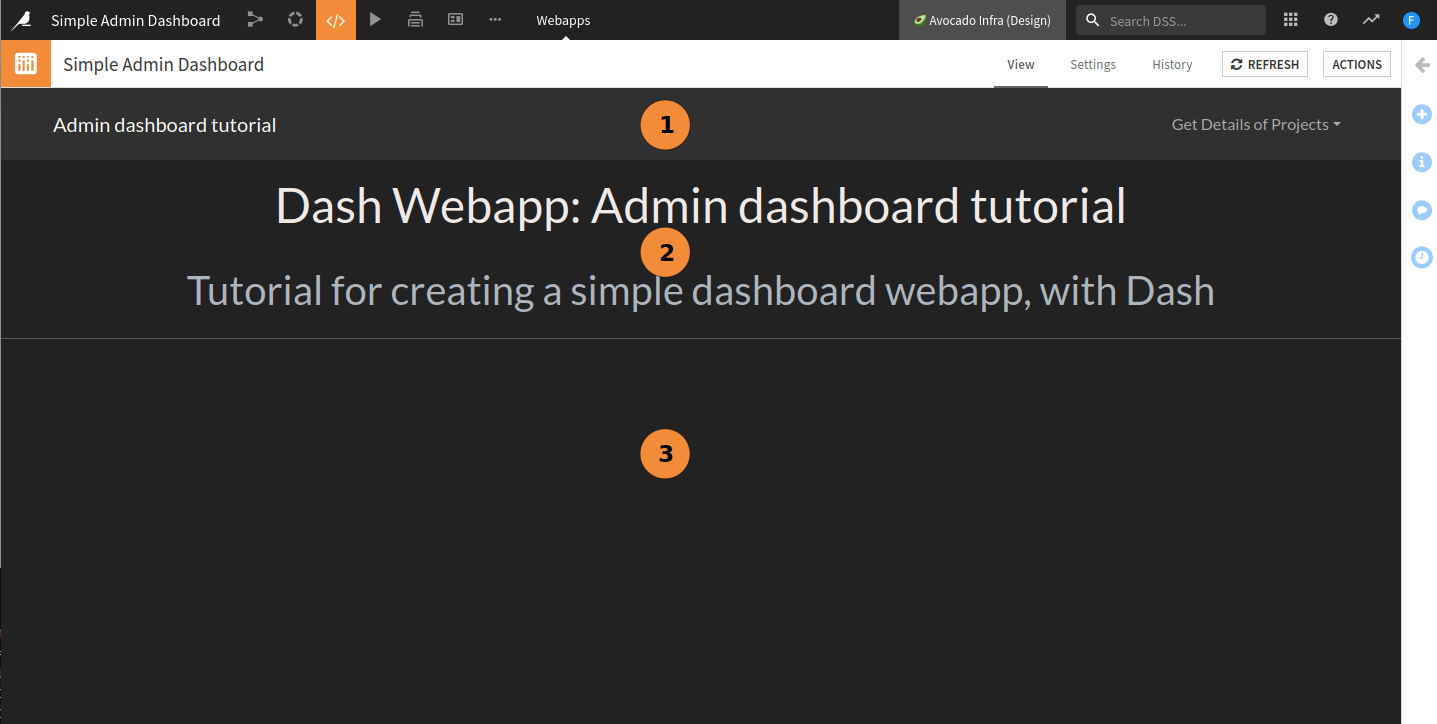
Fig. 5: First layout of the dashboard.#
We will start by focusing on the design, then load data.
We will split the layout into several zones:
Zone 1 (Code 2) contains the navigation bar, with the title of our dashboard and a dropdown menu that we will populate later.
Zone 2 (Code 3) contains the description of our project.
Zone 3 will be the placeholder for the various visualizations we will add.
These three zones make the global layout as described in (Code 4).
# For the description layout, we will use classical HTML tags
description = html.Div([
    html.H1(children="Dash Webapp: Admin dashboard tutorial", className="text-center p-3", style={'color': '#EFE9E7'}),
    html.H2(children="Tutorial for creating a simple dashboard webapp, with Dash",
            className="text-center p-2 text-light "),
    html.Hr(),
])
app.layout = html.Div(className = 'document',
                  children=[
                      navbar,
                      description,
                  ])
# content is not present for now
Getting the data#
In this section we will gather the necessary data to be displayed inside the Webapp.
List of projects#
We want to start by collecting data on the projects living in the instance. To do so, we need to import the dataiku
package, retrieve a client and get the list of projects. Once we have the projects
list, we can display the information (just to be sure that the list is not empty), and populate the navigation bar’s dropdown list.
The code underneath retrieves the list of (accessible) projects. We will come back later on this to add interactivity.
import dataiku

client = dataiku.api_client()
projects = client.list_projects()
To populate the dropdown list, we should replace the following line:
children=[],
in the navigation bar layout template with:
children=[dbc.DropdownMenuItem(p['name'], href=p['projectKey']) for p in projects],
Once we have the project list, we can display their number on a card. As displaying this information is common, we will create a function for (Code 5). Once this function has been created, we can add the card to our layout. We will create a content layout (Code 6), which will be useful in the next steps.
def create_card(result, title):
    card = dbc.Card(
        dbc.CardBody([
            html.P(title),
            html.H3(len(result), style={'text-align':'right','margin-right':'8px'})
        ],),
        style={'border-width':'0px', 'height':'100%'}
    )

    return card
content = html.Div([
    create_card(projects, "Accessible projects")
])
Add the content to the app.layout after the description. The Webapp looks like the screenshot in
Fig. 6, and the value should change if you change the Webapp
settings to run the backend as another user in the “Settings” tab.
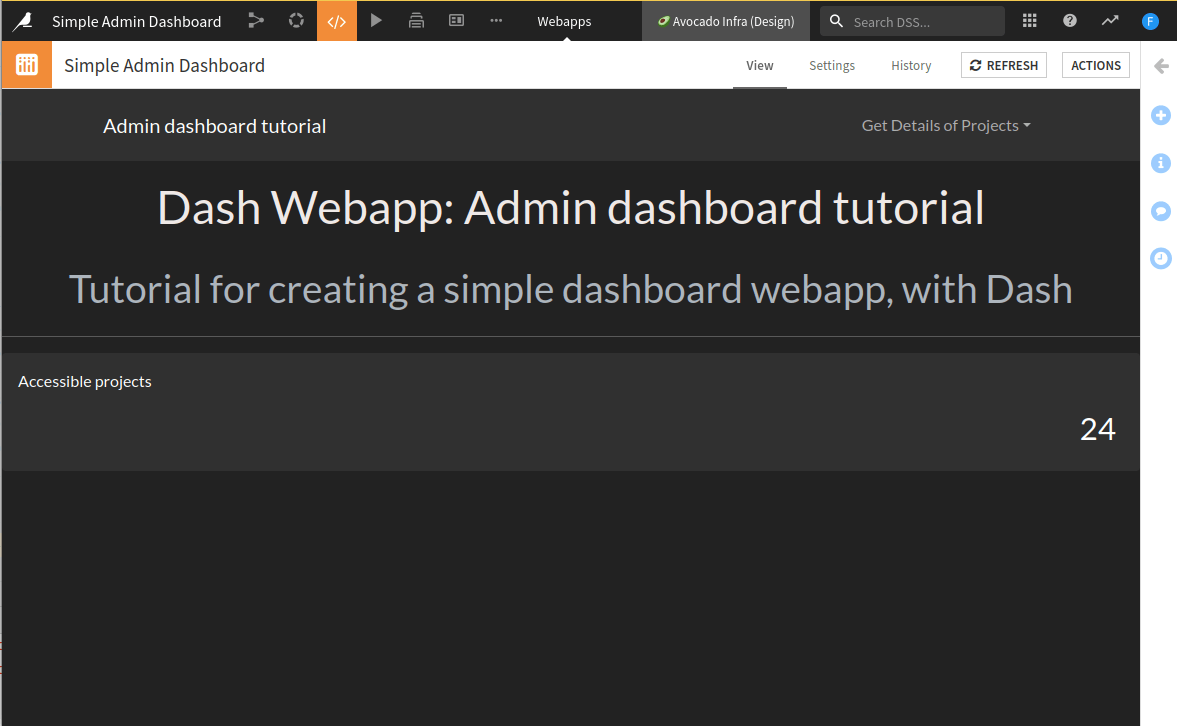
Fig. 6: Display the number of accessible projects.#
Global statistics of the instance#
We can count more items on the instance, such as scenarios, used plugins, code environments, or connections. Not all
these items are accessible without elevated privileges, so we must consider situations where the user doesn’t have
sufficient permissions to access a particular resource. To do so, we create the function
get_value_if_no_execption (See Code 7).
def get_value_if_no_exception(fun: object) -> object:
    """
    Try to run a function. If the function raises an exception, catch it and return an empty array.

    :param fun: the function to execute.

    :return: Return ("success", result of the function) or ("danger", []) if the function fails.

    Usage example:
        .. code-block:: python

        projects = get_value_if_no_exception(client.list_projects)

    """
    try:
        return "success", fun()
    except Exception as _:
        return "danger", []
Now we can correctly handle “errors” if they occur, as shown in Code 8.
projects = get_value_if_no_exception(client.list_projects)
clusters = get_value_if_no_exception(client.list_clusters)
code_envs = get_value_if_no_exception(client.list_code_envs)
connections = get_value_if_no_exception(client.list_connections)
# Personal meanings definitions
meanings = get_value_if_no_exception(client.list_meanings)
plugins = get_value_if_no_exception(client.list_plugins)
running_notebooks = get_value_if_no_exception(client.list_running_notebooks)
running_scenarios = get_value_if_no_exception(client.list_running_scenarios)
As we changed the value of the variable projects, we should update the DropdownMenu accordingly.
So we should replace the following line:
children=[dbc.DropdownMenuItem(p['name'], href=p['projectKey']) for p in projects],
in the navigation bar layout template with:
children=[dbc.DropdownMenuItem(p['name'], href=p['projectKey']) for p in projects[1]],
Getting fancy: adding color borders#
We need to slightly tweak the card generation by changing the create_card function to use these data.
Code 9 shows the modifications. As the
function get_value_if_no_exception return also the state of the execution, we will use it to drop a color border
to the card, as shown in Fig. 7.
get_value_if_no_exception#def create_card(result, title):
card = dbc.Card(
dbc.CardBody([
html.P(title),
html.H3(len(result[1]), style={'text-align':'right','margin-right':'8px'})
],
className="border-start border-{} border-5".format(result[0])),
style={'border-width':'0px', 'height':'100%'}
)
return card
.../...
content = html.Div([
dbc.Row([
dbc.Col(
create_card(projects, "Accessible Projects"), width=2
),
dbc.Col(
create_card(clusters, "Defined Clusters"), width=2
),
dbc.Col(
create_card(code_envs, "Code Envs"), width=2
),
dbc.Col(
create_card(connections, "Defined Connections"), width=2
),
dbc.Col(
create_card(plugins, "Used Plugins"), width=2
),
dbc.Col(
create_card(meanings, "Defined Meanings"), width=2
),
]),
dbc.Row([
dbc.Col(
create_card(running_notebooks, "Running Notebooks"), width=6
),
dbc.Col(
create_card(running_scenarios, "Running Scenarios"), width=6
),
],
style={'padding-top':'1ex'})
], style={'padding-right': '1em', 'padding-left':'1em'})
.../...
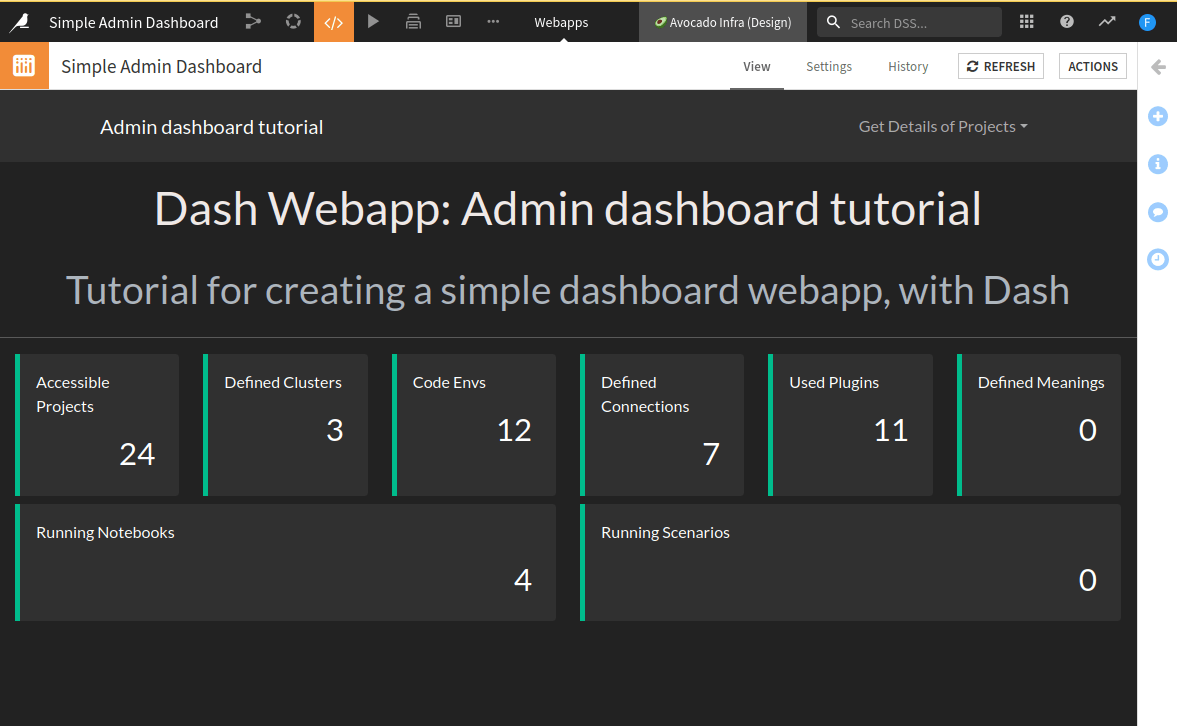
Fig. 7: All cards are created from collected data on the instance (admin view).#
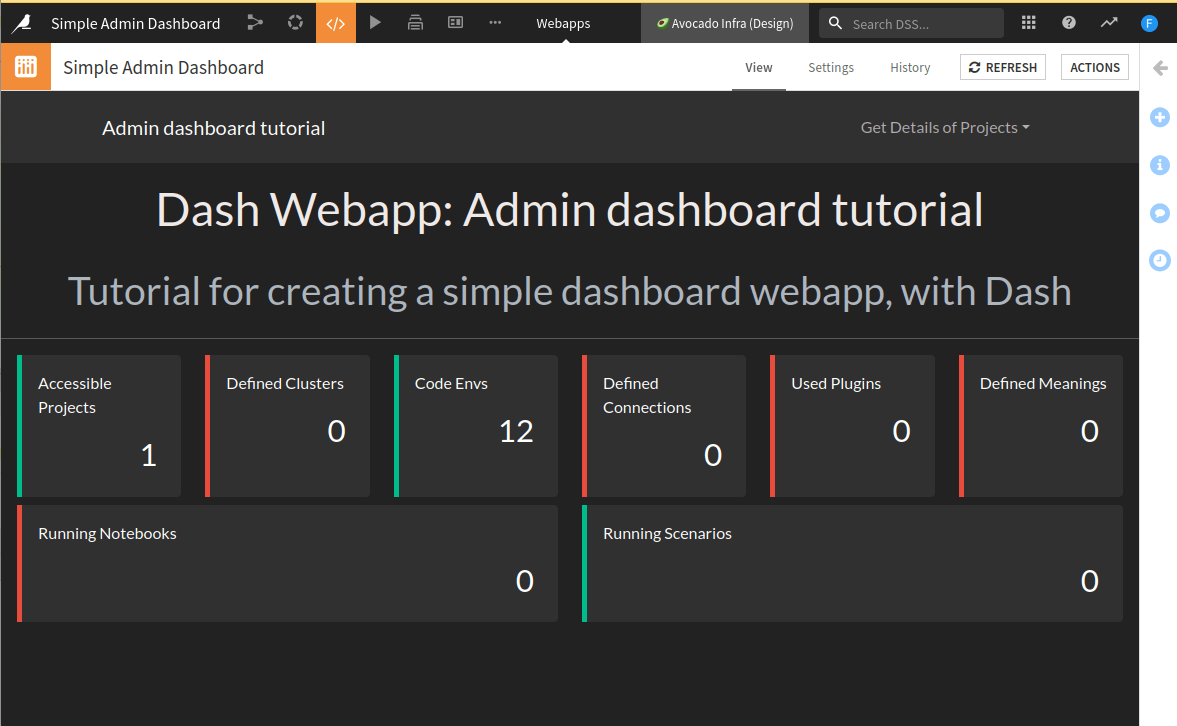
Fig. 8: All cards are created from collected data on the instance (user view).#
“Making cards interactive.”#
For now, the dashboard looks nice, but it lacks interactivity. We will add a button to each card
and bind the click to a function. Before digging into the code, let’s analyze our needs. To create a card,
we need a title and data. This data comes from the get_value_if_no_exception function, which returns a tuple. It
is made of the status of the request and the result of it. We need an id to react to the click event because we want
to include a button in the card and add interactivity. We will also have an icon to make the button nicer.
The click event will pop up a window, showing some information. This leads to Code 10. Of course, we have to adapt this code to our specific needs. To run this, you will need to import the following missing dependencies:
import dash
import dash_bootstrap_components as dbc
from dash.dependencies import Input, Output, State
from dash import html
import dataiku

app.config.external_stylesheets = [dbc.themes.DARKLY, dbc.icons.FONT_AWESOME]
def create_card(result, title, icon="", id="", key=""):
    content = ""
    if key:
        content = [html.P(r[key]) for r in result[1]]
    else:
        content = str(result[1])

    card = dbc.Card([
        dbc.CardBody([
            dbc.Button([
                html.I(className="fa-solid {} me-2".format(icon)),title],
                className="card-title",
                id=id if id else "",
                n_clicks=0
            ),
            html.H3(len(result[1]), style={'text-align':'right','margin-right':'8px'})
        ],
        className="border-start border-{} border-5".format(result[0])),
        dbc.Modal(
            [
                dbc.ModalHeader(dbc.ModalTitle(title)),
                dbc.ModalBody(
                    content
                ),
                dbc.ModalFooter(
                    dbc.Button(
                        "Close", id="close-{}".format(id), className="ms-auto", n_clicks=0
                    )
                ),
            ],
            id="modal-{}".format(id),
            is_open=False,
        )
    ],style={'border-width':'0px', 'height':'100%'})

    if id:
        @app.callback(
            Output("modal-{}".format(id), "is_open"),
            [Input(id, "n_clicks"), Input("close-{}".format(id), "n_clicks")],
            [State("modal-{}".format(id), "is_open")],)
        def toggle_modal(n1, n2, is_open):
            if n1 or n2:
                return not is_open
            return is_open


    return card
We also have to replace the card creation with Code 11.
content = html.Div([
    dbc.Row([
        dbc.Col(
            create_card(projects, "Accessible Projects", "fa-diagram-project", "id-project", "name"), width=2
        ),
        dbc.Col(
            create_card(clusters, "Defined Clusters", "fa-circle-nodes", "id-cluster", "name"), width=2
        ),
        dbc.Col(
            create_card(code_envs, "Code Envs", "fa-toolbox", "id-code-env", "envName"), width=2
        ),
        dbc.Col(
            create_card(connections, "Defined Connections", "fa-ethernet", "id-connection"), width=2
        ),
        dbc.Col(
            create_card(plugins, "Used Plugins", "fa-plug", "id-plugin", "id"), width=2
        ),
        dbc.Col(
            create_card(meanings, "Defined Meanings", "fa-comment", "id-meaning"), width=2
        ),
    ]),
    dbc.Row([
        dbc.Col(
            create_card(running_notebooks, "Running Notebooks", "fa-book", "id-notebook"), width=6
        ),
        dbc.Col(
            create_card(running_scenarios, "Running Scenarios", "fa-list-ol", "id-scenario"), width=6
        ),
    ],
    style={'padding-top':'1ex'})
], style={'padding-right': '1em', 'padding-left':'1em'})
Final code review#
Here is the complete code file present on this page.
import dash
import dash_bootstrap_components as dbc
from dash.dependencies import Input, Output, State
from dash import html
import dataiku

client = dataiku.api_client()
projects = client.list_projects()

def get_value_if_no_exception(fun: object) -> object:
    """
    Try to run a function. If the function raises an exception, catch it and return an empty array.

    :param fun: the function to execute.

    :return: Return ("success", result of the function) or ("danger", []) if the function fails.

    Usage example:
        .. code-block:: python

        projects = get_value_if_no_exception(client.list_projects)

    """
    try:
        return "success", fun()
    except Exception as _:
        return "danger", []


def create_card(result, title, icon="", id="", key=""):
    content = ""
    if key:
        content = [html.P(r[key]) for r in result[1]]
    else:
        content = str(result[1])

    card = dbc.Card([
        dbc.CardBody([
            dbc.Button([
                html.I(className="fa-solid {} me-2".format(icon)),title],
                className="card-title",
                id=id if id else "",
                n_clicks=0
            ),
            html.H3(len(result[1]), style={'text-align':'right','margin-right':'8px'})
        ],
        className="border-start border-{} border-5".format(result[0])),
        dbc.Modal(
            [
                dbc.ModalHeader(dbc.ModalTitle(title)),
                dbc.ModalBody(
                    content
                ),
                dbc.ModalFooter(
                    dbc.Button(
                        "Close", id="close-{}".format(id), className="ms-auto", n_clicks=0
                    )
                ),
            ],
            id="modal-{}".format(id),
            is_open=False,
        )
    ],style={'border-width':'0px', 'height':'100%'})

    if id:
        @app.callback(
            Output("modal-{}".format(id), "is_open"),
            [Input(id, "n_clicks"), Input("close-{}".format(id), "n_clicks")],
            [State("modal-{}".format(id), "is_open")],)
        def toggle_modal(n1, n2, is_open):
            if n1 or n2:
                return not is_open
            return is_open


    return card


app.config.external_stylesheets = [dbc.themes.DARKLY, dbc.icons.FONT_AWESOME]

projects = get_value_if_no_exception(client.list_projects)
clusters = get_value_if_no_exception(client.list_clusters)
code_envs = get_value_if_no_exception(client.list_code_envs)
connections = get_value_if_no_exception(client.list_connections)
# Personnal meanings definitions
meanings = get_value_if_no_exception(client.list_meanings)
plugins = get_value_if_no_exception(client.list_plugins)
running_notebooks = get_value_if_no_exception(client.list_running_notebooks)
running_scenarios = get_value_if_no_exception(client.list_running_scenarios)


navbar = dbc.NavbarSimple(
    children=[
        dbc.DropdownMenu(
            children=[dbc.DropdownMenuItem(p['name'], href=p['projectKey']) for p in projects[1]
                      ],
            nav=True,
            in_navbar=True,
            label="Get Details of Projects",
        ),
    ],
    brand="Admin dashboard tutorial",
    brand_href="#",
    color="dark",
    dark=True,
)

description = html.Div([
    html.H1(children="Dash Webapp: Admin dashboard tutorial", className="text-center p-3", style={'color': '#EFE9E7'}),
    html.H2(children="Tutorial for creating a simple dashboard webapp, with Dash",
            className="text-center p-2 text-light "),
    html.Hr(),
])

content = html.Div([
    dbc.Row([
        dbc.Col(
            create_card(projects, "Accessible Projects", "fa-diagram-project", "id-project", "name"), width=2
        ),
        dbc.Col(
            create_card(clusters, "Defined Clusters", "fa-circle-nodes", "id-cluster", "name"), width=2
        ),
        dbc.Col(
            create_card(code_envs, "Code Envs", "fa-toolbox", "id-code-env", "envName"), width=2
        ),
        dbc.Col(
            create_card(connections, "Defined Connections", "fa-ethernet", "id-connection"), width=2
        ),
        dbc.Col(
            create_card(plugins, "Used Plugins", "fa-plug", "id-plugin", "id"), width=2
        ),
        dbc.Col(
            create_card(meanings, "Defined Meanings", "fa-comment", "id-meaning"), width=2
        ),
    ]),
    dbc.Row([
        dbc.Col(
            create_card(running_notebooks, "Running Notebooks", "fa-book", "id-notebook"), width=6
        ),
        dbc.Col(
            create_card(running_scenarios, "Running Scenarios", "fa-list-ol", "id-scenario"), width=6
        ),
    ],
    style={'padding-top':'1ex'})
], style={'padding-right': '1em', 'padding-left':'1em'})

app.layout = html.Div(className = 'document',
                      children=[
                          navbar,
                          description,
                          content,
                      ])
Conclusion#
In this tutorial, we have built a simple administration dashboard using Dash. We have collected some data from the
dataiku package. We could also have retrieved some data from datasets using the same package. We should also have
added some interactivity to the dropdown menu item. The easiest way is to create a function that produces a
dropdown menu item for a given projectKey and pops up a modal with the data we want to display, as we did for the
card button. Many other improvements could have been done, but this wouldn’t have been relevant for this tutorial.
As the web application code grows, putting the whole code into a single file will be inconvenient. We can split the
code into several parts using the library and importing it into the webapp. If your code needs to access
the app to add interactivity, remember to pass the app as a parameter of your function.