

Comparing zero-shot learning and few-shot learning using Dolly for efficient text classification#
Prerequisites#
Dataiku>=11.4
“Use” permission on a code environment using Python >= 3.9 with the following packages:
torch==1.13.1transformers==4.30.2scikit-learn==1.0.2accelerate==0.19.0
Access to an existing project with the following permissions:
“Read project content” on an existing or new DSS project
“Write project content”
basic natural language processing (NLP) domain knowledge (tokens, embeddings, etc.)
[HIGHLY RECOMMENDED] GPU-enabled code environment
Introduction#
Large Language Models like Dolly and the GPT family allow for zero-shot learning, i.e., they can generate text without any training data. At the same time, they can also be fine-tuned on a specific task with relatively little training data using a technique called few-shot learning. This tutorial will walk you through how to use an LLM for few-shot learning on a text classification task and compare it to zero-shot learning.
Getting the data#
This tutorial uses the Amazon Review
Dataset.
The provided Python script
downloads one of the subset
datasets,
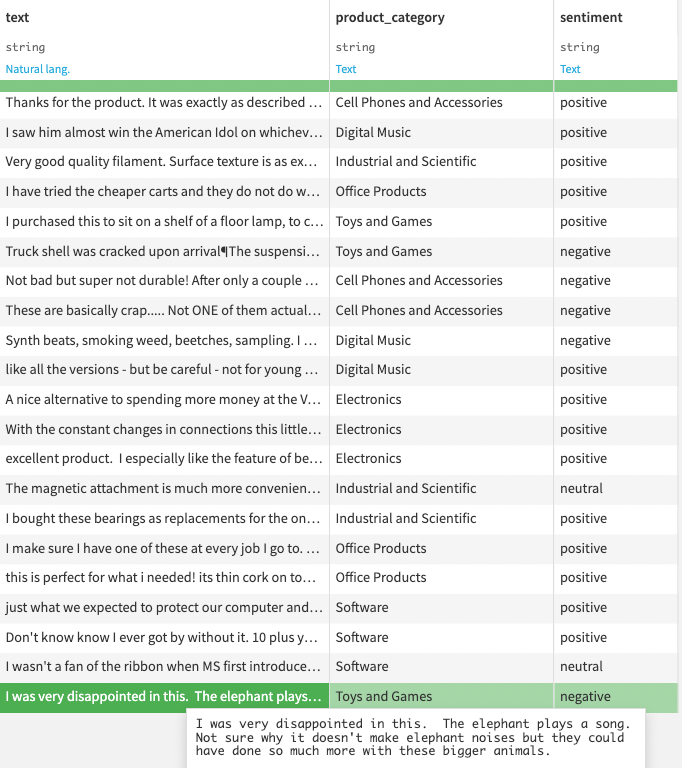
creates a small sample of reviews, and uploads it as a dataset named
beauty_product_reviews. To use this script, you must create a Python recipe
from the flow with an output dataset named beauty_product_reviews and copy the
code into the recipe’s code.
        if sentiment in [1, 2]:
            sentiment = "negative"
        elif sentiment == 3:
            sentiment = "neutral"
        elif sentiment in [4, 5]:
            sentiment = "positive"
Note
The code specifies two recommended sample sizes for processing data - 256 with a GPU and 32 without one. Keep in mind that even with a GPU, the number of samples that can feasibly be processed may vary widely, depending on GPU configuration options: type and memory, among others. Determining the appropriate sample size may require some experimentation.
Model & tokens#
In this tutorial, you will use a pre-trained model to predict a classification
label for these reviews. After loading the relevant libraries (see the complete
code), the provided
script, which can be run as a recipe or in a notebook,
loads a model and the corresponding tokenizer. The transformers library
provides a simple interface to load and use pre-trained models and tokenizers
for various natural language processing tasks. Loading models from remote
repositories like Hugging Face is a common practice rather than training models
for specific NLP tasks.
Here, you’ll be using the databricks/dolly-v2-3b
model. It is trained on a
diverse range of English-language text from the internet and similar sources and
fine-tuned using an instruction corpus. Here is the code for loading the model
and the tokenizer:
tokenizer = AutoTokenizer.from_pretrained(
    "databricks/dolly-v2-3b",
    padding_side="left"
)
model = AutoModelForCausalLM.from_pretrained(
    "databricks/dolly-v2-3b",
    device_map="auto",
    torch_dtype=torch.bfloat16
).eval()
Caution
Loading the model and tokenizer as common objects across multiple uses is a good practice because it saves time and resources. Pre-trained models and tokenizers can be quite large (this one is over five gigs!). Loading them multiple times can be memory-intensive and slow, depending on the bandwidth available.
You load a small set of product reviews using the dataset
(beauty_product_reviews) already in the project. Specify the target labels and
their corresponding token ids using the encode() method. These are the main
steps for preparing data and objects for the text generation pipeline.
Once these assets are loaded, you can set BATCH_SIZE to a constant–in this
case, 8. This is the number of samples that pass through the model’s neural
network during training. The batch size can affect the speed and stability of
the training process, with a larger batch giving faster training times, but it
could also lead to overfitting and instability.
This tutorial compares two text classification techniques. Zero-shot learning leverages a pre-trained model’s understanding of word and concept relationships without further training. Few-shot learning, however, enhances the model with training examples via the prompt, avoiding retraining. You’ll walk through a simple implementation of each to see that even a few examples are better than none. In practice, you might choose one or the other depending on the use case.
Zero-shot learning for text classification#
First, perform zero-shot learning on the dataset using the model. Define a prompt asking the model to decide whether a given product review is positive, neutral, or negative without any examples. Using the pre-trained model and tokenizer, the code iterates over the dataset in batches, tokenizing the prompts and predicting the probability of the labels. The predicted sentiment (positive vs. neutral vs. negative) is then concatenated to the original dataset, along with the probabilities for each sentiment. You have used a pre-trained language model for zero-shot learning on a dataset.
for i in range(0, len(df), BATCH_SIZE):
    print(i)
    # Instantiate the prompts
    prompts = [prompt0.format(txt) for txt in df["text"][i:i+BATCH_SIZE]]

    # Tokenize the prompts and compute the next token probabilities with the model
    input_ids = tokenizer(prompts, return_tensors="pt", padding=True).input_ids
    with torch.no_grad():
        outputs = model(input_ids.to(DEVICE))
    result = torch.nn.Softmax(dim=-1)(outputs.logits[:, -1, target_token_ids])
Few-shot learning for text classification#
For few-shot learning, start by defining a prompt that asks the model to decide
whether a given product review is positive, neutral, or negative. This time,
though, you’ll include a few examples with it. Here is how the examples look
based on the code snippet:
“I love my new chess board!” is positive.
“Not what I expected but I guess it’ll do” is neutral.
“I’m so disappointed; the product seemed much better on the website” is negative.
# Build the prompt with examples
prompt = "Decide whether the following product reviews' sentiment is positive, neutral, or negative."
examples = [
    (
        "I love my new chess board!",
        "positive"
    ),
    (
        "Not what I expected but I guess it'll do",
        "neutral"
    ),
    (
        "I'm so disappointed. The product seemed much better on the website",
        "negative"
    )
Again, the predicted probabilities for each sentiment (positive vs. neutral
vs. negative) are concatenated to the original dataset, along with the
pre-trained language model for few-shot learning as well!
Conclusion#
The model metrics (accuracy, F1-score) demonstrate how few-shot learning can improve a classification task’s performance and efficiency. By defining a few-shot prompt with examples and computing the next token probabilities with a pre-trained language model, you can perform classification on a dataset with limited labeled data. When evaluated using the ground truth, the metrics show that few-shot learning is more efficient. It will likely have much higher accuracy and F1 scores, demonstrating gains from using few-shot learning for classification tasks.
from sklearn.metrics import f1_score
f1_zeroshot = f1_score(df_zeroshot["sentiment"], df_zeroshot["prediction"], average="weighted")
f1_fewshot = f1_score(df_fewshot["sentiment"], df_fewshot["prediction"], average="weighted")
print("Zero-shot accuracy:", acc_zeroshot)
print("Few-shot accuracy:", acc_fewshot)
print("Zero-shot F1 score:", f1_zeroshot)
print("Few-shot F1 score:", f1_fewshot)
You can find two more end-to-end examples using both methods with the OpenAI API instead (GPT-based zero-shot text classification with the OpenAI API and GPT-based few-shot classification with the OpenAI API).
Complete code#
Python recipe for data prep
import dataiku

import requests
import gzip
import json
import csv
import random

# URL & filenames to download & create
URL = 'http://jmcauley.ucsd.edu/data/amazon_v2/categoryFilesSmall/Luxury_Beauty_5.json.gz'
FILE_NAME = 'Luxury_Beauty_5.json.gz'
FILE_UNZIP = 'Luxury_Beauty_5.json'
PROD_CATEGORY = "Luxury Beauty"
SAMPLE_SIZE = 256 # GPU provisioned :fingers-crossed:
SAMPLE_SIZE = 32 # in case no GPU :warning:
DATASET_NAME = "beauty_product_reviews"

response = requests.get(URL)

with open(FILE_NAME, 'wb') as f:
    f.write(response.content)

# Unzip the archive
with gzip.open(FILE_NAME, 'rb') as gz_file:
     with open(FILE_UNZIP, "wb") as f_out:
        f_out.write(gz_file.read())

with open(FILE_UNZIP, "r", encoding="utf-8") as f:
    data = []
    for line in f:
        record = json.loads(line)
        text = record.get("reviewText", "")
        category = PROD_CATEGORY
        sentiment = record.get("overall", "")
        if sentiment in [1, 2]:
            sentiment = "negative"
        elif sentiment == 3:
            sentiment = "neutral"
        elif sentiment in [4, 5]:
            sentiment = "positive"
        data.append({"text": text, "product_category": category, "sentiment": sentiment})


# Get a random sample of 1000 records
sample_data = random.sample(data, SAMPLE_SIZE)

# Get the dataset object
dataset = dataiku.Dataset(DATASET_NAME)

# Define the schema for the dataset
schema = [{"name": "text", "type": "string"},
          {"name": "product_category", "type": "string"},
          {"name": "sentiment", "type": "string"}]

# Write the schema to the dataset
dataset.write_schema(schema)

# Write the rows to the dataset
with dataset.get_writer() as writer:
    for row in sample_data:
        writer.write_row_dict(row)
Python recipe or notebook for performance comparison
import dataiku
import pandas as pd

import torch
from transformers import AutoModelForCausalLM, AutoTokenizer
print("Running script ...\n\n\n")
BATCH_SIZE = 8
DEVICE = torch.device("cuda" if torch.cuda.is_available() else "cpu")

print(f"DEVICE: {DEVICE}, processing batches of {BATCH_SIZE}\n\n")
print("Loading model ..\n\n" )

tokenizer = AutoTokenizer.from_pretrained(
    "databricks/dolly-v2-3b",
    padding_side="left"
)
model = AutoModelForCausalLM.from_pretrained(
    "databricks/dolly-v2-3b",
    device_map="auto",
    torch_dtype=torch.bfloat16
).eval()

DATASET_NAME = "beauty_product_reviews"
df = dataiku.Dataset(DATASET_NAME).get_dataframe()

print(df.info())

## Zero-shot
print("\n\nZero-shot \n")

# Build the zero-shot prompt
prompt0 = "Decide whether the following product review's sentiment is positive, neutral, or negative.\n\nProduct review:\n{}\nSentiment:"

target_tokens = ['positive', 'neutral', 'negative']
target_token_ids = [tokenizer.encode(k)[0] for k in target_tokens]

# target_tokens, target_token_ids

results0 = None

for i in range(0, len(df), BATCH_SIZE):
    print(i)
    # Instantiate the prompts
    prompts = [prompt0.format(txt) for txt in df["text"][i:i+BATCH_SIZE]]

    # Tokenize the prompts and compute the next token probabilities with the model
    input_ids = tokenizer(prompts, return_tensors="pt", padding=True).input_ids
    with torch.no_grad():
        outputs = model(input_ids.to(DEVICE))
    result = torch.nn.Softmax(dim=-1)(outputs.logits[:, -1, target_token_ids])

    if results0 is None:
        results0 = result
    else:
        results0 = torch.cat((results0, result), axis=0)

predicted_token_ids = torch.argmax(results0, axis=1)
predictions0 = [target_tokens[i] for i in predicted_token_ids]

scores0_df = pd.DataFrame(
    results0.float().cpu().numpy(),
    columns=[f"proba_{k}" for k in target_tokens]
)

df_zeroshot = pd.concat([df, pd.Series(predictions0, name='prediction'), scores0_df], axis=1)

## Few-shot
print("\n\nFew-shot \n")

# Build the prompt with examples
prompt = "Decide whether the following product reviews' sentiment is positive, neutral, or negative."
examples = [
    (
        "I love my new chess board!",
        "positive"
    ),
    (
        "Not what I expected but I guess it'll do",
        "neutral"
    ),
    (
        "I'm so disappointed. The product seemed much better on the website",
        "negative"
    )
]
for example in examples:
    prompt += f"\n\nProduct review:\n{example[0]}\nSentiment:\n{example[1]}"
prompt += "\n\nProduct review:\n{}\nSentiment:\n"


results = None

for i in range(0, len(df), BATCH_SIZE):
    print(i)
    # Instantiate the prompts
    prompts = [prompt.format(txt) for txt in df["text"][i:i+BATCH_SIZE]]
    # Tokenize the prompts and compute the next token probabilities with the model
    input_ids = tokenizer(prompts, return_tensors="pt", padding=True).input_ids
    with torch.no_grad():
        outputs = model(input_ids.to(DEVICE))
    result = torch.nn.Softmax(dim=-1)(outputs.logits[:, -1, target_token_ids])
    if results is None:
        results = result
    else:
        results = torch.cat((results, result), axis=0)

predicted_token_ids = torch.argmax(results, axis=1)
predictions = [target_tokens[i] for i in predicted_token_ids]
scores_df = pd.DataFrame(
    results.float().cpu().numpy(),
    columns=[f"proba_{k}" for k in target_tokens]
)

df_fewshot = pd.concat([df, pd.Series(predictions, name='prediction'), scores_df], axis=1)

from sklearn.metrics import accuracy_score
acc_zeroshot = accuracy_score(df_zeroshot["sentiment"], df_zeroshot["prediction"])
acc_fewshot = accuracy_score(df_fewshot["sentiment"], df_fewshot["prediction"])
acc_zeroshot, acc_fewshot
print("Classification completed! And now calculating the results you've been waiting for ..")

import random
print("".join(str(random.randint(0, 9)) for _ in range(50)))
print("".join(str(random.randint(0, 9)) for _ in range(30)))
print("".join(str(random.randint(0, 9)) for _ in range(20)))
print ("ALL DONE\n\n")

from sklearn.metrics import f1_score
f1_zeroshot = f1_score(df_zeroshot["sentiment"], df_zeroshot["prediction"], average="weighted")
f1_fewshot = f1_score(df_fewshot["sentiment"], df_fewshot["prediction"], average="weighted")
print("Zero-shot accuracy:", acc_zeroshot)
print("Few-shot accuracy:", acc_fewshot)
print("Zero-shot F1 score:", f1_zeroshot)
print("Few-shot F1 score:", f1_fewshot)