

Editing & Debugging Code Agent with VS Code#
This tutorial shows how to develop, test, and debug a Code Agent in Dataiku using Code Studio with VS Code. You will learn how to edit, sync, and safely manage Code Agents in your projects. For setting up a Code Studio template, see the documentation.
Prerequisites#
A Dataiku 14.5+ instance.
Administrator privileges for your user profile.
A Kubernetes cluster is configured. For details, visit Elastic AI Computation.
A base image is built. Typically, this is built using a command such as
./bin/dssadmin build-base-image --type container-exec. For details, visit Build the Base Image.A project with some Code Agent and Code Tool. If you haven’t got one, you can follow this tutorial.
A Code Studio Template with VS Code and the Code Environment used by your GenAi component. Refer to this tutorial if you don’t know how to set up a Code Studio template.
A Dataiku 13.5+ instance.
Administrator privileges for your user profile.
A Kubernetes cluster is configured. For details, visit Elastic AI Computation.
A base image is built. Typically, this is built using a command such as
./bin/dssadmin build-base-image --type container-exec. For details, visit Build the Base Image.A project with some Code Agent and Code Tool. If you haven’t got one, you can follow this tutorial.
A Code Studio Template with VS Code and the Code Environment used by your GenAi component. Refer to this tutorial if you don’t know how to set up a Code Studio template.
Administrator privileges for your user profile.
A project with some Code Agent and Code Tool. If you haven’t got one, you can follow this tutorial.
A Code Studio Template with VS Code and the Code Environment used by your GenAi component. Refer to this tutorial if you don’t know how to set up a Code Studio template.
Editing a Code Agent#
If you haven’t set up a Code Studio, create one.
Select the Code Studio attached to your project, and click the Start button.
Once the Code Studio is running, you can select your Code Agent in the code_agents folder within VS Code.
Note
You should not create a Code Agent directly in the code-agents folder. Creating a Code Agent requires more than just creating a simple file. If you create a new file in this folder, you will be able to perform some tests, but the ‘Sync files with DSS’ button won’t save it back to DSS.
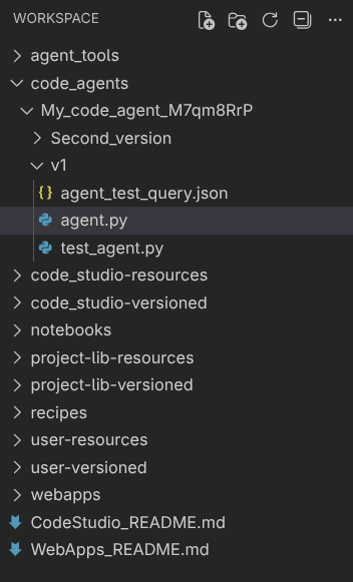
When you open the Code Studio instance, you will find a folder named: /home/dataiku/workspace/code_agents.
All code agents are found in this folder,
in a subfolder with a name that begins with the name of the agent you want to edit.
Suppose you want to edit a code agent named My code agent.
In this code agent, you have two versions (v1 and Second version),
and you want to edit version v1.
The code of your agent will be located in a file named agent.py under the path:
/home/dataiku/workspace/code_agents/My_code_agent_xxxxxxxx/v1/agent.py
where xxxxxxxx represents an ID (chosen by Dataiku), as shown in the figure below:
Any modification you make to this file won’t be propagated to Dataiku unless you hit the Sync files with DSS button. As soon as you synchronize your files with Dataiku, the code agent will be updated across the entire project, potentially affecting some users. Usually, it is not the way that you want to go when you are coding.
If you haven’t set up a Code Studio, create one.
Select the Code Studio attached to your project, and click the Start button.
Once the Code Studio is running, you can select your Code Agent in the code-agents folder within VS Code.
Note
You should not create a Code Agent directly in the code-agents folder. Creating a Code Agent requires more than just creating a simple file. If you create a new file in this folder, you will be able to perform some tests, but the ‘Sync files with DSS’ button won’t save it back to DSS.
To find your agent, you need to know its ID.
This code snippet can help you find it.
A Code Agent can have multiple versions.
You also need to know which version you want to edit.
Suppose your agent has the name Extract_topics, its ID is pO0H7cvh,
and you want to edit the version named v1, you should edit the file code-agents/Extract_topics_pO0H7cvh_v1.py.
When making changes to a Code Agent, you may want to test it. If you use the code below, the agent will run, but you won’t be able to see your changes, as you are working on a local copy of the code.
import dataiku

client = dataiku.api_client()
project = client.get_default_project()


CODE_AGENT = "" # Fill with your Code Agent ID
llm  = project.get_llm(CODE_AGENT)

completion = llm.new_completion()
completion.with_message("How to edit an Code Agent in Dataiku?")
resp = completion.execute()
print(resp.success)
print(resp.trace)
To view your changes, synchronize your files with DSS and then run the code above. However, if you do that, the Code Agent will be updated for the entire project, and users may be affected by your changes. Usually, it is not the way that you want to go when you are coding. Hopefully, Dataiku provides a helper to test your modifications before publishing them.
Let’s take a real example.
Imagine having a Code Agent (Extract_topics) that reformulates a question into smaller,
more easily answerable questions, as shown in the code below.
You also need to test/modify it, for example, to see if changing the base LLM would improve your results.
import dataiku
from dataiku.llm.python import BaseLLM

OPENAI_CONNECTION_NAME = "REPLACE_WITH_YOUR_CONNECTION_NAME"  # example: "openAI"

class MyLLM(BaseLLM):
    def __init__(self):
        pass

    def process(self, query, settings, trace):
        llm = dataiku.api_client().get_default_project().get_llm(f"openai:{OPENAI_CONNECTION_NAME}:gpt-4.1-mini")
        completion = llm.new_completion().with_message("Reformulates a question into smaller, more easily answerable questions", "system")
        for message in query["messages"]:
            if message.get("content"):
                completion = completion.with_message(message["content"], message.get("role", "user"))
        llm_resp = completion.execute()

        resp_text = "Here are the questions you need to answer."
        resp_text = resp_text + "\n" + llm_resp.text
        return {"text": resp_text}
If you run this code, either by using the UI or by using the test file (see below for more information on using this test file), with the following input, you will obtain the following response:
{
   "messages": [
      {
         "role": "user",
         "content": "What is the capital of the country where the Eiffel Tower is built?"
      }
   ],
   "context": {}
}
Here are the questions you need to answer.
To answer your question, let's break it down into smaller parts:

1. Which country is the Eiffel Tower located in?
2. What is the capital city of that country?

Would you like me to provide the answers?
Using the Dataiku helper#
Now, you need to see if changing the LLM will impact the result.
In your agent’s folder, you will find an autogenerated file (test_agent.py) with the following content:
import agent
from dataiku.llm.python import BaseLLM
import json
from dataiku.llm.python.tests import run_completion_query
from dataiku.llm.python.types import SingleCompletionQuery
import inspect
from pathlib import Path

HERE = Path(__file__).resolve().parent

# Autogenerated test case for Code Agents in Code Studio.
# This file can be freely edited in Code Studio, and changes
# will persist.
def test():
    agent_class = guess_agent_class()

    # load the json from agent_test_query.json
    query = load_test_query()
    response = run_completion_query(agent_class, query)
    print(json.dumps(response, indent=2, sort_keys=True))

def load_test_query():
    return json.loads((HERE / "agent_test_query.json").read_text(encoding="utf-8"))

def guess_agent_class():
    classes = [
        cls for name, cls in inspect.getmembers(agent, inspect.isclass)
        if cls.__module__ == agent.__name__
        and issubclass(cls, BaseLLM)
        and cls is not BaseLLM
    ]
    return classes[0]

if __name__ == "__main__":
    test()
This file helps you both in testing and debugging.
It provides starter code to quickly test your agent by reading agent_test_query.json
and using it as input for your query.
If needed, you can modify this file.
The changes will be persisted when you hit the Sync files with DSS button.
Now, you need to see if changing the LLM will impact the result.
In VS Code, in the code-agents folder, create a file named test_agent.py with the following content:
import json
from Extract_topics_pO0H7cvh_v1 import MyLLM
from dataiku.llm.python.tests import run_completion_query

resp = run_completion_query(MyLLM, "What is the capital of the country where the Eiffel Tower is built?")
print(json.dumps(resp, indent=4))
The highlighted line shows how to use the helper for testing your Code Agent. Now that you know how to use your Code Agent locally, you can test your modifications.
For example, if you change your LLM definition with
llm = dataiku.api_client().get_default_project().get_llm(f"openai:{OPENAI_CONNECTION_NAME}:gpt-5-mini")
and run the test again, you will obtain:
{
    "text": "Here are the questions you need to answer.\nHere are smaller, easy-to-answer questions that lead to the original answer:\n\n1. In which city is the Eiffel Tower located?  \n2. Which country is that city in?  \n3. What is the capital of that country?",
    "trace": {
        "type": "span",
        "name": "DKU_TEST_AGENT_CALL",
        "children": [],
        "attributes": {},
        "inputs": {},
        "outputs": {},
        "begin": "2025-12-16T13:23:53.538000Z",
        "end": "2025-12-16T13:28:08.331000Z",
        "duration": 254793
    }
}
Tailoring to your needs#
By default, the run_completion_query method calls the aprocess method if it exists;
otherwise, it calls process; if process does not exist, it calls aprocess_stream;
if aprocess_stream also does not exist, it calls process_stream.
Usually, an agent only implements one of these functions,
so using the run_completion_query is enough for the vast majority of cases.
But sometimes, you can use another calling chain to test your agent.
If you fall into a case where running this function does not fit your needs,
you can instantiate the class and then test all the functions you want to test.
To be able to do this, you first need to import the agent’s class:
from agent import MyLLM
Once the import is complete, you can test the methods you need by simply calling them.
For example, if you want to test the aprocess method,
you can use this code (don’t forget to import asyncio):
def test():
    query = load_test_query()

    agent = MyLLM()
    response = asyncio.run(agent.aprocess(query, None, SpanBuilder("titi")))

    print(response)
With the helper, you can easily test your modifications.
However, if you synchronize your files, you will see that your test file (test_agent.py) has disappeared.
This is due to the synchronization; as the test file is not a Code Agent, it is not saved,
and as it is not present as an Agent, the synchronization deletes it.
To be able to keep your test file from one synchronization to another,
you need to move it from the code-agents folder to the code_studio-versioned folder.
However, if you simply move the file, you will encounter an error,
as Extract_topics_pO0H7cvh_v1.py is no longer in the same folder as the test file.
You will need to modify the test file to include the code-agents folder in the path, as shown in the code below.
import sys
import os

current_file_path = os.path.abspath(__file__)
parent_dir = os.path.dirname(os.path.dirname(current_file_path))
sibling_dir = os.path.join(parent_dir, 'code-agents')
sys.path.insert(0, sibling_dir)

import json
from Extract_topics_pO0H7cvh_v1 import MyLLM
from dataiku.llm.python.tests import run_completion_query

resp = run_completion_query(MyLLM, "What is the capital of the country where the Eiffel Tower is built?")
print(json.dumps(resp, indent=4))
As you are able to run your Code Agent in Code Studio, you can use the Debug action of Code Studio, as you do for classical debugging.
If your agent is using a tool, you will also be able to debug it by putting a breakpoint in the tool.
Do not forget to synchronize your files with Dataiku once you have finished testing/debugging your Code Agent.
Wrapping up#
In this tutorial, you learned how to develop and test a Code Agent in Dataiku using Code Studio and VS Code. You discovered how to safely edit, synchronize, and debug your agents, as well as run local tests before publishing changes.