

Sessionization in SQL, Hive, and Python#
Sessionization is the act of turning event-based data into sessions, the ordered list of a user’s actions in completing a task. It’s widely used in several domains, such as:
- Web analytics:A session tracks all of a user’s actions during a single visit to a website, such as a buying process on an e-commerce site.Analyzing these sessions provides crucial insights into user behavior, including common purchase paths, site navigation, exit points, and the effectiveness of various acquisition funnels.
- Trip analytics:Given the GPS coordinates history of a vehicle, you can compute sessions to extract the different trips.Each trip can then be labeled distinctly (e.g., user going to work, on holidays, etc.).
- Predictive maintenance:A session can encompass all the information related to a machine’s behavior (working, idle, etc.) until a change in its assignment occurs.
Given a user ID or machine ID, the question is: how can we recreate sessions? Or more precisely, how do we choose the boundaries of a session?
The third example defines a new session when the assignment changes. If we examine the first two examples, however, we see that we can define a new session if the user has been inactive for a certain amount of time, T.
In this case, a session is defined by two things: a user ID and a threshold time. If the subsequent action occurs within a time range greater than T, it marks the start of a new session. This threshold can depend on the website constraints themselves.
Prerequisites#
An SQL database that supports window functions, such as PostgreSQL.
An HDFS connection for Hive.
An SQL Dataset named
toy_data. You can create this Dataset by uploading thisCSV fileand using a Sync recipe to store the data in an SQL connection.
Preparing the data#
Coming from a CSV, the mytimestamp column of the toy_data dataset is currently stored as a string. To tackle sessionization, we want it stored as a date.
Create a Prepare recipe with
toy_dataas the input.Store the output into your SQL database and create the recipe.
Parse the
mytimestampcolumn as a date into a new column.Delete the original and rename the parsed date column as
mytimestamp.Run the recipe and update the schema.
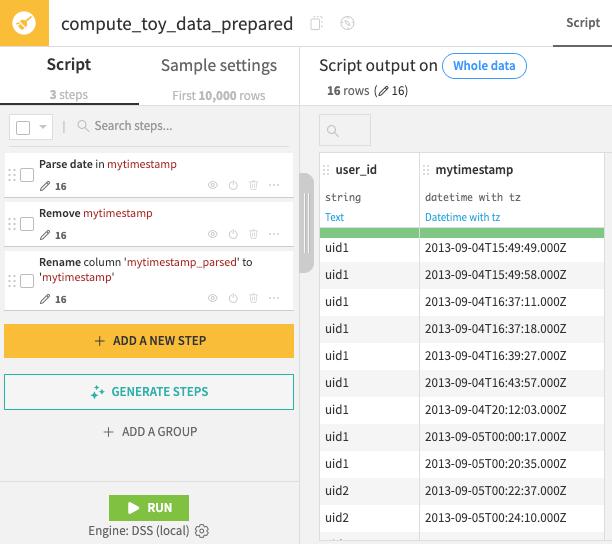
On opening the synced output dataset, recognize that:
It’s sorted by time.
There are two different users.
mytimestampis stored as a date.
Note
For more information on syncing datasets to SQL databases, please see this course on Dataiku & SQL.
Sessionization in SQL#
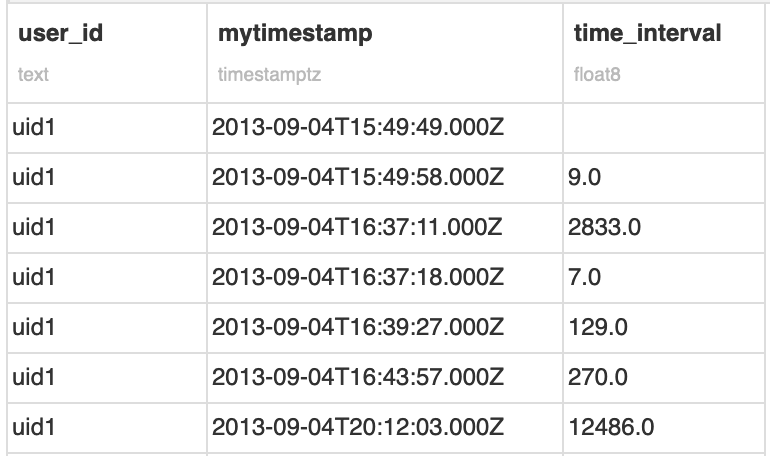
The objective is to identify the row in the ordered dataset where a new session begins.
To do that, we need to calculate the interval between two rows of the same user. The SQL window function LAG() does it for us:
Create a new SQL notebook on the
toy_data_prepareddataset.Create a new query.
Use the tables tab on the left to confirm the name of your table.
If using the starter project, directly copy the snippet below to calculate a
time_intervalcolumn.Click Run to confirm the result.
SELECT *
    ,  EXTRACT(EPOCH FROM mytimestamp)
       - LAG(EXTRACT(EPOCH FROM mytimestamp))
       OVER (PARTITION BY user_id ORDER BY mytimestamp) AS time_interval
FROM "DKU_SESSIONIZATION_toy_data_prepared";
This SQL query outputs a new column that is the difference between the timestamp of the current row and the previous one, by user_id.
Note that the first appearance of a user contains a row with an empty time interval, as the calculation cannot produce a value.
Based on this interval, we will now flag each session of a given user. Assuming 30 minutes of inactivity defines a new session, we can slightly transform the previous expression into this one:
SELECT *
  , CASE
      WHEN EXTRACT(EPOCH FROM mytimestamp)
           - LAG(EXTRACT(EPOCH FROM mytimestamp))
           OVER (PARTITION BY user_id ORDER BY mytimestamp) >= 30 * 60
      THEN 1
      ELSE 0
    END as new_session
FROM
  "DKU_SESSIONIZATION_toy_data_prepared";
This query creates a Boolean column, where a value of 1 indicates a new session and zero otherwise.
Finally, we can create a cumulative sum over this Boolean column to create a session_id.
To make it easier to visualize, we can concatenate it with the user_id, and then build our final session_id column:
SELECT *
  , user_id || '_' || SUM(new_session)
  OVER (PARTITION BY user_id ORDER BY mytimestamp) AS session_id
FROM (
  SELECT *
    , CASE
       WHEN EXTRACT(EPOCH FROM mytimestamp)
          - LAG(EXTRACT(EPOCH FROM mytimestamp))
            OVER (PARTITION BY user_id ORDER BY mytimestamp) >= 30 * 60
       THEN 1
       ELSE 0
      END as new_session
    FROM
      "DKU_SESSIONIZATION_toy_data_prepared"
) s1
We finally have our sessionized data! We can now move towards more advanced analytics and derive new KPIs.
Note that this code is enough for this simple example. However, if we had a large partitioned Hive table, a simple increment may not be enough (because we would have collisions for each partition).
In this case, it’s possible to concatenate the user ID with the epoch of the first row of the session.
You can perform the concatenation by calculating the first timestamp of each session and joining it on the previously calculated session_id.
Sessionization in Hive#
If your data is stored in Hadoop (HDFS), and you can use Hive (and a version >= 0.11, where window partitioning functions were introduced), creating sessions will be similar to how you did in the previous PostgreSQL example. To make it work, ensure that your timestamp column has been serialized as “Hive” in your Dataiku dataset (in Dataset > Settings > Preview).
Copy the existing Prepare recipe.
Name the output
toy_data_hdfs.Store it in an HDFS connection.
Make sure the format is “CSV (Hive compatible)”.
Create and run the recipe.
In a Hive notebook on the output dataset, run the following query, adjusting the connection name as needed.
SELECT *
    , CONCAT(user_id,
       CONCAT('_',
        SUM(new_session) OVER (PARTITION BY user_id ORDER BY mytimestamp)
       )
      ) AS session_id
FROM (
    SELECT *
        , CASE
            WHEN UNIX_TIMESTAMP(mytimestamp)
                 - LAG (UNIX_TIMESTAMP(mytimestamp))
                 OVER (PARTITION BY user_id ORDER BY mytimestamp) >= 30 * 60
            THEN 1
            ELSE 0
          END AS new_session
    FROM `connection_name`.`toy_data_hdfs`
) s1
Sessionization in Python#
You can also build sessions using Python. There are several ways to do it, ranging from a pure Python implementation to reproducing the logic above using the pandas library, which is what we will demonstrate here.
In a Python notebook, use the following snippet.
import dataiku
import pandas as pd
from datetime import timedelta

# define threshold value
T = timedelta(seconds=30*60)

# load dataset
toy_data = dataiku.Dataset("toy_data_prepared").get_dataframe()

# add a column containing previous timestamp
toy_data =  pd.concat([toy_data,
                       toy_data.groupby('user_id').transform(lambda x:x.shift(1))]
                      ,axis=1)
toy_data.columns = ['user_id','mytimestamp','prev_mytimestamp']

# create the new session column
toy_data['new_session'] = ((toy_data['mytimestamp'] - toy_data['prev_mytimestamp'])>=T).astype(int)

# create the session_id
toy_data['increment'] = toy_data.groupby("user_id")['new_session'].cumsum()
toy_data['session_id'] = toy_data['user_id'].astype(str) + '_' + toy_data['increment'].astype(str)

# to get the same result as with hive/postgresql
toy_data = toy_data.sort_values(['user_id','mytimestamp'])
The output of this code should give you the sessionized dataset similar to the previous example. We can see that the shift() function is equivalent to LAG() in PostgreSQL, and transform() to a window function.
Wrapping Up#
Congratulations, you are now able to detect and mark sessions within your data, using SQL, Hive, or Python.
Reference documentation#
Classes#
|
Provides a handle to obtain readers and writers on a dataiku Dataset. |
Functions#
|
Read the dataset (or its selected partitions, if applicable) as a Pandas dataframe. |