

Connecting to an external Vector Store#
In this tutorial, you will learn how to connect to an external Vector Store using the Custom Python Agent tool. In this tutorial we will look at MongoDB Atlas Vector Search specifically, however, this tutorial would apply to other vector stores as well, as you’d only need to swap out the Mongo-specific code with the vector store you’d want to use otherwise.
Prerequisites#
As we’ll be creating an Custom Python Tool, it can be beneficial to read how they work in this tutorial. It is not a mandatory tutorial to follow, but it will allow you to understand the basics of Custom Python Tools.
Dataiku >= 14.2
MongoDB Atlas Cluster
Use the pre-seeded sample database if the database is empty
Have a username/password with read access to the database
A Vector Search Index
Python environment with
pymongoinstalled as an additional package
Introduction#
In this tutorial, we’ll be diving into how to use MongoDB Atlas Vector Search in an Agent Tool. We’ll be using MongoDB Atlas to store the data. For easy demonstration of the tools.
You’ll see references to movies and a movie index in this tutorial. This is because we’re using the pre-seeded database by MongoDB: a collection of movies and their respective information. You, of course, don’t need to use the pre-seeded database, so feel free to adapt to your needs.
Generate Embeddings#
Although generating embeddings is listed as a prerequisite for this tutorial, it is essential to highlight this step. You will need to generate embeddings for the data you intend to use. You must use the same embedding model for creating the embeddings as you will use in the agent tool; Otherwise, it will not work (correctly).
Hint
If you haven’t yet created the embeddings, this is the time to do so. You can follow the tutorial on the MongoDB Documentation site for this if you don’t know how.
Storing the embeddings in the MongoDB Vector Search index is a mandatory step here.
Setting up the Custom Python Tool#
To set up the Custom Python Tool, go to the GenAI menu and click Agent Tools.
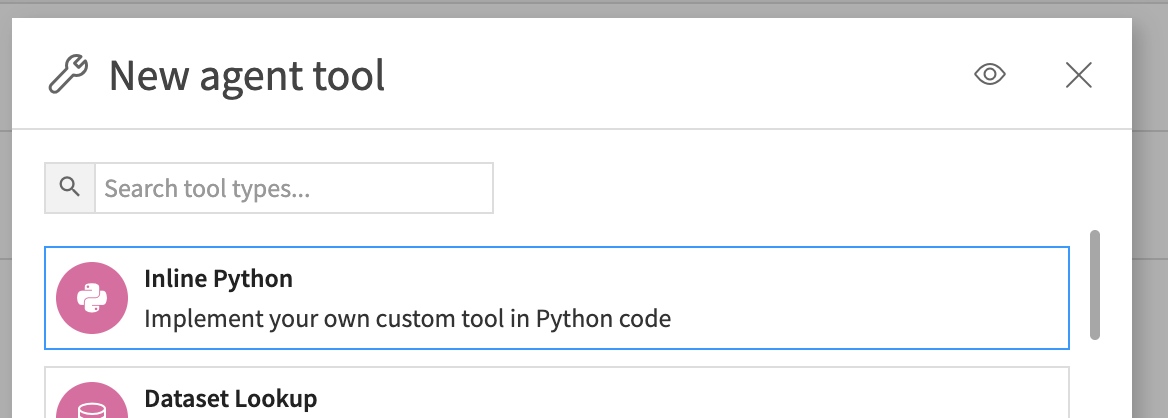
Then click the New Agent Tool button on the top-right, and select Custom Python.
Then, give it a suitable name, such as MongoDB-Vector-Search, and click Create.
The generated Custom Python Tool will have a prefilled code structure that we’ll use to create our tool.
Selecting your Code Environment#
Now, you need a Code Environment with the pymongo package installed.
Once you have created this Code Environment, you can select it through the Settings tab on your Custom Python Tool, and then click Save.
Using MongoDB Vector Search#
Now that you have all your configuration done correctly, it is time to focus on the code. As mentioned, we’ll be using the code already present in your Custom Python Tool by default. However, if it is not already present, here’s the code that should be in your tool right now.
custom-python-template.py
import dataiku
from dataiku.llm.agent_tools import BaseAgentTool

class MyAgentTool(BaseAgentTool):
    """An empty interface for a code-based agent tool"""

    def __init__(self):
        pass

    def get_descriptor(self, tool):
        """
        Returns the descriptor of the tool, as a dict containing:
           - description (str)
           - inputSchema (dict, a JSON Schema representation)
        """
        return {
            "description": "",
            "inputSchema" : {
                "$id": "",
                "title": "",
                "type": "object",
                "properties": {},
                "required": []
            }
        }


    def invoke(self, input, trace):
        """
        Invokes the tool.

        The arguments of the tool invocation are in input["input"], a dict
        """
        return {
            "output": "",
            "sources": [],
        }
Ensure you update the class name to something relevant, such as this.
class MongoVectorSearchTool(BaseAgentTool):
Importing pymongo#
With everything set up correctly, we can now focus on the code required for talking to your
MongoDB Vector Search. The first thing to do is importing pymongo.
import dataiku
from dataiku.llm.agent_tools import BaseAgentTool
from pymongo import MongoClient
Configuration#
The next step is configuration. There are several fields you will need to configure to get your connection working correctly. We’ll go over them one by one.
from pymongo import MongoClient

MONGO_URI = "mongodb+srv://[username]:[password]@[cluster]"
MONGO_DB = "movies"
MONGO_COLLECTION = "movies_embeddings"
MONGO_INDEX = "movie_index"
TEXT_FIELD = "title"
VECTOR_FIELD = "embedding"
NUM_CANDIDATES = 100
EMBEDDING_MODEL_ID = "internal-embedding-id"

class MongoVectorSearchTool(BaseAgentTool):
MONGO_URI: Full MongoDB Atlas connection string, including username, password, and cluster host.MONGO_DB: Name of the MongoDB database that stores the vectorized data.MONGO_COLLECTION: Name of the collection inside that database containing documents and their embeddings.MONGO_INDEX: Name of the MongoDB Atlas Vector Search index defined on the collection’s embedding field.TEXT_FIELD: Name of the text field in each document that you want to return as the result.VECTOR_FIELD: Name of the field in each document that stores the embedding vector used for similarity search.NUM_CANDIDATES: Number of nearest-neighbor candidates MongoDB considers internally before selecting the topkresults returned to the tool.EMBEDDING_MODEL_ID: Identifier of the embedding model configured in the Dataiku project that you use to turn the query text into a vector.
Defining config and descriptor#
The methods for defining config and getting the descriptor, set_config and get_descriptor respectively,
don’t need much adjustment. We won’t need set_config at all, and get_descriptor needs a bit of tweaking to
match our use case. As set_config is a potential useful method, we’ll define it as an empty method.
We’ll also remove the __init__ method from our code as we’re not using it in our use case.
    def set_config(self, config, plugin_config):
        # Not needed for this script
        pass

    def get_descriptor(self, tool):
        return {
            "description": "Semantic search over a MongoDB Atlas Vector Search collection",
            "inputSchema": {
                "type": "object",
                "properties": {
                    "query": {
                        "type": "string",
                        "description": "User question or search text",
                    },
                    "k": {
                        "type": "integer",
                        "description": "Number of results to return",
                        "default": 5,
                    },
                },
                "required": ["query"],
            },
        }
Compute the search query#
In the same way you’ve created embeddings for your dataset, you’ll also need to compute the embedding for your query. We’ll do this inline as so.
        args = input["input"]
        query_text = args["query"]
        client = dataiku.api_client()
        project = client.get_default_project()
        llm = project.get_llm(EMBEDDING_MODEL_ID)

        emb_query = llm.new_embeddings()
        emb_query.add_text(query_text)
        emb_resp = emb_query.execute()
        query_vector = emb_resp.get_embeddings()[0]
As you can see, we’re using the EMBEDDING_MODEL_ID you defined in the
configuration to generate the embeddings using the built-in tools.
Hint
Ensure that your EMBEDDING_MODEL_ID matches the model used to generate
the embeddings, to ensure this process works correctly.
Connect to MongoDB#
Next, we will connect to your MongoDB Vector Search. For this,
we’re going to be using the MongoClient class you’ve imported from the
pymongo package, and several of your configuration variables.
        mongo = MongoClient(MONGO_URI)
        coll = mongo[MONGO_DB][MONGO_COLLECTION]
Configuring the pipeline#
With the connection in place, we can now configure the pipeline.
        k = args.get("k", 5)
        pipeline = [
            {
                "$vectorSearch": {
                    "index": MONGO_INDEX,
                    "path": VECTOR_FIELD,
                    "queryVector": query_vector,
                    "numCandidates": NUM_CANDIDATES,
                    "limit": k,
                }
            },
            {
                "$project": {
                    TEXT_FIELD: 1,
                    "score": {"$meta": "vectorSearchScore"},
                }
            },
        ]
As you can see, we defined the pipeline using the MongoDB pipeline standards.
We’ve defined the relevant fields, all explained in the configuration, as
well as using the k property used in running this Custom Python Tool.
Furthermore, the second step of the pipeline defines the return value, where we return the TEXT_FIELD
property we defined in the configuration, as well as the score, which is defined by the search.
Getting the results#
Everything is in place; the last step is to obtain the results and return them to the Custom Python Tool for consumption. For this, we only need a few more lines of code.
        raw = list(coll.aggregate(pipeline))
        results = [
            {
                "text": doc[TEXT_FIELD],
                "score": doc["score"],
            }
            for doc in raw
        ]

        return {"output": results}
As you can see, we’re looping over the results, formatting the response, and then returning the results so it can be displayed in the Custom Python Tool or used by other agent tools.
Testing the Custom Python Tool#
Your code is complete. For reference, you can find the full code here.
mongodb-vector-search.py
import dataiku
from dataiku.llm.agent_tools import BaseAgentTool
from pymongo import MongoClient

MONGO_URI = "mongodb+srv://[username]:[password]@[cluster]"
MONGO_DB = "movies"
MONGO_COLLECTION = "movies_embeddings"
MONGO_INDEX = "movie_index"
TEXT_FIELD = "title"
VECTOR_FIELD = "embedding"
NUM_CANDIDATES = 100
EMBEDDING_MODEL_ID = "internal-embedding-id"

class MongoVectorSearchTool(BaseAgentTool):
    def set_config(self, config, plugin_config):
        # Not needed for this script
        pass

    def get_descriptor(self, tool):
        return {
            "description": "Semantic search over a MongoDB Atlas Vector Search collection",
            "inputSchema": {
                "type": "object",
                "properties": {
                    "query": {
                        "type": "string",
                        "description": "User question or search text",
                    },
                    "k": {
                        "type": "integer",
                        "description": "Number of results to return",
                        "default": 5,
                    },
                },
                "required": ["query"],
            },
        }

    def invoke(self, input, trace):
        args = input["input"]
        query_text = args["query"]
        k = args.get("k", 5)

        client = dataiku.api_client()
        project = client.get_default_project()
        llm = project.get_llm(EMBEDDING_MODEL_ID)

        emb_query = llm.new_embeddings()
        emb_query.add_text(query_text)
        emb_resp = emb_query.execute()
        query_vector = emb_resp.get_embeddings()[0]

        mongo = MongoClient(MONGO_URI)
        coll = mongo[MONGO_DB][MONGO_COLLECTION]

        pipeline = [
            {
                "$vectorSearch": {
                    "index": MONGO_INDEX,
                    "path": VECTOR_FIELD,
                    "queryVector": query_vector,
                    "numCandidates": NUM_CANDIDATES,
                    "limit": k,
                }
            },
            {
                "$project": {
                    TEXT_FIELD: 1,
                    "score": {"$meta": "vectorSearchScore"},
                }
            },
        ]

        raw = list(coll.aggregate(pipeline))
        results = [
            {
                "text": doc[TEXT_FIELD],
                "score": doc["score"],
            }
            for doc in raw
        ]

        return {"output": results}
It is time to test the tool. If you have configured all correctly, you should see an immediate response.
On the right of the screen in your Custom Python Tool, you see a Text field. Enter a query that matches your data using the format below, and then click the Run Test button.
{
   "input": {
      "query": "Give me movies about trains",
      "k": 5
   },
   "context": {}
}
You should see the result below the Run Test button in the Tool Output tab.
[
  {
    "text": "The Great Train Robbery",
    "score": 0.4930661916732788
  },
  {
    "text": "Shanghai Express",
    "score": 0.44809791445732117
  },
  {
    "text": "Now or Never",
    "score": 0.43981125950813293
  },
  {
    "text": "The Iron Horse",
    "score": 0.4387389123439789
  },
  {
    "text": "City Lights",
    "score": 0.4223432242870331
  }
]
This section is also where you can explore the Logs as well as the Tool Descriptor, which will show
you the result of what you defined in the get_descriptor method.
Conclusion#
You’ve now connected to a remote MongoDB Vector Search using a Custom Python tool. You can use this connection and connections similar to it, to connect to external sources that have not been configured inside your Dataiku instance and/or those that are not supported out of the box by Dataiku.
You can now use this Custom Python tool to query your external Vector Store throughout Dataiku.
Reference documentation#
Classes#
|
Entry point for the DSS API client |
A handle to interact with an embedding query. |
|
A handle to interact with an embedding query result. |
Functions#
|
Get a handle to interact with a specific LLM |
|
Create a new embedding query. |
Retrieve vectors resulting from the embeddings query. |
|
|
Add text to the embedding query. |
|
Run the embedding query. |