

Manipulating Artifact Fields with Govern Custom Actions#
In this tutorial, you will learn how to use Govern Custom Actions to read from and write to artifact fields. We’ll be reading from three params and writing to two fields. We’ll be doing a simple calculation for a fictional “potential” value.
Prerequisites#
Govern Node 14.4 or higher with Advanced License
A Govern project
Which you can freely edit
Using a blueprint version you can freely edit
Project Setup#
In this tutorial, we’ll look into Custom Actions to manipulate artifact fields. In order to do this, we’ll need to configure our blueprint to have those fields. Furthermore, we’ll then add the Custom action to our blueprint that will leverage params.
To create a Govern project, head over to the Blueprint Designer using the top-right waffle menu, then proceed to fork the default Govern Project. Then go to the Governed Project page using the navigation bar on top, and create a new project using the blue Create button on the top right, and select your newly created blueprint version.
Important
If you do not know how to use the Blueprint designer to create a new version of the Govern Project blueprint, you might want to check this tutorial: Tutorial | Custom governance templates.
Set up custom fields#
For this tutorial we need to create two fields where we’ll put our potential calculation results: Q1 potential and Year potential.
First, navigate to your Govern project you’re going to edit, then click the 3-dots menu on the top right, and click the Edit blueprint version menu option.
You’ll be redirected to the blueprint version you’ve used to create the project. Head over to the Fields tab using the left-hand navigation. Next, we’ll be adding the fields. You can add a field by pressing the blue + button next to the Fields header on the left.
Add these fields, both of type number. Make sure the IDs are as follows (and name them appropriately):
q1_potential
projected_year_potential
Once you’ve added the fields, you can click Save on the top right; however as we’ll continue editing the blueprint, you don’t have to.
Create custom action#
Now we’ll create the custom action (placeholder). For the purpose of flow, we’ll keep the action as a placeholder. We’ll dive into editing the action after it’s been placed in the view.
As you are still editing the blueprint, you should see the Actions tab on the left of the screen. Click this tab and then click the blue + button in the left-hand sidebar.
Give the action a name such as Potential Calculator and change the ID at this stage if you want to. As with the custom fields, you can click Save now on the top right.
Adding the fields and action to a view#
Now that we have created 2 fields and 1 action, it’s time to add them to a view so we can use them.
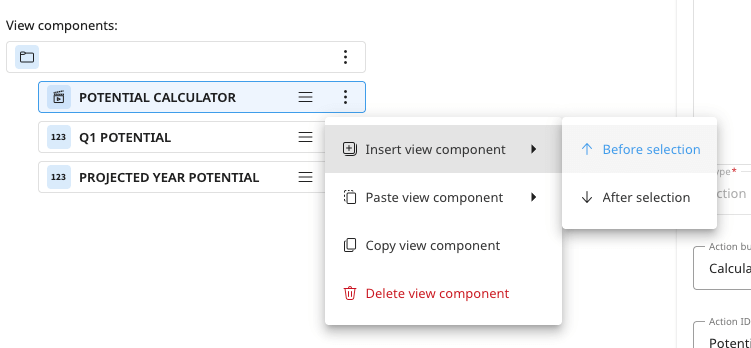
First, click the Views tab on the left of the screen. Then, either use an existing view or create a new view for your project. For simplicity reasons, I recommend reusing the Exploration info view. Click Exploration info, and add all the created fields and the action. You can add any field by clicking the 3 dots at an existing field, choose Insert View Component, and then select either before or after.
You can see how to do this in the image below.
To add the fields you just created, select type Fields in the dialog, and then filter on Potential to find the relevant fields.
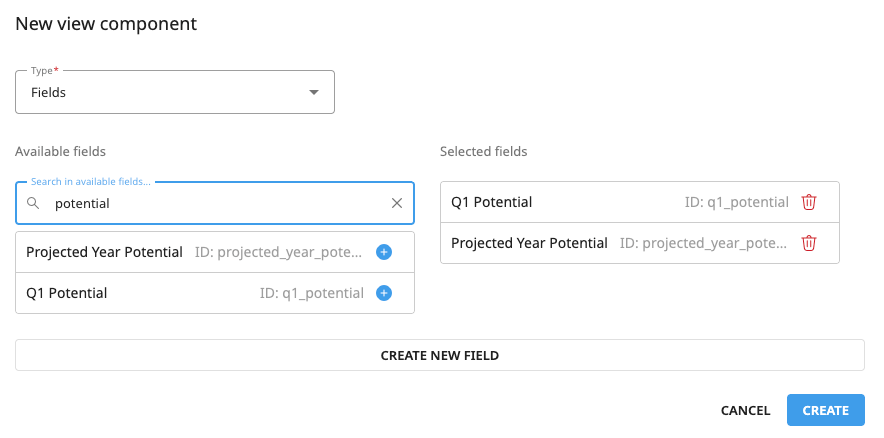
After adding them, click the Create button on the bottom-right of the dialog.
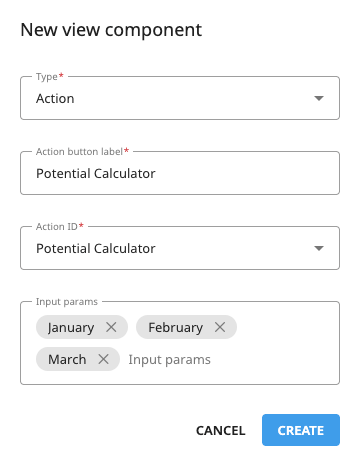
Next, using the same method as before, insert another view component above “Q1 Potential”. And now you select type Action. Then select the action created earlier and add the Action button label, as shown in the image below.
We’ll also be adding 3 input params to the Action button. To add input params, type the name of the field and then type , between each param. You should be adding January, February and March as shown in the screenshot. Make sure you have the capitalization correct as these params are case-sensitive.
Click the Create button to add the action to your view.
Optionally, you can remove any fields from the Exploration info that are not required for this tutorial, and then click Save on the top right. You will get a warning dialog, and you can click Save again on the dialog.
Configure the Custom Action#
Now that we have all the moving parts in place, we can go ahead and actually write our custom action. Go back to the Actions tab on the left of the screen and click on the Potential Calculator action you created earlier.
At this point, you can remove the sample code provided.
First, we’ll get the fields in the current artifact.
from govern.core.artifact_action_handler import get_artifact_action_handler

handler = get_artifact_action_handler()
client = handler.client

artifact_id = handler.enrichedArtifact.artifact.id
artifact = client.get_artifact(artifact_id)

definition = artifact.get_definition()
raw_data = definition.get_raw()
fields = raw_data.setdefault("fields", {})
In the code above, we’re getting the fields from the current artifact. But of course, this requires several steps to get the raw data.
Next, we’re going to fetch the value of the three month params we’ve defined earlier. For this, we’re also going to convert the value to float just in case the field is empty or contains non-numeric values.
MONTH_FIELDS = ["January", "February", "March"]

def to_float(value):
    if value in (None, ""):
        return 0.0
    try:
        return float(value)
    except (ValueError, TypeError):
        return 0.0

params = handler.params or {}
field_values = [to_float(params.get(key)) for key in MONTH_FIELDS]
Note
We’re reading from handler.params here to do calculations. But remember you can just as easily
also read from fields by replacing params.get to fields.get.
In the code above, we have created a list of values from the three params provided. As you can see this logic can easily be expanded by adding more months or removing some. And furthermore, this script will also work if one or more fields are left empty or have non-numeric values.
The next step is to do our calculations. As you might’ve guessed from the names of the fields created, we’ll calculate the total potential of Q1, as well as full-year projections.
In practice, this means we’ll compute a sum for Q1 and multiply the 3-month average by 12.
In code, this looks like this:
q1_total = sum(field_values)
avg_month = q1_total / len(MONTH_FIELDS)
projected_year = avg_month * 12.0
As you can see, the code is relatively straightforward, just a few basic calculation lines.
Lastly, we’ll need to set the two defined fields with the values we just calculated, and save the values so they’ll be visible on screen.
fields["q1_potential"] = q1_total
fields["projected_year_potential"] = projected_year

definition.save()

handler.status = "OK"
handler.message = f"Updated q1_potential={q1_total:.2f} and projected_year_potential={projected_year:.2f}"
As you can see, for setting data, we only need the ID of the relevant fields.
This is why you needed to have the IDs correct when creating the fields.
We also provided an OK status to the handler. Setting the status to ERROR would’ve displayed a red error box instead.
You can use this when making more complex custom actions, or, for example, if you wanted to make
the 3 “month params” mandatory to run this custom action.
The handler.message text will be displayed next to the action button. In our case, we’ve given the calculated values
directly, but of course, they will be displayed in the fields themselves as well. Feel free to configure this as you please.
Make sure you click the Save button on the top right once you’ve provided the full code.
Complete code#
We’ve now gone through all the code required to make this custom action work. However, for reference, the full code is displayed below if you want an easy copy-pasteable example. In the next step, we’ll go to testing the code.
from govern.core.artifact_action_handler import get_artifact_action_handler

MONTH_FIELDS = ["January", "February", "March"]

def to_float(value):
    if value in (None, ""):
        return 0.0
    try:
        return float(value)
    except (ValueError, TypeError):
        return 0.0


handler = get_artifact_action_handler()
client = handler.client

artifact_id = handler.enrichedArtifact.artifact.id
artifact = client.get_artifact(artifact_id)

definition = artifact.get_definition()
raw_data = definition.get_raw()
fields = raw_data.setdefault("fields", {})

params = handler.params or {}
field_values = [to_float(params.get(key)) for key in MONTH_FIELDS]

q1_total = sum(field_values)
avg_month = q1_total / len(MONTH_FIELDS)
projected_year = avg_month * 12.0

fields["q1_potential"] = q1_total
fields["projected_year_potential"] = projected_year

definition.save()

handler.status = "OK"
handler.message = f"Updated q1_potential={q1_total:.2f} and projected_year_potential={projected_year:.2f}"
Testing the custom action#
Now that you have the custom action configured, it is time to test it. At this point, return to your Govern Project you created for this tutorial, or create a project now using the blueprint you have just altered.
Once in your project, click the Exploration view on the left. In case you configured a different view for your fields, click that one instead.
Your screen should now look like this:
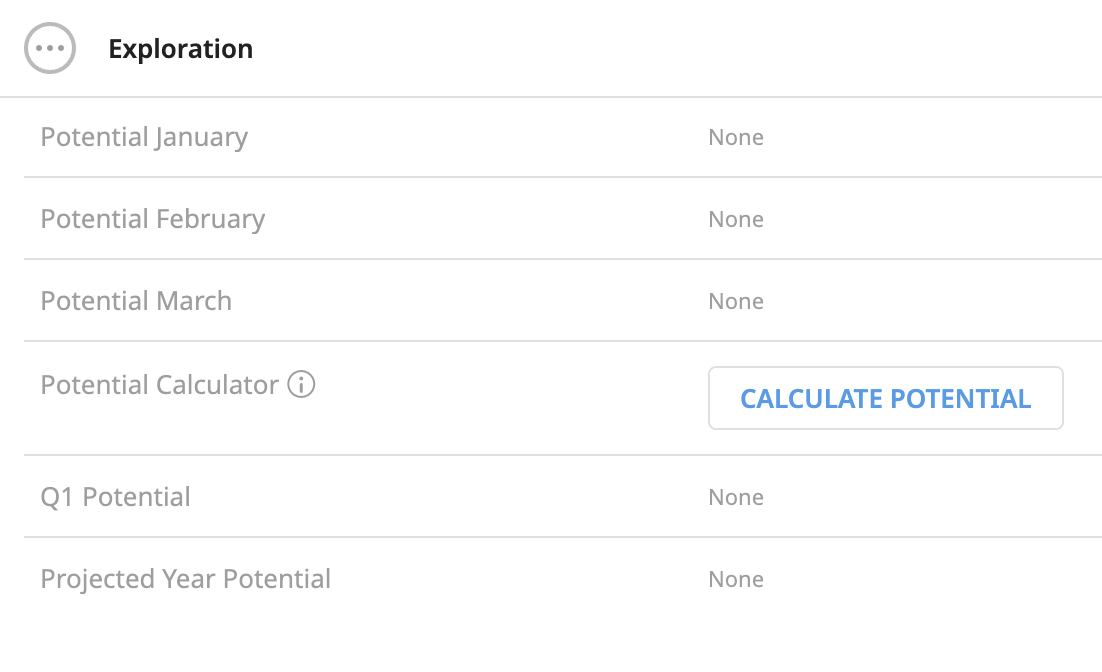
Click the Edit button on the top right and input some numbers into the January/February/March fields. Then click the Save button on the top right. You should now see the numbers printed above your custom action button. Click your action button Calculate Potential, and very quickly, you should see a success message with the correct message. And, most importantly, the calculated values should be a sum of the first 3 months, and a projection for the rest of the year.
Wrapping up#
Now you understand how to read from params (or fields) and write to fields using a custom action. This is a very important building block in understanding how to integrate with artifacts and fields, using custom actions.
As a custom action is a fully configurable Python script you can do much more with it, such as calling Scenarios on the design node. If you use the How to trigger Scenarios from a Govern node tutorial as your guideline but apply that logic in the action button instead, you now know how to call scenarios using a button click. Not only that, but you can also call any external service here, or integrate any LLM or Agent directly, so you can use GenAI to fill fields.
Reference documentation#
Classes#
A handle to interact with an artifact on the Govern instance. |
|
The definition of an artifact. |
Functions#
|
Return a handle to interact with an artifact. |
Retrieve the artifact definition and return it as an object. |
|
|
Get the raw content of the artifact. |
|
Save this settings back to the artifact. |