

Serve and share your static webapp
This tutorial will show you how to share a simple static webapp composed of one HTML, one CSS, and one JavaScript file. You will also learn how to make this webapp public so you can share it with users without requiring Dataiku authentication.
Prerequisites
Dataiku >= 13.1
Administrator privileges to modify Public webapps settings.
Creating your webapp
Creating an empty webapp
Everything starts as described in the tutorial to create your first webapp.
From the Code menu, select Webapps
Use the + New Webapp button
Choose Code Webapp then Standard
Select An empty Standard app
Enter the name for your webapp
You now have an empty webapp ready to use.
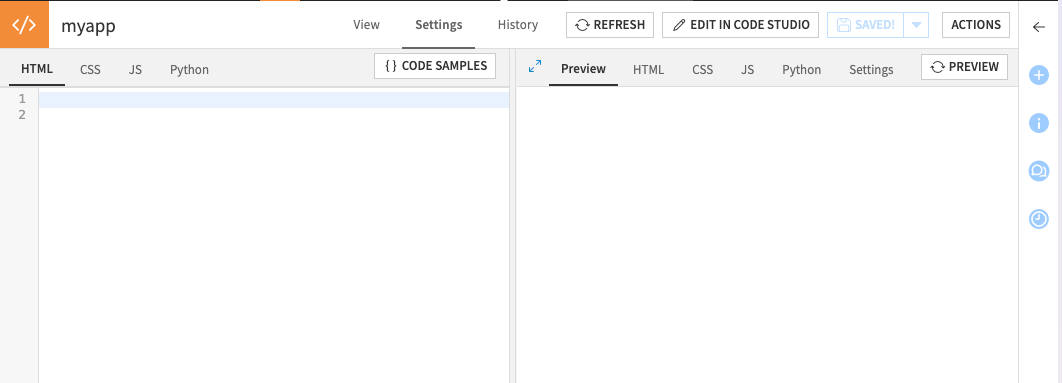
Fig. 1: Empty Standard webapp
Adding your webapp code
It is time to add the code of your static webapp. For this tutorial, you will create a webapp that displays the content of a CSV file you can choose. Download and paste each code content in the corresponding tab. All the code is also available at the end of this tutorial.
At this stage, you have a running webapp in Dataiku.
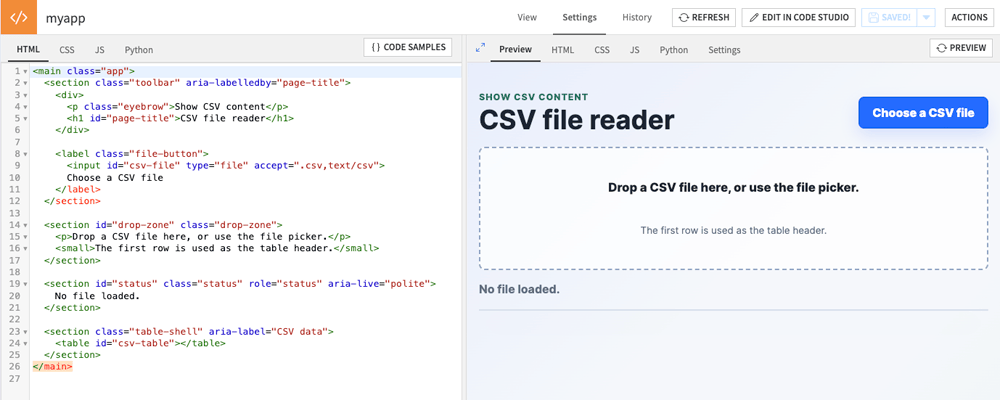
The webapp in Dataiku.
You can use your webapp and share it with other Dataiku users as described in the documentation on direct access to webapps.
Making the webapp public
Dataiku also provides a way to share your webapp with users without requiring Dataiku authentication.
Gathering identifiers
The next steps in this tutorial will use 2 identifiers: your Project key and your webapp ID.
When editing your webapp, your URL will look like https://<Dataiku instance URL>/projects/<MY_PROJECT_KEY>/webapps/<webappId>_<webapp name>/edit.
Please take notes of:
your Project key: this is the complete sequence of characters between
projects/and/webappsin the URL.your webapp ID: it is the first 8 characters (before the underscore) in the URL
For example, if your URL is https://dataiku.mycompany.com/projects/STATIC_PROJECT/webapps/yW1w30l_staticapp/edit, the identifiers are:
- Project key: STATIC_PROJECT
- webapp ID: yW1w30l
Modifying your instance settings
To allow public use, you will first need to add your webapp to a whitelist on your instance.
In your Dataiku instance, choose Administration from the Applications menu.
Navigate to the Settings tab.
Select the Other security settings, in the SECURITY & AUDIT section, then click on the Webapps link.
The Webapps section of the settings includes a dedicated Public Webapps area, and clicking the + ADD VALUE button registers your webapp in the whitelist of your instance. As indicated, the webapp is identified by a key composed of the Project key and the webapp ID. You will find this information in your Dataiku URL.
To whitelist your webapp, use the value MY_PROJECT_KEY.webappId and click on the SAVE button.
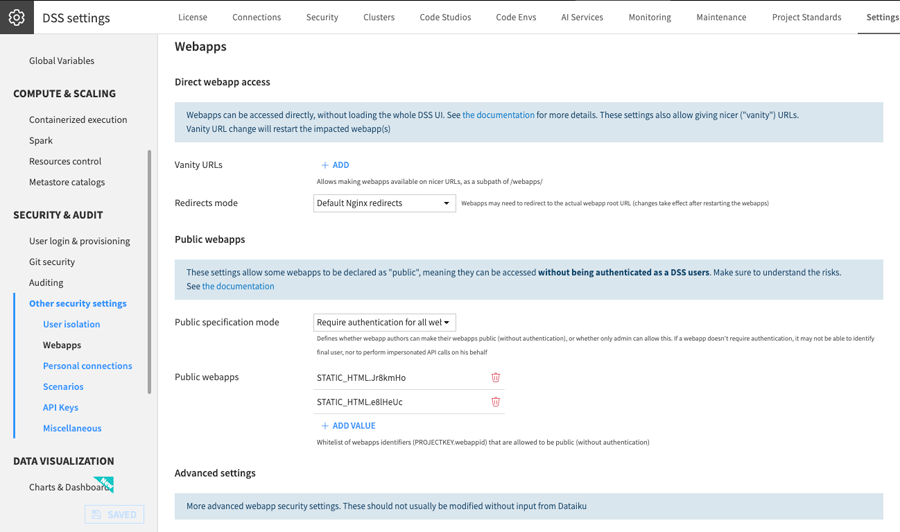
Dataiku settings for Public Webapps
For further information, please refer to the documentation on Public webapps
Enabling Python backend
To serve your webapp to public users, you need to enable the Python backend.
Navigate to the Python tab.
Click on the Enable link.
Leave the Python code tab empty. Your static webapp is now accessible to any public user.
The URL to access the webapp will be, for example: https://<Dataiku instance URL>/webapps/<MY_PROJECT_KEY>/<webappId>/
Complete code
HTML code
<main class="app">
  <section class="toolbar" aria-labelledby="page-title">
    <div>
      <p class="eyebrow">Show CSV content</p>
      <h1 id="page-title">CSV file reader</h1>
    </div>

    <label class="file-button">
      <input id="csv-file" type="file" accept=".csv,text/csv">
      Choose a CSV file
    </label>
  </section>

  <section id="drop-zone" class="drop-zone">
    <p>Drop a CSV file here, or use the file picker.</p>
    <small>The first row is used as the table header.</small>
  </section>

  <section id="status" class="status" role="status" aria-live="polite">
    No file loaded.
  </section>

  <section class="table-shell" aria-label="CSV data">
    <table id="csv-table"></table>
  </section>
</main>
CSS code
:root {
  color-scheme: light;
  font-family: Inter, ui-sans-serif, system-ui, -apple-system, BlinkMacSystemFont, "Segoe UI", sans-serif;
  background: #f5f7fb;
  color: #1c2533;
}

* {
  box-sizing: border-box;
}

body {
  margin: 0;
  min-height: 100vh;
  background:
    linear-gradient(135deg, rgba(35, 117, 255, 0.08), transparent 38%),
    linear-gradient(315deg, rgba(18, 169, 125, 0.08), transparent 42%),
    #f5f7fb;
}

.app {
  width: min(1120px, calc(100% - 32px));
  margin: 0 auto;
  padding: 40px 0;
}

.toolbar {
  display: flex;
  align-items: center;
  justify-content: space-between;
  gap: 20px;
  margin-bottom: 18px;
}

.eyebrow {
  margin: 0 0 6px;
  color: #28715e;
  font-size: 0.78rem;
  font-weight: 800;
  letter-spacing: 0.08em;
  text-transform: uppercase;
}

h1 {
  margin: 0;
  font-size: clamp(2rem, 5vw, 3.4rem);
  line-height: 1;
}

.file-button {
  display: inline-flex;
  align-items: center;
  justify-content: center;
  min-height: 44px;
  padding: 0 18px;
  border: 1px solid #1d5ed8;
  border-radius: 8px;
  background: #246bfe;
  color: #fff;
  font-weight: 750;
  cursor: pointer;
  white-space: nowrap;
  box-shadow: 0 10px 22px rgba(36, 107, 254, 0.18);
}

.file-button:hover {
  background: #1d5ed8;
}

.file-button input {
  position: absolute;
  inline-size: 1px;
  block-size: 1px;
  overflow: hidden;
  clip: rect(0 0 0 0);
  clip-path: inset(50%);
  white-space: nowrap;
}

.drop-zone {
  display: grid;
  place-items: center;
  min-height: 170px;
  padding: 28px;
  border: 2px dashed #93a6c5;
  border-radius: 8px;
  background: rgba(255, 255, 255, 0.74);
  text-align: center;
  transition: border-color 160ms ease, background 160ms ease, transform 160ms ease;
}

.drop-zone.is-over {
  border-color: #12a97d;
  background: #ecfff9;
  transform: translateY(-1px);
}

.drop-zone p {
  margin: 0;
  font-size: 1.05rem;
  font-weight: 750;
}

.drop-zone small {
  display: block;
  margin-top: 8px;
  color: #5e6d82;
}

.status {
  min-height: 22px;
  margin: 16px 0;
  color: #5e6d82;
  font-weight: 650;
}

.status.error {
  color: #b42318;
}

.table-shell {
  overflow: auto;
  /* ~50 lignes visibles (≈ 44px/ligne + l'en-tête), au-delà : scroll vertical */
  max-height: calc(51 * 44px);
  border: 1px solid #d7dfeb;
  border-radius: 8px;
  background: #fff;
  box-shadow: 0 18px 42px rgba(21, 33, 56, 0.08);
}

table {
  width: 100%;
  border-collapse: collapse;
  min-width: 620px;
}

th,
td {
  padding: 12px 14px;
  border-bottom: 1px solid #e7ecf3;
  text-align: left;
  vertical-align: top;
  white-space: pre-wrap;
}

th {
  position: sticky;
  top: 0;
  z-index: 1;
  background: #eef4ff;
  color: #23324d;
  font-size: 0.86rem;
  text-transform: uppercase;
}

tr:nth-child(even) td {
  background: #fafcff;
}

tr:last-child td {
  border-bottom: 0;
}

@media (max-width: 680px) {
  .app {
    width: min(100% - 20px, 1120px);
    padding: 24px 0;
  }

  .toolbar {
    align-items: stretch;
    flex-direction: column;
  }

  .file-button {
    width: 100%;
  }
}
Javascript code
const fileInput = document.querySelector("#csv-file");
const dropZone = document.querySelector("#drop-zone");
const statusBox = document.querySelector("#status");
const table = document.querySelector("#csv-table");
fileInput.addEventListener("change", () => handleFile(fileInput.files[0]));
dropZone.addEventListener("dragover", (event) => {
event.preventDefault();
dropZone.classList.add("is-over");
});
dropZone.addEventListener("dragleave", () => dropZone.classList.remove("is-over"));
dropZone.addEventListener("drop", (event) => {
event.preventDefault();
dropZone.classList.remove("is-over");
handleFile(event.dataTransfer.files[0]);
});
function handleFile(file) {
if (!file) return;
if (!(file.type === "text/csv" || file.name.toLowerCase().endsWith(".csv"))) {
return showError("Please choose a CSV file.");
}
const reader = new FileReader();
reader.addEventListener("load", () => {
try {
const text = String(reader.result);
renderTable(parseCsv(text, detectDelimiter(text)), file.name);
} catch (error) {
showError(error.message);
}
});
reader.addEventListener("error", () => showError("Unable to read the file."));
reader.readAsText(file);
}
function detectDelimiter(csvText) {
const firstLine = csvText.split(/\r?\n/, 1)[0] || "";
let best = ",";
for (const delimiter of [",", ";", "\t"]) {
if (countOutsideQuotes(firstLine, delimiter) > countOutsideQuotes(firstLine, best)) {
best = delimiter;
}
}
return best;
}
function countOutsideQuotes(text, delimiter) {
let count = 0;
let insideQuotes = false;
for (let i = 0; i < text.length; i += 1) {
if (text[i] === '"') {
if (insideQuotes && text[i + 1] === '"') i += 1;
else insideQuotes = !insideQuotes;
} else if (text[i] === delimiter && !insideQuotes) {
count += 1;
}
}
return count;
}
function parseCsv(csvText, delimiter) {
const rows = [];
let row = [];
let cell = "";
let insideQuotes = false;
for (let i = 0; i < csvText.length; i += 1) {
const char = csvText[i];
if (char === '"') {
if (insideQuotes && csvText[i + 1] === '"') { cell += '"'; i += 1; }
else insideQuotes = !insideQuotes;
} else if (char === delimiter && !insideQuotes) {
row.push(cell);
cell = "";
} else if ((char === "\n" || char === "\r") && !insideQuotes) {
if (char === "\r" && csvText[i + 1] === "\n") i += 1;
row.push(cell);
rows.push(row);
row = [];
cell = "";
} else {
cell += char;
}
}
row.push(cell);
rows.push(row);
if (insideQuotes) throw new Error("The CSV contains unclosed quotes.");
const cleaned = rows.filter((cells) => cells.some((value) => value !== ""));
if (cleaned.length === 0) throw new Error("The CSV file is empty.");
return cleaned;
}
function renderTable(rows, fileName) {
const columnCount = Math.max(...rows.map((row) => row.length));
const cell = (row, i) => row[i] ?? "";
const [headers, ...bodyRows] = rows;
const headerCells = Array.from({ length: columnCount }, (_, i) => {
const value = escapeHtml(cell(headers, i) || "Column");
return "<th>" + value + "</th>";
}).join("");
const thead = "<thead><tr>" + headerCells + "</tr></thead>";
const bodyHtml = bodyRows.map((row) => {
const rowCells = Array.from({ length: columnCount }, (_, i) => {
const value = escapeHtml(cell(row, i));
return "<td>" + value + "</td>";
}).join("");
return "<tr>" + rowCells + "</tr>";
}).join("");
const tbody = "<tbody>" + bodyHtml + "</tbody>";
table.innerHTML = thead + tbody;
statusBox.classList.remove("error");
statusBox.textContent = `${fileName} loaded: ${bodyRows.length} row(s), ${columnCount} column(s).`;
}
function escapeHtml(value) {
return value.replace(/[&<>"]/g, (c) => ({ "&": "&", "<": "<", ">": ">", '"': """ }[c]));
}
function showError(message) {
table.replaceChildren();
statusBox.classList.add("error");
statusBox.textContent = message;
}
Wrapping up
Congratulations! You can now serve a static webapp and share it with public users.