

Editing & Debugging Webapp in a Code Studio#
This tutorial shows how to develop, test, and debug a webapp in Dataiku using Code Studio with Visual Studio Code. By the end of this tutorial, you will be able to edit a webapp locally, run and debug it with Visual Studio Code, and safely synchronize your changes back to Dataiku. For setting up a Code Studio template, see the documentation.
Prerequisites#
Dataiku >= 14.5
Administrator privileges for your user profile to allow you to create a Code Studios template.
Creating your Code Studio template#
To edit your webapp with Code Studio, you need to create a Code Studio template with the code env adapted to your webapp and a Visual Studio.
Creating a Code Studio Template#
In your Dataiku instance, choose Administration from the Applications menu.
Navigate to the Code Studios tab.
Select + Create Code Studio Template.
Type a name for your template, such as
webapp-edit-template, and then select Create.
Adding the Code Environment block#
Navigate to the Definition tab, where you select the blocks you want to use in your Code Studio.
You may use an Add Code Environment block to choose a precise Code Environment.
This Code Environment must have the requirements needed for your webapp. Depending on your type of webapp, you will need at least the following required packages:
Type of webapp |
Framework |
Required packages |
|---|---|---|
Standard |
Flask |
flask
flask-sock
lxml
|
FastAPI |
fastapi
uvicorn_worker
gunicorn
lxml
|
|
Bokeh |
Bokeh |
bokeh
|
Dash |
Dash |
dash
flask-sock
|
Streamlit |
Streamlit |
streamlit
|
For the purpose of this tutorial, we are going to edit a webapp based on Dash.
So, select a Code Environment with dash and flask-sock.
Adding the Visual Studio Code block#
Use the + Add a Block and select the Visual Studio Code block.
This will be your IDE to edit your webapp.
Note
You can customize your Code Studios with additional blocks, such as the OpenCode block, to add your code assistant. You will find detailed information in Using a code assistant in Code Studios: OpenCode.
Building the template#
Let’s build and publish the Docker image so that our template becomes available. To do this:
Select Build.
Wait while Dataiku begins building the Docker image.
Once the build is complete, you can select Build History to view the build details.
Working with a webapp#
We are now ready to start working with a webapp. Let’s see how to create, edit, run and debug a new web application.
Creating your webapp#
You can create a Dash webapp following the following steps:
Select the Webapps option in the code menu (</>)
Use the + New Webapp button
Choose Code Webapp
Choose the Dash option
Keep An empty Dash app and name your app
Copy and paste the following code in the Python editor.
from dash import Dash, dcc, html, dash_table, Input, Output
from dash.exceptions import PreventUpdate
import logging
import dataiku

logger = logging.getLogger(__name__)

project = dataiku.api_client().get_default_project()
datasets_name = list(map((lambda x: x.get("name", "")), project.list_datasets()))

# build your Dash app
app.layout = html.Div([
    html.H1("How to display a dataset"),
    dcc.Dropdown(datasets_name, placeholder="Choose a dataset to display.", id='dropdown'),
    dash_table.DataTable(id='table')
])


@app.callback(
    Output('table', 'data'),
    Output('table', 'columns'),
    Input('dropdown', 'value')
)
def update(value):
    # If there is no value, do nothing (this is the case when the webapp is launched)
    if value is None:
        raise PreventUpdate
    # Take only the 100 first rows
    dataset = dataiku.Dataset(value).get_dataframe(limit=100)
    return dataset.to_dict('records'), [{"name": i, "id": i} for i in dataset.columns]
This Dash application will show a dataset selector and will display a table containing the content of the selected Dataset. You will find more details in the dedicated Dash basics tutorial.
Editing your webapp#
If you haven’t set up a Code Studio, create one using the template.
Note
If you need information, the Launching your first Code Studio tutorial will guide you through this step.
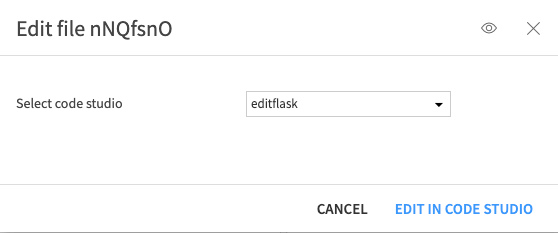
From your webapp, use the EDIT IN CODE STUDIO button.
Select your Code Studio in the dialog:
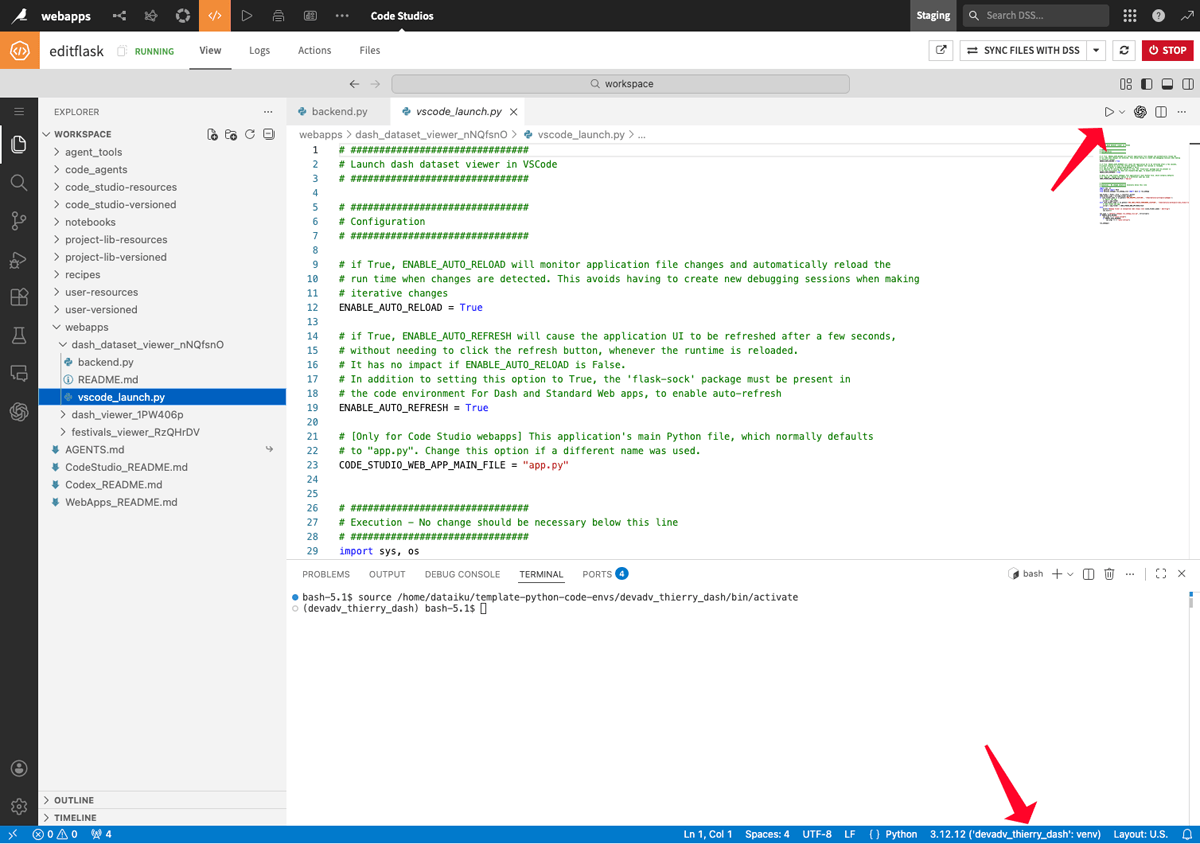
Your webapp will be located in a dedicated subfolder of the folder named webapps.
The app folder contains the following:
/backend.py,/main.py,/app.py, etc. : main application file. This is the code edited in DSS for a regular webapp./vscode_launch.py: a run-and-debug-in-VSCode launcher, initially provided by Dataiku/README.md: A starter readme provided by Dataiku, but yours to adapt to your needsOptionally, other application files, including
/config.tomlfor Streamlit appsJavaScript, CSS, and HTML files for a standard webapp
Modifying the code#
We are going to add a sort on the table displaying a Dataset.
from dash import Dash, dcc, html, dash_table, Input, Output
from dash.exceptions import PreventUpdate
import logging
import dataiku

logger = logging.getLogger(__name__)

project = dataiku.api_client().get_default_project()
datasets_name = list(map((lambda x: x.get("name", "")), project.list_datasets()))

# build your Dash app
app.layout = html.Div([
    html.H1("How to display a dataset"),
    dcc.Dropdown(datasets_name, placeholder="Choose a dataset to display.", id='dropdown'),
    dash_table.DataTable(
        id='table',
        sort_action='native',
        sort_mode='multi'
    )
])


@app.callback(
    Output('table', 'data'),
    Output('table', 'columns'),
    Input('dropdown', 'value')
)
def update(value):
    # If there is no value, do nothing (this is the case when the webapp is launched)
    if value is None:
        raise PreventUpdate
    # Take only the 100 first rows
    dataset = dataiku.Dataset(value).get_dataframe(limit=100)
    return dataset.to_dict('records'), [{"name": i, "id": i} for i in dataset.columns]
Running the code#
Open the file vscode_launch.py from your webapp folder. In the bottom right, select the Python interpreter for your VSCode.
Use the one you added in your Code Studio template. You can then use the Run button on the top right corner.
Once it is started, you will have a pop up at the bottom right with a button to open the app in your browser.

If you missed the pop up, you will find a way to open your webapp from the PORTS tab.
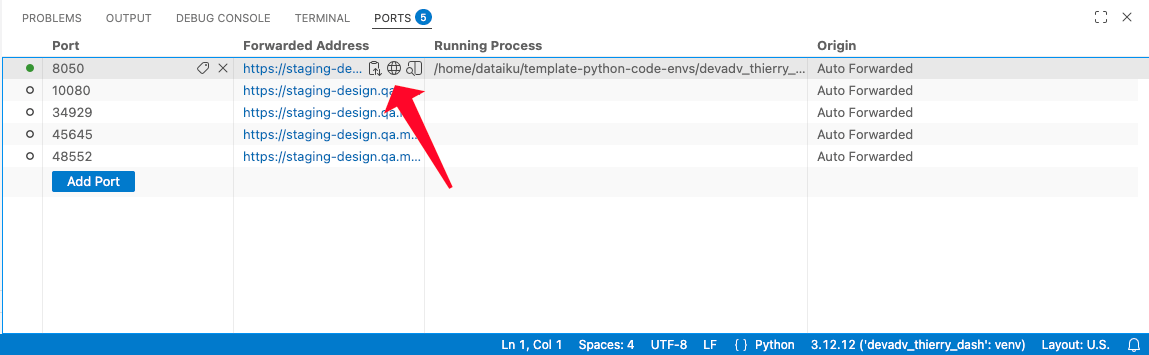
The three icons will provide alternative ways to open your webapp:
Copy Local address: to use the address in the browser and window of your choice.
Open in Browser: to open in the current browser.
Preview in Editor to open in a split view with the code editor.
Once you are done with this session, you can stop your application. To do so, focus on the Terminal window where the logs were displayed and hit the keys CTRL+C.
Warning
Do not hit the red STOP button on the upper right, as it will stop the entire Code Studio.
Debugging the code#
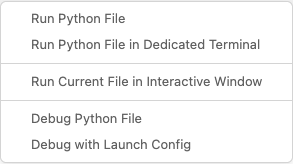
When the file vscode_launch.py is open, you can also run with the debugger. To do so, use the dropdown on the right of the run icon and use the debug option.
In that mode, you will be able to use the debugging features of Visual Studio Code, like using breakpoints.
You will benefit from all the Visual Studio Code features, and you will find information in the Debug code documentation. Just keep in mind to use the buttons in the upper middle panel to have debug actions, including the stop button to end your debugging session.
Synchronizing your changes#
Once the changes made to the webapp meet your success criteria, you need to synchronize the code with the Dataiku Webapp. Use the SYNC FILES WITH DSS button to start the synchronization.
Wrapping up#
In this tutorial, you learned how to develop and test a webapp in Dataiku using Code Studio and Visual Studio Code. You discovered how to edit, synchronize, and debug your app.
Reference documentation#
Functions#
Build an API client for the current DSS instance. |
|
Get a handle to the current default project, if available (i.e. |
|
|
List the datasets in this project. |
|
Read the dataset (or its selected partitions, if applicable) as a Pandas dataframe. |